A ripped leather car seat can detract from the beauty of your car’s interior and even affect its resale value. But don’t worry, a “repair rip leather car seat” solution might be easier than you think. Whether it’s a minor snag or a larger tear, this comprehensive guide will equip you with the knowledge and steps to effectively address those pesky rips and restore your car’s interior to its former glory.
Understanding the Enemy: Why Do Leather Car Seats Rip?
Before we delve into the “how-to,” it’s helpful to understand the common culprits behind those unsightly rips:
- Wear and Tear: The most frequent offender. Years of getting in and out, combined with friction from clothing and belongings, can eventually take a toll on the leather.
- Sharp Objects: Keys, pens, even children’s toys can cause accidental punctures and tears.
- Sun Damage: Prolonged exposure to UV rays can dry out leather, making it brittle and prone to cracking and ripping.
- Improper Cleaning: Using harsh chemicals or abrasive materials can weaken the leather, leading to premature wear and tear.
Can a Ripped Leather Car Seat Be Repaired?
The good news is that in many cases, yes! The extent of the damage will determine the best course of action. Let’s explore the options:
DIY Repair Kits: A Quick Fix for Minor Rips
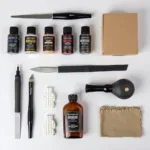
For small rips and tears, DIY leather repair kits can be a cost-effective solution. These kits usually include a color-matched compound, adhesive, and tools to help you fill and seal the damaged area.
Pros:
- Affordable: DIY kits are significantly cheaper than professional repairs.
- Convenient: You can tackle the repair yourself at your own pace.
Cons:
- Limited to Minor Damage: Deep tears or extensive damage may require professional attention.
- Color Matching Challenges: Finding a perfect color match can be tricky, and an inaccurate match will be noticeable.
Professional Upholstery Repair: When Only the Best Will Do
For larger rips, deep cuts, or when you want a seamless, professional finish, seeking the expertise of an auto upholstery specialist is the way to go.
Pros:
- High-Quality Results: Professionals have the experience, tools, and materials to deliver a flawless repair that’s often invisible to the naked eye.
- Durability: Professionals use high-quality materials and techniques that ensure a long-lasting repair.
Cons:
- Higher Cost: Expect to pay a premium for professional expertise and quality materials.
- Time Commitment: The repair process might take longer, requiring you to be without your vehicle for a short period.
How to Repair Rips in Leather Car Seats: A Step-by-Step DIY Guide
Ready to tackle a minor rip yourself? Follow these steps:
- Clean the Area: Use a gentle leather cleaner and a microfiber cloth to remove dirt, dust, and debris from the ripped area and surrounding leather. Allow it to dry completely.
- Assess the Damage: If the rip has loose edges, carefully trim them with sharp scissors.
- Prepare the Repair Compound: (If using a kit). Follow the manufacturer’s instructions to mix the repair compound to match the color of your leather.
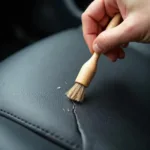
- Apply the Compound: Carefully fill the rip with the compound, ensuring it’s level with the surrounding leather surface. Use a palette knife or the provided applicator tool for precision.
- Remove Excess Compound: Wipe away any excess compound immediately using a clean cloth.
- Heat and Texture (If Necessary): Some kits include a heat tool or grain paper to help blend the repair and mimic the texture of your leather.
- Apply Leather Conditioner: Once the repair is dry, apply a high-quality leather conditioner to the entire seat to restore moisture and suppleness.
Preventing Future Rips: Proactive Care for Long-Lasting Leather
Prevention is always better than cure! Here’s how to keep your leather seats looking their best and minimize the risk of future rips:
- Regular Cleaning: Clean your leather seats every few weeks with a pH-neutral leather cleaner and a soft microfiber cloth.
- Conditioning is Key: Condition your leather seats at least every three months, or more frequently in harsh climates, to prevent drying and cracking.
- UV Protection: Park your car in the shade or use a sunshade to protect your leather from harmful UV rays.
- Mindful Habits: Avoid placing sharp objects on your seats, and be mindful when getting in and out of your vehicle.
FAQs: Repair Rip Leather Car Seat
Q: Can I use superglue to fix a ripped leather car seat?
A: While tempting, it’s not recommended. Superglue is too harsh for leather and can cause further damage and discoloration.
Q: How much does it cost to have a leather car seat professionally repaired?
A: The cost can vary widely depending on the extent of the damage, the type of leather, and the location. It’s best to get a quote from a reputable auto upholstery shop.
Q: Can I repair a ripped leather car seat with duct tape?
A: Duct tape is a temporary fix at best and will likely leave behind a sticky residue and may even damage the leather further.
Ready to Restore Your Ride’s Interior?
A “repair rip leather car seat” solution is within reach! Whether you opt for a DIY approach or seek professional assistance, taking action will preserve the beauty and value of your vehicle’s interior. If you need expert advice or are considering professional repair, don’t hesitate to reach out. Contact us via WhatsApp at +1(641)206-8880 or email us at [email protected]. Our dedicated customer support team is available 24/7 to assist you. You can also learn more about maintaining your car’s interior by reading our articles on how to repair rips in leather car seats, can a ripped leather car seat be repaired, and how to repair ripped car seat leather. We’re here to help you keep your car looking its best, inside and out.


