Windows 8 introduced a feature called Automatic Repair, designed to automatically fix boot-related issues when your computer fails to start correctly. While this feature is intended to be helpful, there are situations where you might want to disable it. This guide will show you exactly how to stop auto repair in Windows 8, giving you more control over the startup process of your PC.
Automatic Repair kicks in when Windows detects two consecutive unsuccessful boot attempts. It initiates diagnostic procedures, including running chkdsk to check for disk errors and System File Checker (sfc /scannow) to restore corrupted system files. For many users, this automation is a welcome safety net, potentially resolving startup problems without requiring technical expertise.
However, there are valid reasons why you might find Automatic Repair more of a hindrance than a help. Let’s explore why disabling this feature might be the right move for you.
Why Disable Automatic Repair in Windows 8?
While Automatic Repair aims to resolve issues, it can become problematic in certain scenarios:
- Reverting System Tweaks: If you’re someone who customizes Windows, perhaps by applying tweaks like changing the boot screen as mentioned in guides like this one for Windows 8.1 boot logo customization, Automatic Repair can undo these modifications. It essentially reverts system files to their default state, wiping out your personalized changes. This can be frustrating if you frequently tweak your system’s appearance or functionality.
- Automatic Repair Loop: In some unfortunate situations, Automatic Repair can get stuck in a continuous loop. Your computer may repeatedly attempt to repair itself, fail, and restart the repair process again and again, preventing you from actually booting into Windows. This loop becomes a major obstacle to accessing your system and requires manual intervention to break.
- Lack of Transparency and Control: Automatic Repair operates in the background with minimal user feedback. Windows provides little to no information about what it’s doing during the repair process. This lack of transparency can be disconcerting, especially for users who prefer to understand and control what’s happening with their computers. Advanced users often prefer to manually run diagnostic and repair tools like
chkdskorbcdeditso they can monitor the process and make informed decisions. - Troubleshooting Advanced Issues: For more complex boot problems, Automatic Repair’s automated approach might not be sufficient or even relevant. In such cases, you might need to perform specific troubleshooting steps or use specialized tools that Automatic Repair doesn’t offer. Disabling it allows you to bypass the automated process and directly address the underlying issue with targeted solutions.
If any of these scenarios resonate with you, disabling Automatic Repair in Windows 8 can give you more control and prevent unwanted automated interventions. Here’s how to do it.
Step-by-Step Guide: Disabling Automatic Repair
Disabling Automatic Repair in Windows 8 is a straightforward process using the Command Prompt. Here are the steps:
-
Open Command Prompt as Administrator: You need to open an elevated Command Prompt to execute commands that modify system settings. There are several ways to do this. One common method is:
- Press the Windows key to go to the Start screen.
- Type
cmd. - Right-click on the Command Prompt result that appears.
- Select Run as administrator.
- Click Yes if prompted by User Account Control.
If you’re unfamiliar with opening an elevated Command Prompt, you can find detailed instructions in articles like “Do you know all these ways to open an elevated command prompt in Windows?”.
-
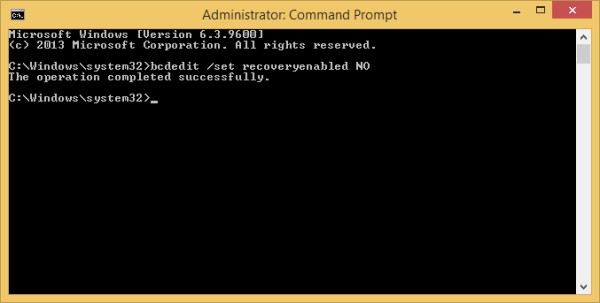
Execute the Disable Command: In the elevated Command Prompt window, type the following command exactly as shown and press Enter:
bcdedit /set recoveryenabled NOThis command uses the
bcdedit(Boot Configuration Data Edit) tool to modify the boot settings. The/set recoveryenabled NOpart specifically disables the Automatic Repair feature. Command Prompt showing the bcdedit command to disable automatic repair in Windows 8
Alt text: A screenshot of the Command Prompt window in Windows 8, displaying the command “bcdedit /set recoveryenabled NO” typed in, ready to disable the automatic repair feature.
-
Confirmation: After executing the command, you should see the message “The operation completed successfully.” This confirms that Automatic Repair has been disabled.
That’s all it takes! Windows 8 will no longer automatically initiate the repair process if it fails to boot. You will now have manual control over troubleshooting startup issues.
How to Re-enable Automatic Repair
If you decide to re-enable the Automatic Repair feature in Windows 8 later, the process is just as simple.
-
Open Command Prompt as Administrator: Follow the same steps as in the disabling process to open an elevated Command Prompt.
-
Execute the Enable Command: In the elevated Command Prompt, type the following command and press Enter:
bcdedit /set recoveryenabled YESThis command, using
bcdeditagain, setsrecoveryenabledtoYES, re-activating the Automatic Repair feature. -
Confirmation: You should again see the “The operation completed successfully.” message, indicating that Automatic Repair is now re-enabled.
Bonus Tip: Last Known Good Configuration
While you’re taking control of your Windows 8 boot process, you might also be interested in another related feature: Last Known Good Configuration. Although disabled by default in Windows 8 and later, it can be a useful recovery option in certain situations. You can learn how to enable it in this guide: “How to restore the Last Known Good Configuration feature in Windows 8.1”.
Conclusion
Disabling Automatic Repair in Windows 8 gives you greater control over your system’s startup behavior. By following these simple command-line steps, you can prevent unwanted automated repairs, especially if you are comfortable with manual troubleshooting or frequently customize your system. Remember that you can easily re-enable Automatic Repair at any time if you change your mind or find it necessary. This flexibility allows you to tailor Windows 8’s recovery options to best suit your needs and technical expertise.
