
Automatic Repair is a built-in feature in Windows 10 and Windows 11 designed to diagnose and fix common startup issues that might prevent your computer from booting correctly. Typically, if your system fails to start properly twice in a row, on the third attempt, Automatic Repair kicks in. This can be helpful, but sometimes, you might prefer to troubleshoot problems yourself, or Automatic Repair itself might get stuck in a loop, preventing you from accessing your system.
If you’re looking to take control and manually resolve startup problems, or if you’re experiencing issues with the Automatic Repair process itself, disabling this feature in Windows 10 is a viable option. This guide will walk you through the necessary steps to stop automatic repair from running on your Windows 10 machine. We’ll also cover how to re-enable it if you change your mind later.
Steps to Disable Automatic Repair in Windows 10
To disable the automatic repair function in Windows 10, you will need to use the Command Prompt with administrator privileges. Here’s how to do it:
- Click on the Start button.
- Type Command Prompt in the search bar.
- Right-click on Command Prompt from the search results and select Run as administrator. This is crucial as you need administrative rights to execute the necessary commands.
- Once the Command Prompt window is open, type the following command and press Enter:
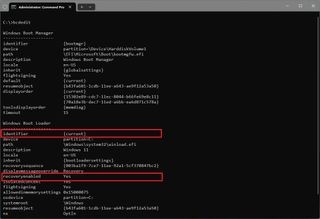
bcdedit - This command will display the Boot Configuration Data. Look for the Windows Boot Loader section. Under this section, confirm that the values for “recoveryenabled” and “identifier” are set to “{current}” and “yes”, respectively. This is usually the default setting.
- To disable automatic repair, type the following command and press Enter:
bcdedit /set {current} recoveryenabled no
This command modifies the boot configuration data to disable the automatic repair feature. The "{current}" part specifies that you are applying the setting to the currently running operating system, and "no" is the value to disable recovery.
After executing these steps, Automatic Repair will no longer start automatically after the third unsuccessful boot attempt in Windows 10.
How to Re-enable Automatic Repair in Windows 10
If you decide to re-enable the Automatic Repair feature, or if it was previously disabled and you want to turn it back on, follow these steps:
- Open Start.
- Search for Command Prompt, right-click, and select Run as administrator.
- Type the command
bcdeditand press Enter. - Again, under the Windows Boot Loader section, check if the “recoveryenabled” and “identifier” values. If you have previously disabled it, “recoveryenabled” should be set to “no”.
- To re-enable automatic repair, type this command and press Enter:
bcdedit /set {current} recoveryenabled yes
This command reverses the previous action, setting the "recoveryenabled" value back to "yes" for the current operating system, thus enabling the Automatic Repair feature.
Once you’ve completed these steps, Windows 10 will again automatically attempt to diagnose and repair startup problems if your system fails to boot correctly multiple times.
By following these instructions, you can easily control the Automatic Repair feature in Windows 10, allowing you to either take a more hands-on approach to troubleshooting or rely on the automated system as needed.