It’s easy to overlook the unsung heroes of your vehicle, but neglecting your car brakes can lead to serious safety concerns. While many car owners focus on aesthetics and routine maintenance like oil changes, brake maintenance is equally, if not more, critical. Your brakes are responsible for your safety on the road, and understanding how they work and how to repair them is essential for every car owner.
What are Car Brakes and How Do They Work?
Brakes are fundamental to your car’s safety system. Contrary to common understanding, brakes don’t actually stop the car itself; instead, they halt the rotation of your wheels. This action, in turn, slows down and eventually stops your vehicle. Modern vehicles primarily use disc brakes, a highly effective system that provides reliable stopping power.
Disc brakes are composed of several key components working in harmony:
- Brake Discs (Rotors): These plate-like discs are attached to each wheel and rotate with them.
- Calipers: These clamp onto the rotors, housing the brake pads.
- Brake Pads: Located inside the calipers, these are the friction material that presses against the rotors.
- Brake Lines: These hydraulic lines transmit pressure from the master cylinder to the calipers.
- Brake Master Cylinder: This component, when you press the brake pedal, initiates the hydraulic pressure in the brake lines.
When you apply the brakes, the master cylinder sends hydraulic pressure through the brake lines to the calipers. The calipers then squeeze the brake pads against the rotors, creating friction. This friction slows the rotation of the wheels, bringing your car to a halt.
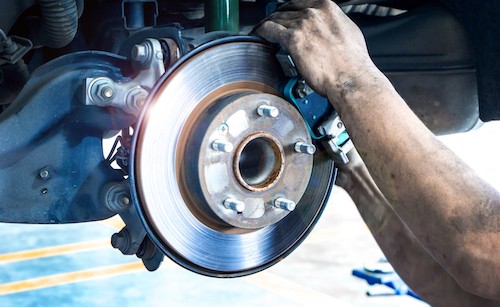 Car Brakes 101: Disc brake system components for effective vehicle stopping
When Do Your Brakes Need Repair? Recognizing the Warning Signs
Knowing when your brakes need attention is crucial for safety and preventing costly repairs. Several warning signs indicate potential brake issues:
- Squealing or Grinding Noises: A high-pitched squeal when braking often signals worn brake pads. Grinding noises can indicate that the brake pads are completely worn down, and you’re now experiencing metal-on-metal contact, damaging the rotors.
- Longer Stopping Distances: If you notice your car taking longer to stop than usual, it could be a sign of worn brake pads, brake fluid issues, or other brake system problems.
- Soft or Spongy Brake Pedal: A brake pedal that feels soft or spongy when pressed might indicate air in the brake lines or low brake fluid.
- Vibrations When Braking: Pulsating or vibrations felt through the brake pedal or steering wheel during braking can be a sign of warped brake rotors.
- Warning Light on Dashboard: The brake warning light on your dashboard can illuminate for various reasons, including low brake fluid or issues with the anti-lock braking system (ABS). Never ignore this warning light.
Tools and Materials for DIY Brake Repair
For those comfortable with DIY car maintenance, replacing brake pads is a manageable task. Here’s what you’ll need:
- Jack and Jack Stands: Essential for safely lifting and supporting your vehicle.
- Wrench Set and Socket Set: For removing wheel nuts and caliper bolts.
- Screwdrivers (various sizes): May be needed for removing caliper components.
- Brake Pad Spreader Tool: To compress the caliper piston back into its housing, making room for new, thicker brake pads.
- Torque Wrench: To ensure bolts are tightened to the correct specification.
- New Brake Pads: Purchase pads specific to your vehicle’s make and model.
- Brake Cleaner: To clean brake components and remove brake dust.
- Brake Fluid (DOT 3 or DOT 4, as specified by your vehicle manufacturer): Optional, for topping off or bleeding the brake system if necessary.
- Gloves and Safety Glasses: Safety gear is paramount when working on brakes.
Step-by-Step Guide: How to Replace Brake Pads
Safety First!
-
Ensure your vehicle is parked on a level surface and the parking brake is firmly engaged. For extra safety, use wheel chocks behind the wheels that will remain on the ground.
-
Loosen the Lug Nuts: Using a wrench, slightly loosen the lug nuts on the wheel of the brake you’ll be working on. Don’t remove them completely yet.
-
Jack Up Your Car and Secure with Jack Stands: Consult your car’s owner’s manual for the correct jacking points. Raise the vehicle with the jack and securely place jack stands underneath the frame rails near the wheel you’re working on. Never work under a car supported only by a jack.
-
Remove the Wheel: Completely remove the lug nuts and carefully take off the wheel.
-
Inspect the Brake Caliper and Rotor: Visually inspect the brake caliper, rotor, and brake lines for any signs of damage, leaks, or excessive wear.
-
Remove the Caliper Bolts: Locate the bolts on the back of the caliper that secure it to the caliper bracket. Using your socket set, remove these bolts. You may need to use a wrench to hold the guide pins in place while loosening the bolts.
-
Carefully Remove the Caliper: Once the bolts are removed, gently slide the caliper off the rotor. Be careful not to damage the brake lines. If the caliper is tight, you may need to gently wiggle it or use a screwdriver to carefully pry it loose. Do not let the caliper hang by the brake hose. Suspend it using a wire or bungee cord from the suspension components, or carefully rest it on a secure surface.
-
Remove the Old Brake Pads: The old brake pads should now be accessible. They may simply slide out or be held in place by clips or shims. Note their orientation for installing the new pads correctly.
-
Compress the Caliper Piston: Using the brake pad spreader tool, carefully and slowly compress the caliper piston back into its bore. This creates space for the new, thicker brake pads. Take care not to damage the piston or caliper.
-
Clean the Caliper and Rotor Area: Use brake cleaner to thoroughly clean the caliper, caliper bracket, and rotor. This removes brake dust and debris, ensuring proper brake function.
-
Install the New Brake Pads: Install the new brake pads in the same orientation as the old ones. Ensure they are seated correctly in the caliper bracket and any clips or shims are properly positioned.
-
Reinstall the Caliper: Carefully slide the caliper back over the rotor and new brake pads. Align the caliper bolt holes and reinstall the caliper bolts. Tighten the bolts to the torque specification recommended in your vehicle’s repair manual using a torque wrench.
-
Reinstall the Wheel and Tighten Lug Nuts: Put the wheel back on, hand-tighten the lug nuts in a star pattern, and then lower the vehicle until the wheel just touches the ground. Use the torque wrench to tighten the lug nuts to the correct specification.
-
Lower the Car Completely: Remove the jack stands and lower the car completely to the ground.
-
Pump the Brakes to Test: Before driving, pump the brake pedal several times to ensure the brake pads are properly seated against the rotors and the brake pedal feels firm.
-
Bed-in New Brakes: Follow the brake pad manufacturer’s instructions for bedding in new brakes. This usually involves a series of moderate to firm stops from increasing speeds to properly transfer brake pad material to the rotors and optimize braking performance.
Maintaining Your Car Brakes for Longevity
Regular maintenance is key to extending the life of your brakes and ensuring optimal performance:
- Regular Inspections: Have your brakes inspected during routine maintenance, such as oil changes or tire rotations. Check brake pad thickness and rotor condition.
- Brake Fluid Checks and Flushes: Brake fluid absorbs moisture over time, which can reduce its effectiveness and lead to corrosion. Follow your vehicle manufacturer’s recommendations for brake fluid flushes, typically every two to three years.
- Avoid Hard Braking: Aggressive braking generates excessive heat, accelerating brake pad wear and potentially warping rotors. Practice smooth, gradual braking whenever possible.
When to Seek Professional Help
While replacing brake pads is a DIY-friendly task, some brake repairs are best left to professionals:
- Complex Brake System Issues: Problems beyond brake pads and rotors, such as issues with the master cylinder, ABS system, or brake lines, require specialized knowledge and tools.
- Brake Line Problems: Repairing or replacing brake lines involves working with the hydraulic system and requires expertise to ensure safety.
- Master Cylinder Issues: The master cylinder is a critical component, and repairs or replacements should be handled by experienced technicians.
- Lack of Experience or Tools: If you are uncomfortable working on brakes or lack the necessary tools, it’s always safer to seek professional brake service.
Conclusion
Maintaining and repairing your car brakes is paramount for your safety and the safety of others on the road. Understanding the basics of brake function and being able to perform simple maintenance tasks like brake pad replacement can save you money and give you peace of mind. However, for complex brake issues, don’t hesitate to consult with a qualified mechanic. Prioritizing brake maintenance ensures your vehicle is always ready to stop safely, no matter the driving conditions.