
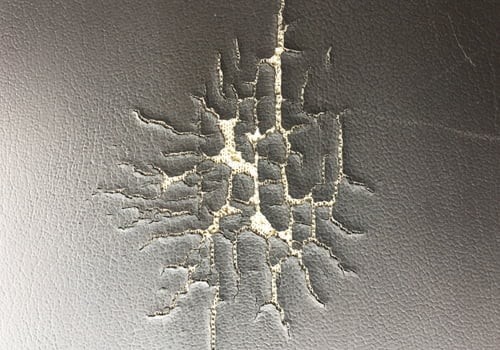
Vinyl car armrests are prone to wear and tear, especially cracking, due to constant use and exposure to sunlight and temperature changes. Cracked or damaged armrests not only detract from your car’s interior aesthetics but can also be uncomfortable. Fortunately, repairing a vinyl car armrest is a manageable DIY project that can restore its look and feel. This guide will walk you through a comprehensive method using heat-cure filler, ensuring a durable and professional-looking repair.
While minor cracks might be addressed with flexible fillers, for a more robust and long-lasting repair, especially on car armrests that endure daily stress, a heat-cure putty is the superior choice. This method, also applicable to leather with careful technique, creates a stronger bond and a more seamless finish.
To effectively repair your vinyl car armrest, you’ll need specific tools and materials. Investing in quality supplies will not only make the repair process easier but also contribute to a better outcome.
Here’s what you will need:
- Heat-Cure Filler: This is crucial for a durable repair that can withstand the stresses of a car interior.
- Heat Gun: Essential for curing the filler and manipulating the vinyl. A dual temperature heat gun is recommended for better control.
- Reducer Nozzle: This focuses the heat, making it easier to work on smaller areas and prevent damage to surrounding vinyl.
- Graining Pads: Used to replicate the original texture of the vinyl after applying the filler, ensuring a seamless blend. Consider investing in a good set for repeated use. Alternatives like SEM graining papers are available for smaller projects.
- Razor Blade: A new, sharp razor blade for carefully shaving away sharp, raised edges of the cracks.
- Palette Knife or Needle Tool: For precise application of the heat-cure filler.
- Plastic Spreader: To level the filler and remove excess.
- Denatured or Rubbing Alcohol: For cleaning the vinyl surface before and after the repair.
- Small Board or Block: To apply even pressure when using graining pads.
- Subpatch Material (if needed): For larger holes, you may need a subpatch material and adhesive to provide backing before applying filler.
- Gloves: To protect your hands and help with texturizing.
- Optional: Graining Mold Kit: For creating custom grain patterns if you cannot find a matching graining pad.
- Optional: Chill Block or Water: To quickly cool down the repaired area between steps.
- Optional: Spray Grain (like SEM Chip Guard): To further blend the texture of the repaired area.
- Optional: Rub ‘n Restore® Color and Clear Prep+Finish™: For color matching and sealing the repair (if desired).
Once you have gathered all the necessary materials, you can proceed with the repair process. Follow these step-by-step instructions to restore your vinyl car armrest:
-
Prepare the Damaged Area: Begin by thoroughly cleaning the vinyl armrest with denatured or rubbing alcohol to remove any dirt, grease, or protectant. This ensures proper adhesion of the filler.
-
Shave Sharp Edges: Using a new razor blade held almost parallel to the surface, carefully shave away any sharp, curling edges of the cracks that protrude above the surface. This will create a smoother base for the filler.
-
Melt Low-Profile Edges (Optional): For edges that are too low to shave or are risky to cut, you can gently melt them down using the heat gun. Apply heat at around 550°F (288°C) from a distance of 2-6 inches (5-15 cm) for 5-15 seconds. The vinyl will become glossy as it softens. Be cautious not to overheat and damage the vinyl. A reducer nozzle is very helpful for this step.
-
Emboss with Grain Pad (Immediately After Melting): Immediately after heating and while the vinyl is still warm, firmly press a graining pad onto the melted area. Use a small board or block to apply even pressure evenly and prevent dents in the armrest. Hold for 10-15 seconds. Repeat heating and graining if needed until the edges are level and smooth as possible. Allow the vinyl to cool completely to room temperature before proceeding to the next step.
-
Apply Heat-Cure Filler: Using a palette knife or needle tool, apply a thin, even coat of heat-cure filler to the cracked area. Work the filler into the cracks, ensuring good coverage. Level the filler and remove any excess using a plastic spreader to create a smooth, even surface.
-
Initial Heat Curing: Using the heat gun at around 550°F (288°C) and holding it 8-10 inches (20-25 cm) away from the repair, gently warm the filler. Heat until the glossy white cream of the filler starts to transform into a more translucent, frosted appearance. Be careful not to overheat it to the point where it becomes glossy again, as this can affect graining.
-
Emboss with Grain Pad (During Curing): Immediately after heating, firmly press the grain pad and wooden block onto the warmed filler with gentle, even pressure. Hold for 5-10 seconds. This will emboss the texture of the grain pad onto the filler as it cools and cures. The pressure also helps to level any ridges or high spots in the filler.
-
Cool Down: Allow the repaired area to cool down to room temperature. You can speed up the cooling process with a chill block or by gently applying a damp cloth or sponge for a few minutes.
-
Repeat Filler and Graining (If Necessary): Repeat steps 5-8, applying thin coats of filler and graining after each heat curing, until the repaired surface is level with the surrounding vinyl and the cracks are no longer visible.
-
Final Texturizing (Optional): For a more seamless blend, apply a final, very thin coat of heat-cure filler and texturize it with a gloved finger or a sponge to match the surrounding vinyl texture. Heat and emboss with the grain pad one last time.
-
Blend Texture Further (Optional): If needed, use a spray grain product like SEM Chip Guard to further blend the texture and minimize any lines or inconsistencies.
-
Coloring and Finishing (Optional): If desired, apply a vinyl colorant like Rub ‘n Restore® color to match the original armrest color. Follow with a clear protective finish like Clear Prep+Finish™ for added durability and protection.
-
Re-working (If Needed): If you need to rework the repair at any stage, use a cleaner like Flite™ or rubbing alcohol to remove any applied color or filler before reapplying heat-cure filler.
By following these steps carefully, you can effectively repair cracks in your vinyl car armrest, restoring its appearance and comfort. With patience and attention to detail, you can achieve professional-quality results at home, saving you the cost of professional repair or armrest replacement.