
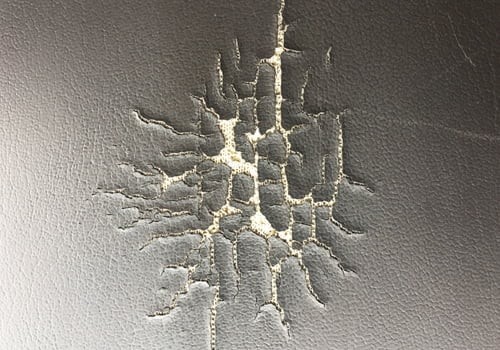
Vinyl auto armrests, constantly exposed to sunlight, temperature fluctuations, and daily wear and tear, are prone to cracking over time. As the vinyl material dries out, these cracks can develop sharp, upward-curling edges, detracting from your car’s interior aesthetics and comfort. Fortunately, repairing a cracked vinyl auto armrest is a manageable DIY project that can restore its appearance and extend its lifespan.
While temporary fixes using low-temperature putties exist, the most effective and durable solution for repairing cracks in vinyl auto armrests is utilizing a high-temperature heat-cure filler. This method, also applicable to leather with careful technique, ensures a robust and seamless repair that withstands regular use and environmental stressors. This guide will walk you through the process of how to repair your vinyl auto armrest using heat-cure filler, achieving professional-quality results in your own garage.
Why Vinyl Auto Armrests Crack and Why Repairing Them Matters
Vinyl, a popular material for car interiors, including armrests, becomes brittle and susceptible to cracking as it loses moisture over time – a process known as desiccation. Sun exposure and temperature changes accelerate this drying process. Furthermore, the constant pressure and friction from daily use, especially on high-stress areas like armrests, contribute to the development and propagation of cracks.
Repairing these cracks isn’t just about aesthetics; it’s about maintaining the overall condition and value of your vehicle. A cracked and damaged armrest can:
- Diminish your car’s interior appeal: Cracks are unsightly and can make your car look older and less cared for.
- Reduce comfort: Sharp edges of cracks can be uncomfortable against your skin and clothing.
- Lower resale value: A well-maintained interior, including armrests, is a significant factor in a car’s resale value.
- Prevent further damage: Repairing cracks early can prevent them from worsening and requiring more extensive repairs later.
The Superior Solution: Heat-Cure Filler for Vinyl Armrest Repair
While you might consider using a flexible, air-dry putty for minor vinyl repairs, heat-cure filler stands out as the superior choice for repairing cracks in auto armrests. Here’s why:
- Enhanced Durability: Heat-cure fillers create a much stronger and more durable repair compared to air-dry fillers. The heat curing process hardens the filler, making it resistant to cracking and wear, even in high-stress areas.
- Seamless Finish: Heat-cure fillers can be embossed with graining pads to perfectly match the original texture of your vinyl armrest, resulting in a virtually invisible repair.
- Long-lasting Results: Repairs made with heat-cure fillers are designed to last, providing a long-term solution to cracked vinyl armrests.
- Versatility: While ideal for vinyl, heat-cure filler can also be used on leather, making it a versatile product for various auto interior repairs. (Exercise caution and lower heat when working with leather as it is more sensitive to heat.)
Tools and Materials You’ll Need for Vinyl Armrest Repair
To effectively repair your vinyl auto armrest using heat-cure filler, gather the following tools and materials:
- Heat-Cure Filler: This is the core material for the repair. Choose a high-quality heat-cure filler designed for vinyl and leather repair. Check out Heat Cure Putty here.
- Heat Gun: A heat gun is essential for both prepping the vinyl and curing the filler. Opt for a dual-temperature heat gun for greater control. Find a Dual Temperature Heat Gun on Amazon.
- Reducer Nozzle: This attachment for your heat gun concentrates the heat, making it easier to work on small areas and prevent overheating surrounding vinyl. Get a Reducer Nozzle on Amazon.
- Graining Pads: These pads are used to emboss the heat-cure filler, replicating the original texture of your vinyl. Invest in a good set of graining pads for professional results. Explore Graining Pads. Alternatively, consider a graining mold kit to create custom textures.
- Razor Blade (New and Clean): Used for shaving away sharp, curled edges of the cracks.
- Palette Knife or Needle Tool: For precise application of the heat-cure filler into the cracks.
- Plastic Spreader: To level and remove excess filler, ensuring a smooth repair surface.
- Denatured or Rubbing Alcohol: For cleaning the vinyl surface before applying the filler.
- Subpatch Material (Optional): For repairing holes or larger gaps in the vinyl, you may need a subpatch material and adhesive.
- Wooden Block or Small Board: To apply even pressure when embossing with graining pads.
Step-by-Step Guide: How to Repair Your Vinyl Auto Armrest with Heat-Cure Filler
Follow these detailed steps to repair your cracked vinyl auto armrest using heat-cure filler:
Step 1: Prepare the Damaged Area
- Subpatch Holes (If Necessary): If you have holes in your armrest, first subpatch them with a suitable material and glue. Let the adhesive dry completely.
- Shave Sharp Edges: Using a new razor blade held almost parallel to the surface, carefully shave away any sharp, upward-curling edges of the cracks. This will create a smoother surface for the filler to adhere to.
- Melt Curled Edges (Carefully): For edges that are too low-profile to shave or too risky, gently melt them down using a heat gun set to approximately 550°F (288°C). Hold the heat gun 2-6 inches away from the vinyl for 5-15 seconds. The vinyl will become slightly glossy as it melts. Be cautious not to overheat and damage the vinyl. For thicker vinyl, you can briefly use a higher temperature (around 1000°F/538°C) with a reducer nozzle, but proceed with extreme caution.
Step 2: Clean the Vinyl
Thoroughly clean the repair area with denatured or rubbing alcohol to remove any dirt, grease, or protectants. This ensures proper adhesion of the heat-cure filler.
Step 3: Apply Heat-Cure Filler
Using a palette knife or needle tool, carefully apply a thin coat of heat-cure filler into the cracks and over the prepared area. Level the filler and remove any excess using a plastic spreader. Aim for a smooth, even surface that is slightly higher than the surrounding vinyl to allow for sanding and texturing.
Step 4: Heat the Filler
Using the heat gun set to around 550°F (288°C), hold it 8-10 inches away from the repaired area and warm the filler. Observe the filler as it heats; it will transition from a glossy white cream to a more translucent, frosted appearance. Be careful not to overheat the filler, which can cause it to become glossy again and potentially damage the surrounding vinyl.
Step 5: Emboss with Graining Pad
Immediately after heating the filler, firmly press a graining pad onto the warmed filler using a wooden block or small board to apply even pressure. Hold for 5-10 seconds. This process embosses the texture of the graining pad onto the filler as it cools and hardens, replicating the original vinyl texture. The pressure also helps to level any ridges or high spots in the filler.
Step 6: Cool and Repeat
Allow the repaired area to cool completely to room temperature. This is crucial for the filler to fully harden. You can speed up the cooling process with a chill block or by gently applying a damp cloth (water). Repeat steps 3-5 until the repaired surface is level with the surrounding vinyl and the cracks are completely filled and textured.
Step 7: Final Texturizing (Optional)
If necessary, for a more seamless blend, apply a final thin coat of heat-cure filler and lightly texturize it with a gloved hand to soften any lines or inconsistencies in the texture. Heat and emboss with a graining pad one last time. For further texture blending, consider using a spray grain product like SEM Chip Guard.
Step 8: Color and Finish (Optional)
To perfectly match the original color and finish of your armrest, you can apply a vinyl colorant like Rub ‘n Restore® color and protect it with a clear finish like Clear Prep+Finish™. Shop Rub ‘n Restore Products.
Step 9: Re-working (If Needed)
If you are not satisfied with the repair and need to rework it, use a cleaner like Flite™ or rubbing alcohol to remove the color and filler before applying more heat-cure filler and repeating the process.
Tips for a Professional Vinyl Armrest Repair
- Use a Dual-Temperature Heat Gun: Having a heat gun with adjustable temperature settings provides greater control and reduces the risk of damaging the vinyl.
- Reducer Nozzle is Essential: A reducer nozzle concentrates heat, making it easier to target small areas and prevent overheating larger sections of the armrest.
- Invest in Good Graining Pads: High-quality graining pads will produce a more realistic and durable texture match.
- Practice Makes Perfect: If you’re new to vinyl repair, practice on a scrap piece of vinyl to get a feel for the heat gun and filler application before working on your armrest.
- Watch Video Demonstrations: Visual guides can be incredibly helpful. Watch videos demonstrating heat-cure filler application on vinyl or leather to further understand the process. (Refer to the video embedded in the original article for a demonstration on leather, the techniques are largely transferable to vinyl).
Conclusion
Repairing a cracked vinyl auto armrest with heat-cure filler is a rewarding DIY project that can significantly improve your car’s interior appearance and comfort. By following these step-by-step instructions and using the right tools and materials, you can achieve professional-quality results and restore your armrest to its former glory. Don’t let cracked vinyl detract from your driving experience – take the initiative to repair it and enjoy a refreshed and more comfortable car interior. Consider exploring our range of vinyl and leather repair products to ensure you have everything you need for a successful repair.