
Maintaining your golf car battery charger is crucial for ensuring your vehicle is always ready to go. A common issue that can arise is a short circuit, which can prevent your batteries from charging and potentially damage your charger. Understanding how to identify and repair a short in your golf car battery charger can save you time and money on costly repairs or replacements. This guide will walk you through the steps to diagnose and fix a short, keeping your golf car running smoothly.
Identifying a Short Circuit in Your Golf Car Battery Charger
Before you start any repairs, it’s important to confirm that you are indeed dealing with a short circuit. Here are some telltale signs:
- Charger Fails to Turn On: If your charger shows no signs of power when plugged into both the golf car and a power outlet, a short could be the culprit. Check if any lights illuminate or if there’s any fan noise.
- Tripped Circuit Breaker: A short circuit often draws excessive current, which can trip the circuit breaker in your home or the charger itself. If the breaker trips immediately after plugging in the charger, suspect a short.
- Burning Smell or Smoke: In severe cases, a short can cause overheating, leading to a burning smell or even smoke emanating from the charger or its wires. Immediately unplug the charger if you notice this.
- Visible Wire Damage: Inspect the charger’s power cord and charging cables for any visible damage like cuts, frayed wires, or melted insulation. These are common locations for shorts to occur.
Safety Precautions
Working with electrical components requires caution. Before attempting any repairs, ensure you follow these safety measures:
- Disconnect Power: Always unplug the golf car battery charger from the power outlet before inspecting or repairing it.
- Battery Disconnect (Optional but Recommended): For added safety, you can also disconnect the golf car batteries, although this is less critical when working solely on the charger.
- Use Insulated Tools: Use tools with insulated handles to prevent electrical shock.
- Work in a Dry Area: Ensure your workspace is dry to minimize the risk of electric shock.
- If Unsure, Seek Professional Help: If you are uncomfortable working with electrical components or unsure about any step, it’s always best to consult a qualified electrician or golf car technician.
Steps to Repair a Short in a Golf Car Battery Charger
Once you’ve identified a potential short and taken necessary safety precautions, follow these steps to troubleshoot and repair the issue:
1. Visual Inspection for Obvious Shorts
Begin with a thorough visual inspection of the charger:
- Power Cord: Examine the entire length of the power cord for cuts, pinches, or abrasions. Pay close attention to areas near the plugs and where the cord enters the charger housing.
- Charging Cables and Connectors: Inspect the cables that connect to the golf car batteries. Check for damage to the insulation, corroded connectors, or loose wiring.
- Internal Components (If Comfortable Opening the Charger): Caution: Only proceed if you are comfortable and knowledgeable about electronics. Opening the charger may void warranties. If you choose to open it, look for:
- Burned Components: Visually check for any burnt resistors, capacitors, or other components on the circuit board.
- Loose Wires: Look for any wires that have come loose from their terminals.
- Signs of Overheating: Discoloration or melted plastic around components can indicate overheating due to a short.
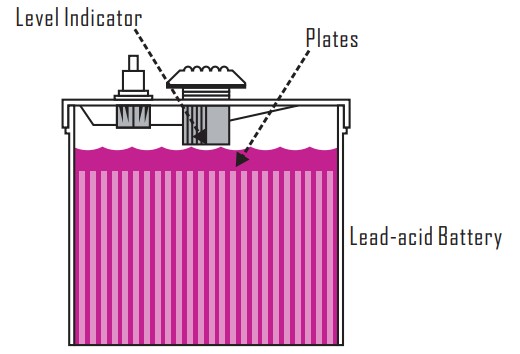 Golf Cart Battery Electrolyte Level
Alt text: Illustration depicting the proper electrolyte level in a golf cart lead-acid battery cell, showing levels both above the plates and below the level indicator, for use in articles about golf cart maintenance and battery care.
2. Testing with a Multimeter
A multimeter is an essential tool for diagnosing electrical shorts. Here’s how to use it:
-
Continuity Test:
- Set your multimeter to the continuity setting (usually indicated by a diode symbol or a speaker icon).
- Test the Power Cord: Unplug the power cord. Test continuity between each prong of the plug and the corresponding pin in the charger connector. There should be continuity only between matching pins. If you find continuity between different pins, there’s a short in the cord.
- Test Charging Cables: Similarly, test the charging cables for continuity between the positive and negative leads. There should be no continuity (infinite resistance) unless the charger is designed to have a closed circuit even when not charging (refer to charger manual if available). Continuity here would indicate a short.
- Component Level Testing (Advanced): If you’ve opened the charger, you can use the continuity test to check individual components like diodes and transistors for shorts. However, this requires more advanced electronics knowledge.
-
Resistance Test:
- Set your multimeter to measure resistance (Ohms – Ω).
- Input Resistance Test: With the charger unplugged, measure the resistance across the input power terminals of the charger. A very low resistance (close to zero) indicates a short circuit within the charger’s internal circuitry. A normal reading will be higher, depending on the charger’s design.
- Output Resistance Test: Measure the resistance across the output terminals of the charger (where it connects to the batteries). Again, very low resistance could indicate a short in the output circuitry.
3. Repairing the Short
Once you’ve located the short, the repair process depends on the cause:
- Damaged Wires: If the short is due to damaged wires in the power cord or charging cables, you can often repair it by:
- Replacing the Cord or Cable: The easiest solution is to replace the entire damaged cord or cable with a new one of the same specification.
- Repairing the Wire (If Minor Damage): For minor damage, you might be able to repair the wire by carefully cutting away the damaged insulation, inspecting the wire strands, and using electrical tape or heat shrink tubing to re-insulate the wire. Ensure the repair is robust and waterproof.
- Loose Connections: Tighten any loose wire connections you find inside the charger (if you opened it) or at the connectors.
- Component Failure (Advanced): If the short is due to a failed internal component, repair becomes more complex and usually requires component-level electronics repair skills. This might involve:
- Identifying the Faulty Component: Using schematics (if available) and further multimeter testing to pinpoint the exact component that has failed.
- Replacing the Component: Desoldering the faulty component and soldering in a new, identical replacement. This requires soldering skills and knowledge of electronic components. For most users, component-level repair is not recommended.
4. Testing After Repair
After making repairs, it’s crucial to test the charger before connecting it back to your golf car batteries:
- Continuity and Resistance Tests (Re-test): Repeat the continuity and resistance tests mentioned in step 2 to ensure the short is resolved.
- Power-On Test (Without Batteries): Plug the charger into a power outlet (without connecting to the golf car). Observe if it powers on correctly (lights, fan). If it still trips the breaker or shows signs of a short, there’s still an issue.
- Charging Test (With Batteries): If the charger seems to power on correctly, carefully connect it to your golf car batteries and monitor the charging process. Check for any overheating, unusual noises, or error messages on the charger.
Conclusion
Repairing a short in a golf car battery charger can range from simple fixes like replacing a damaged cord to more complex internal repairs. By following these steps, you can systematically diagnose and often resolve the issue yourself. However, remember to prioritize safety and seek professional help if you are uncomfortable or unsure at any point. Regularly inspecting your charger’s cords and connections can also help prevent shorts and ensure the longevity of your golf car battery charging system.