
Leather car seats elevate the interior of any vehicle, offering a touch of luxury and comfort. However, they are also susceptible to everyday wear and tear, and scratches are a common problem. Fortunately, those unsightly scratches on your car leather are not a permanent disaster. With the right approach and products, learning how to repair scratched car leather at home is easier and more cost-effective than you might think. This guide will walk you through a simple, step-by-step process to restore your leather car seats to their former glory.
Scuffs and scratches often appear as surface damage, but they can detract from the overall look and feel of your car’s interior. Before you consider expensive professional repairs or replacements, explore the DIY method. This guide, along with readily available leather repair kits, provides everything you need to tackle those scratches effectively and efficiently. Let’s dive into the process and learn how to bring your car leather back to life.
STEP 1. Thoroughly Clean the Damaged Leather Area
Just like any successful repair, preparation is key. The first and most crucial step in repairing scratched car leather is to ensure the area is completely clean and free from any dirt, dust, or contaminants. Any residue can interfere with the repair process and prevent proper adhesion of the repair products.
To clean the scratched area effectively, use an alcohol-based cleaner, commonly included in leather repair kits. Apply a small amount of the cleaner to a clean, soft cloth. Gently wipe down the scratched leather surface, ensuring you cover the entire damaged area and slightly beyond. This alcohol cleaner will not only remove surface dirt but also degrease the leather, preparing it for the next steps.
Once you have thoroughly cleaned the area, allow it to air dry completely. This usually takes about 5 to 10 minutes. Ensure the leather is fully dry before proceeding to the next step. A clean and dry surface is essential for a successful and long-lasting leather scratch repair.
STEP 2. Sand Down Any Rough Edges on the Scratch
After cleaning and drying the scratched car leather, the next step is to address any roughness around the damaged area. Scratches can sometimes leave raised or rough edges, which need to be smoothed out to achieve a seamless repair.
Take fine-grit sandpaper, typically around 1200 grit, which is often included in leather repair kits. Gently sand the rough edges of the scratch. The goal here is not to remove the scratch entirely at this stage, but to smooth out any unevenness and create a level surface for the filler to adhere to. Use light pressure and sand in the direction of the scratch, or in small circular motions, to avoid causing further damage.
Continue sanding until the area feels smooth to the touch. Regularly check the surface by running your fingers over it. Removing the rough texture is essential for a professional-looking finish, ensuring that the repair blends seamlessly with the surrounding leather. Once sanded, wipe away any sanding dust with a clean, dry cloth before moving on to the next stage.
STEP 3. Apply Leather Heavy Filler to the Scratched Area
With the scratched car leather cleaned and sanded smooth, it’s time to fill in the scratch. For deeper scratches or scuffs where there is a loss of leather, using a leather filler is crucial for restoring a level surface.
Take a small amount of heavy leather filler, usually provided in a leather repair kit, and apply it directly to the scratched area. Use a spatula or a similar tool, also often included in kits, to carefully spread the filler into the scratch. The aim is to fill the scratch to be level with the surrounding leather surface.
Apply the filler in thin layers, building it up gradually. This method is better than applying a thick layer at once, as it allows for more even drying and prevents cracking. After applying each thin layer, allow it to dry. Natural air drying can take around 25 to 30 minutes, but you can speed up the process using a hairdryer on a low heat setting.
Continue applying thin layers of filler until the scratch is filled and level with the surrounding leather. For deeper scratches, this may require multiple applications. Ensure each layer is completely dry before applying the next to maintain the integrity of the repair. Any excess filler outside the scratch can be gently wiped away with a damp cloth before it dries completely.
STEP 4. Sand the Dried Leather Filler for a Smooth Surface
Once the leather filler has completely dried and filled the scratch to a level surface, the next step in repairing scratched car leather is to sand down the filler. This ensures that the filled area is perfectly smooth and even with the surrounding leather, preparing it for coloring and finishing.
Using the same fine-grit sandpaper (1200 grit) used in Step 2, gently sand the dried filler. The goal here is to level the filler and blend it seamlessly with the original leather surface. Use light, even strokes and avoid pressing too hard, which could gouge the filler or the surrounding leather.
Sand until the filled area is smooth and flush with the rest of the leather. Periodically check the surface by feeling it with your fingers to ensure there are no raised edges or unevenness. Take your time with this step to achieve a flawless base for the colorant. After sanding, remove any dust particles with a clean, dry cloth to ensure a clean surface for the next stage of the repair process.
STEP 5. Apply Leather Colorant to Match Your Car Seat
With the scratch filled and sanded smooth, the next crucial step in how to repair scratched car leather is to restore the color. Leather repair kits typically include a colorant and various tints to achieve a perfect color match with your car’s leather interior.
Before applying colorant directly to the repaired area, it’s essential to test the color match. Find an inconspicuous area on your leather car seat, such as under the seat or in a less visible corner. Apply a small amount of the provided base colorant and, using the tints and color matching guide, carefully mix to achieve a color that perfectly matches your car leather. It’s always better to start with a lighter shade and gradually darken it by adding small amounts of tint.
Once you are satisfied with the color match on your test area, apply the matched colorant to the repaired scratch. Use a sponge or a soft cloth to apply thin, even coats of colorant over the filled area, ensuring complete coverage. Dry each coat with a hairdryer on a low setting before applying the next. Multiple thin coats are better than one thick coat for achieving even color and preventing runs or drips. Continue applying coats until the scratch is completely concealed and the color seamlessly blends with the surrounding leather.
STEP 6. Prepare the Leather Finish for the Right Sheen
After restoring the color, the final step in repairing scratched car leather is to apply a leather finish. This finish not only protects the repaired area but also ensures that the sheen matches the surrounding leather. Leather repair kits often include both gloss and matte finishes, allowing you to customize the final look.
To determine the correct finish for your car leather, observe the sheen of the undamaged areas. If your leather has a glossy appearance, use a gloss finish. For a matte look, use a matte finish. For a satin finish, which is somewhere in between, mix equal parts of gloss and matte finish in a small measuring cup – often provided in the kit.
Always test your finish mixture in an inconspicuous area first, just as you did with the colorant. Apply a small amount and let it dry to ensure it matches the sheen of your original leather. Adjust the ratio of gloss to matte finish as needed until you achieve a perfect match. Getting the finish right is crucial for making the repair invisible and ensuring it blends seamlessly with the rest of your car’s leather interior.
STEP 7. Apply the Leather Finish for Protection and Uniform Look
Once you have prepared the correct leather finish and tested it for sheen match, it’s time to apply it to the repaired area. This final step in how to repair scratched car leather is crucial for sealing in the colorant and providing protection to the repaired scratch.
Using a clean sponge or cloth, apply a generous coat of the prepared leather finish over the entire repaired area. Ensure you cover the colored area completely and slightly overlap onto the surrounding original leather for a seamless blend. You can let the finish air dry naturally, or use a hairdryer on a low setting to speed up the drying process.
After the first coat is dry, apply a second coat of finish using the same method. Two coats of finish provide better protection against wear, fading, and help to seal in the color, ensuring a more durable and long-lasting repair. Once the final coat is completely dry, your scratched car leather should look almost as good as new, with the repair seamlessly blending into the original leather.
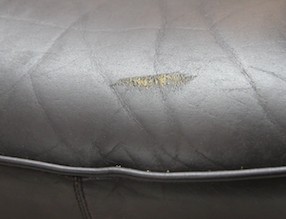
FINAL RESULT: Restored Leather Car Seat
As you can see, repairing scratched car leather is a manageable DIY task. By following these simple steps and using a leather repair kit, you can effectively eliminate unsightly scratches and scuffs from your car seats. This process not only restores the appearance of your leather but also protects it from further damage.
Achieving professional-quality results at home is entirely possible, even for those new to DIY repairs. Investing in a quality leather repair kit and dedicating a little time can save you significant money compared to professional repair services or leather replacement. If you’re dealing with scratches on your car leather, take action today and restore the luxurious look and feel of your vehicle’s interior.