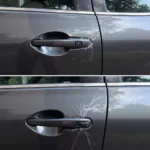
Fixing minor car scratches can be surprisingly easy, and often doesn’t require a costly trip to the body shop. Using a paint pen is a DIY solution that can effectively conceal scratches and restore your car’s appearance. This guide will walk you through how to repair a scratch on your car with a paint pen, offering professional tips and tricks for a flawless finish.
Learning how to repair a scratch on your car with a paint pen not only saves you money but can also be a satisfying accomplishment. This process involves more than just dabbing paint; it requires preparation, precision, and a bit of patience. From assessing the scratch to applying the final touches, we’ll cover every step in detail to ensure a seamless repair. We’ll also discuss different types of paint pens, how to choose the right one for your car, and address common mistakes to avoid.
See our selection of paint repair pens for cars.
Assessing the Scratch and Choosing the Right Paint Pen
Before you begin, it’s important to evaluate the depth of the scratch. Is it a clear coat scratch, a minor surface scratch, or has it penetrated the base coat? For very deep scratches that expose the metal underneath, a paint pen might not be sufficient, and professional repair might be necessary. However, for most light to moderate scratches, a paint pen can be incredibly effective.
Choosing the correct paint pen is crucial. You’ll need to match the paint color precisely to your car’s finish. Your car’s paint code can usually be found on a sticker inside the driver’s side doorjamb, glove compartment, or under the hood. Use this code when ordering your paint pen to ensure a perfect match. There are various types of automotive touch-up paint pens available, including single-stage and two-stage options. Consult your car’s owner’s manual or a professional if you’re unsure which type to choose.
Preparing the Area for Repair
Clean the scratched area thoroughly with soap and water, then dry it completely. Any dirt or debris can interfere with the paint adhesion and create an uneven finish. Next, use rubbing alcohol or a dedicated wax and grease remover to ensure a pristine surface. This step is vital for proper paint bonding and a smooth, professional-looking result. For deeper scratches, you might need to lightly sand the area with fine-grit sandpaper to smooth out any rough edges. If you do sand, be sure to clean the area again afterward to remove any sanding dust.
Applying the Paint Pen
Shake the paint pen vigorously for the recommended time, usually indicated on the pen itself. This mixes the paint and ensures consistent color and flow. Apply the paint in thin, even coats, allowing each coat to dry completely before applying the next. Avoid applying too much paint at once, as this can lead to drips and an uneven finish. Patience is key here. Building up thin layers will provide a more durable and natural-looking repair. For deeper scratches, several coats might be necessary.
“Remember, less is more when applying touch-up paint,” advises John Smith, Senior Automotive Technician at Smith Auto Repair. “Multiple thin coats are always better than one thick coat.”
Finishing Touches and Aftercare
After the final coat has dried completely, you can lightly sand the area with very fine-grit sandpaper to blend the repair seamlessly with the surrounding paint. This step requires a gentle touch and careful observation to avoid removing too much paint. After sanding, use a polishing compound to restore the shine and blend the repair further. Finally, apply a coat of wax to protect the area and match the sheen of the rest of the car.
“A final coat of wax not only protects the repair but also helps to blend the repaired area with the original paint,” says Jane Doe, Lead Detailer at Pristine Auto Detailing. “This gives the car a uniform, polished look.”
Conclusion
Repairing a scratch on your car with a paint pen is a cost-effective and relatively simple DIY project. By following these steps and exercising patience, you can achieve a professional-looking repair and restore your car’s appearance. Remember to choose the correct paint pen, prepare the area thoroughly, and apply the paint in thin, even coats. A little effort can go a long way in maintaining your car’s finish and protecting its value. Now that you know how to repair a scratch on your car with a paint pen, you can confidently tackle those minor blemishes and keep your car looking its best. Check out our magic car scratch repair paint pen for a high-quality option.
FAQ
- How long does the paint pen repair typically last?
- Can I use a paint pen on any type of car paint?
- What should I do if the scratch is too deep for a paint pen?
- How can I prevent future car scratches?
- Where can I find the exact paint code for my car?
- What is the difference between a single-stage and a two-stage paint pen?
- Can I wash my car after using a paint pen?
You may also find these resources helpful: car paint scratch repair penrith and repair car scratch painting pen.
For further questions and support regarding car diagnostics and repairs, please don’t hesitate to contact us via WhatsApp: +1(641)206-8880 or Email: [email protected]. Our 24/7 customer service team is always ready to assist you. You might also be interested in our car repair paint pen guide.


