
Rust is a relentless enemy for car owners, especially in regions with harsh winters or salty air. When rust attacks your car’s sheet metal, it can seem daunting. However, with the right tools and techniques, repairing rusted out sheet metal is a manageable DIY project. This guide will walk you through the process of patching rusted panels, saving you money and extending the life of your vehicle.
The first crucial decision when dealing with rust is whether to repair or replace the affected panel. Bolt-on components like fenders, doors, and sunroofs are often easier to replace entirely if the rust damage is extensive. Replacement is straightforward: simply unbolt the old part and install a new or salvaged one.
However, when rust affects panels welded directly to the car’s body, or when replacement isn’t feasible, patching becomes the go-to solution. You then have another choice: use a pre-made patch panel designed for your car model or fabricate one yourself from generic sheet metal. If a patch panel is available, it’s generally the quicker and less laborious route. Pre-formed panels save considerable time compared to the intricate work of cutting, bending, and shaping metal from scratch.
In situations where pre-made patches are unavailable or prohibitively expensive due to shipping costs, like our example with the Saab 99 wheel arches, fabricating your own patch is necessary. We opted to purchase a 2×3-foot piece of 20-gauge sheet metal from a local auto body supply shop. This gauge is ideal for car panels—easy to weld and often pre-coated with rust protection. With our materials secured, it was time to begin the repair process.
Step 1: Preparing the Damaged Area
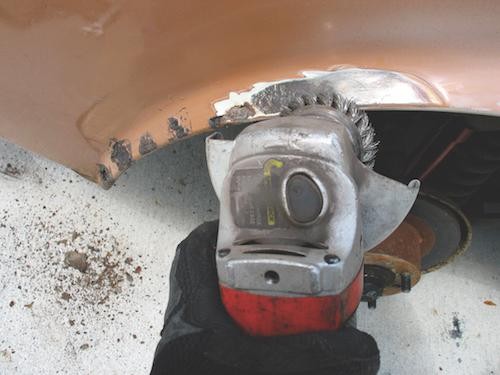
Preparing rusted car fender for repair by removing paint and rust with a wire brush on an angle grinder.
Before starting any repair work, it’s essential to thoroughly clean the area around the rust. This involves removing all traces of old paint, body filler (like Bondo), and surface rust. A wire cup brush mounted on an angle grinder is highly effective for this initial cleaning phase. Work outwards from the rusted area, removing all loose material to expose the true extent of the damage.
Be prepared for the rusted area to be larger than it initially appears. As you remove layers of paint, filler, and rust, you might discover hidden corrosion. In our case, a seemingly small rust spot on the fender lip expanded significantly as we cleaned it. Remember to always wear appropriate safety gear, including eye protection and a respirator mask, during this and subsequent steps to protect yourself from flying debris and dust.
Step 2: Cutting Away the Rusted Metal
Using a grinding wheel on an angle grinder to remove rust and shape the damaged car panel for patching.
Once the initial cleaning is done, switch to a grinding wheel on your angle grinder. This step is crucial for removing any remaining rust and shaping the damaged area into a clean, patchable form. The goal is to cut back the sheet metal until you reach solid, rust-free metal around the entire perimeter of the hole.
Alternative tools for cutting out the rusted metal include a plasma cutter, which offers precise cuts, a reciprocating saw for larger sections, or a die grinder for more detailed work. Regardless of the tool you choose, ensure you cut back far enough to eliminate all traces of rust. Leaving any rust behind will compromise the repair, allowing corrosion to spread again in the future.
Step 3: Creating a Patch Panel Template
Crafting a cardboard template to match the shape of the rusted car panel for accurate patch fabrication.
Creating an accurate patch panel is essential for a successful repair. Start by making a template out of cardboard. Hold the cardboard against the cleaned-out opening and trace the shape. Cut out the cardboard template slightly larger than the hole and then progressively trim it down until it fits the opening perfectly. This iterative process of fitting and trimming ensures a precise template.
Once you are satisfied with the cardboard template’s fit, lay it onto your sheet metal. Trace the outline of the template onto the sheet metal using a marker. This traced outline will guide you when cutting out your metal patch panel. Accurate tracing is important for ensuring your metal patch matches the contours of the area you are repairing.
Step 4: Selecting the Right Welding Tool
Choosing a MIG welder for sheet metal repair on a car body panel.
For welding sheet metal, MIG (Metal Inert Gas) welders are generally preferred due to their ease of use and ability to create clean welds on thinner materials. Depending on the gauge of your sheet metal and the power available, you can choose from various MIG welders. For home repairs, a 110-volt MIG welder like the Daytona MIG 140-amp model we used is often sufficient. For thicker gauges or more demanding work, a 220-volt welder like the HTP 160-amp MIG welder might be beneficial, offering more power and a higher duty cycle.
When setting up your MIG welder, power and wire speed settings are crucial and will vary based on your specific welder, the thickness of the sheet metal, and the type of welding wire. A good starting point for thin automotive sheet metal on a 110V welder might be a medium-low power setting and a moderate wire speed. It’s always recommended to practice on scrap metal of the same thickness to dial in your settings before welding on your car. This practice will help you achieve proper weld penetration without burning through the metal.
Step 5: Tack Welding the Patch in Place
Tack welding a fabricated sheet metal patch onto a car fender for initial securement.
With your patch panel cut and your welder set, it’s time to begin welding. Wearing welding gloves for protection, carefully position the patch panel over the prepared opening. Use one hand to hold the patch firmly in place and use your MIG welder to apply a single tack weld. A tack weld is a small, localized weld used to temporarily hold pieces together.
After the first tack weld, check the patch alignment to ensure it’s correctly positioned. If necessary, make adjustments before proceeding. Once you’re satisfied with the placement, apply a few more tack welds around the perimeter of the patch. Space these tack welds a few inches apart initially. If the sheet metal needs to conform to a curve, gently bend and shape the patch as you tack weld, gradually working your way around the panel. Tack welding minimizes heat buildup and distortion, which is crucial when working with thin sheet metal.
Step 6: Stitch Welding for a Solid Joint
Stitch welding around the perimeter of a car panel patch to minimize heat and warping.
Once the patch is securely tack welded, you can proceed with stitch welding to create a continuous, strong weld seam. Stitch welding involves laying down a series of short welds (stitches) rather than one continuous bead. This technique is vital for minimizing heat input into the sheet metal, which reduces the risk of warping or distortion.
Work your way around the perimeter of the patch, applying short welds approximately an inch long, then move to a different section to allow the previous weld to cool. Continue this process, jumping around to different areas to distribute heat evenly. Avoid welding in one continuous pass, as this will generate excessive heat and likely warp the panel. Stitch welding also makes it easier to control the weld and achieve good penetration without burning through the thin sheet metal.
Step 7: Grinding Down the Welds
Using an angle grinder to smooth down weld beads on a car body patch.
After the stitch welding is complete and the weld has cooled, it’s time to grind down the welds. Use an angle grinder with a grinding disc to carefully remove the peaks of the weld beads. The goal is to make the weld flush with the surrounding metal surface. Be cautious not to grind too aggressively, as you want to leave a sufficient amount of weld material for strength and avoid grinding into the base metal.
Smooth down the welds until they are relatively even with the surrounding panel. This step reduces the amount of body filler needed later in the process, leading to a cleaner, more professional finish. A smooth weld also makes the subsequent bodywork and painting stages easier.
Step 8: Rust Prevention and Priming
Applying phosphoric acid metal treatment to a repaired car panel to prevent future rust.
With the welding and grinding complete, the bare metal is vulnerable to rust. It’s crucial to immediately protect the repaired area. Begin by applying a phosphoric acid-based metal treatment, such as Ospho, to the entire bare metal surface, including the welds and the surrounding cleaned area. Phosphoric acid converts any remaining rust into a stable iron phosphate coating and etches the metal surface, improving primer adhesion.
After the metal treatment has dried according to the manufacturer’s instructions, apply an etching primer. Etching primer is designed to bond strongly to bare metal and provides an excellent base for subsequent primer and paint layers. This step is essential for long-term rust prevention and ensures a durable, high-quality finish to your car body repair. Following these steps will protect your repair and keep your car looking great for years to come.