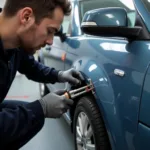
Dealing with a cracked, dented, or scratched plastic bumper? You’re not alone. Plastic bumpers are designed to absorb impact, making them susceptible to damage. Fortunately, repairing a plastic car bumper is often easier than it looks. Whether you’re a seasoned DIYer or a newbie, this comprehensive guide will walk you through the steps to get your bumper looking its best again.
Assessing the Damage: Repair or Replace?
Before diving into the repair process, it’s crucial to assess the extent of the damage. Minor scratches, scuffs, and small dents can often be repaired at home. However, significant cracks, deep gouges, or damage affecting the bumper’s structural integrity might require professional attention or even a complete replacement.
Gathering Your Tools and Materials
Having the right tools and materials is essential for a successful plastic bumper repair. Here’s a list of what you’ll typically need:
- Cleaning supplies: Soap and water, rubbing alcohol, microfiber cloths
- Sandpaper: Various grits (e.g., 180, 320, 400)
- Plastic filler/body filler (if necessary)
- Plastic spreader (if using filler)
- Plastic bumper repair kit (includes adhesive, reinforcement mesh)
- Heat gun or hairdryer
- Primer specifically for plastics
- Automotive paint (matched to your car’s color)
- Clear coat
- Painting supplies: Paint thinner, paint trays, brushes, or spray gun
Step-by-Step Guide to Repairing Your Plastic Bumper
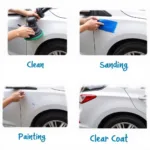
1. Clean the Damaged Area:
Thoroughly clean the damaged area with soap and water. Rinse well and allow it to dry completely. Once dry, use rubbing alcohol to remove any lingering dirt, grease, or wax.
2. Sand the Damaged Area:
Start with coarse-grit sandpaper (around 180 grit) to roughen up the surface around the damage. Gradually work your way up to finer grits (320, then 400) until the area is smooth. This creates a better surface for adhesion.
3. Repairing Cracks and Holes:
- For small cracks and holes, a plastic bumper repair kit is your best bet. These kits usually contain an adhesive and reinforcement mesh. Follow the manufacturer’s instructions carefully, as application methods can vary.
- For larger damage, you might need to use a plastic filler or body filler. Apply the filler using a plastic spreader, working it into the damaged area. Allow it to dry completely according to the product instructions.
- Once the filler is dry, sand it down using the same gradual sanding process as before. The goal is to create a seamless transition between the repaired area and the surrounding bumper.
4. Apply Primer:
Apply a thin, even coat of primer specifically designed for plastics. Primer helps the paint adhere properly and creates a uniform surface. Allow the primer to dry completely before moving on to painting.
5. Paint the Bumper:
Use automotive paint that matches your car’s color. If you’re unsure about the exact color code, you can usually find it on a sticker inside your car’s door jamb or in your owner’s manual.
- For small repairs, you can often get away with using touch-up paint and a brush.
- For larger areas, using a spray gun will give you a more professional finish. Apply multiple thin coats, allowing each coat to dry before applying the next.
6. Apply Clear Coat:
Once the paint is dry, apply a clear coat to protect the paint and give it a glossy finish. Again, apply multiple thin coats, allowing each coat to dry in between.
7. Buffing (Optional):
If you want an even smoother finish, you can buff the repaired area after the clear coat has fully cured (usually 24-48 hours). Use a buffing compound and a buffing pad, following the instructions on the buffing compound.
Tips from a Car Repair Expert:
“When repairing a plastic bumper, patience is key,” says John Smith, a seasoned car repair expert with over 20 years of experience. “Take your time with each step, from cleaning and sanding to applying the filler and paint. Rushing the process will only lead to subpar results.” He also emphasizes the importance of using high-quality products designed specifically for plastic bumpers.
FAQs About Plastic Bumper Repair
Q: Can I repair a plastic bumper myself, or should I hire a professional?
A: Minor scratches, scuffs, and dents can often be tackled with DIY repairs. For significant damage, especially anything affecting the bumper’s structure, it’s best to consult a professional.
Q: Can I use any type of paint on my plastic bumper?
A: No, you should use automotive paint that’s designed for plastic bumpers. Using the wrong type of paint can lead to poor adhesion and an uneven finish.
Q: How long does it take for a plastic bumper repair to dry?
A: Drying times vary depending on the products used. Always refer to the manufacturer’s instructions for specific drying times for fillers, primers, paints, and clear coats.
Exploring Further Car Repair Solutions
Want to learn more about tackling various car repairs? Check out these related articles:
- Repair scratched plastic car bumper for tips on fixing those pesky scratches.
- Car plastic bumper trim paint repair kit for a convenient solution to refresh your bumper trim.
Need Professional Assistance?
If you’re unsure about any step of the repair process or feel uncomfortable tackling the repair yourself, don’t hesitate to seek professional help. For expert car repair advice and assistance, get in touch with our team. Contact us via WhatsApp: +1(641)206-8880, Email: [email protected]. Our 24/7 customer support team is ready to help!


