
Experiencing a blank, white screen on your Pioneer car stereo can be incredibly frustrating. If your Pioneer head unit is displaying a solid white screen, possibly with lines or no touch response, you might be facing what’s commonly known as the “White Screen of Death.” This issue, unfortunately known to affect certain Pioneer models, can render your car’s entertainment system unusable. While Pioneer initially offered a courtesy repair program for this specific problem, it’s important to understand the current situation and explore your repair options. This guide will walk you through understanding the Pioneer car stereo white screen issue and explore how to get it repaired.
Understanding the Pioneer “White Screen of Death” Issue
The “White Screen of Death” in Pioneer car stereos isn’t just a random glitch; it’s a symptom of an underlying hardware problem. This issue primarily affects Pioneer head units manufactured between 2020 and 2022. Common models reported to be susceptible include the DHT-160, DMH-1770NEX, and AVH-X2800BS, among others in that generation.
Symptoms of the White Screen of Death
The symptoms are quite distinct and usually progress over time:
- Initial Appearance: The white screen might appear intermittently when you first start your vehicle.
- Increased Frequency: Over time, the white screen becomes more persistent and appears more often.
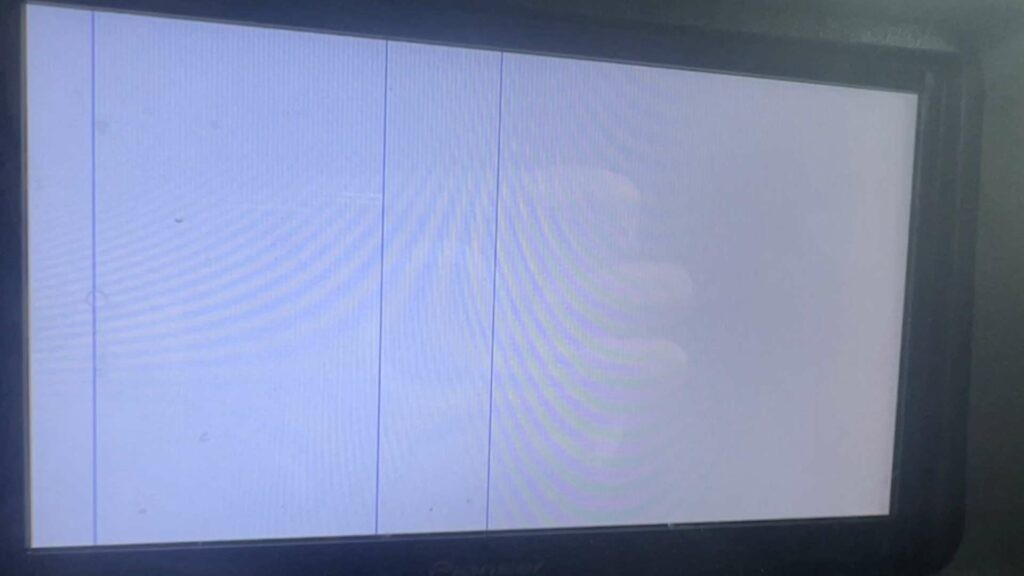
- Solid White Display: The screen displays a bright, solid white color.
- Vertical Lines: You might notice vertical lines running through the white screen.
- No Touch Interactivity: The touchscreen becomes unresponsive, and you lose control of your car stereo functions.
Root Cause of the Problem
The technical culprit behind the white screen issue lies in the internal components of these Pioneer head units. Poorly manufactured internal connectors and weak solder joints on the mainboard or ribbon cables are the primary cause. This is due to manufacturing defects affecting the connection integrity over time and temperature changes within a vehicle’s dashboard environment. This kind of hardware failure is similar in nature to issues seen in other electronics with LCD screens that suffer from connection problems.
Is Pioneer Still Offering Free Repairs for the White Screen Issue?
Important Update (November 2024): Pioneer, to their credit, initially acknowledged the widespread nature of this manufacturing defect and offered a courtesy repair program. This program allowed owners to send in their affected head units for repair, even if they were out of warranty.
However, based on recent reports and user feedback, Pioneer is unfortunately no longer honoring free repairs for out-of-warranty units exhibiting the White Screen of Death. This is a significant change and a disappointment for many Pioneer customers who purchased these units during the affected period.
What Are Your Options Now?
If your Pioneer car stereo is displaying the white screen and is out of warranty, here are your likely options:
-
Contact Pioneer Customer Support: It’s still worth contacting Pioneer customer support directly to inquire about your specific situation. While a free repair might not be guaranteed, they may offer some form of assistance or guidance, especially if you emphasize the known manufacturing defect.
-
DIY Repair (Advanced): If you have experience with electronics repair and soldering, you might consider attempting a DIY repair. The issue is often related to soldering points or connector issues. However, this is an advanced undertaking and could void any remaining warranty or potentially damage the unit further if not done correctly. It is generally not recommended for those without electronics repair expertise.
-
Professional Repair Services: Seek out professional car audio repair shops or electronics repair services. They can diagnose the specific problem and provide a repair quote. Look for shops experienced with car stereos and Pioneer units specifically.
-
Head Unit Replacement: Depending on the cost of repair and the age of your unit, replacing the entire head unit might be the most practical option. Consider upgrading to a newer model with improved features and reliability.
Basic Troubleshooting Steps (Before Seeking Repair)
Before you assume a hardware failure, there are a few basic troubleshooting steps you can try, although they are unlikely to resolve a true “White Screen of Death” issue caused by hardware:
-
Check Power Connections: Ensure your car stereo is receiving power. Check fuses related to your car audio system. Though a power issue is less likely to cause a white screen specifically, it’s a basic check.
-
Reset the Head Unit: Some head units have a reset button (often small and recessed). Consult your Pioneer owner’s manual to see if your model has a reset function and how to perform it. This might temporarily resolve minor software glitches, but unlikely to fix a hardware problem.
Removing Your Pioneer Head Unit for Repair or Replacement
Whether you are sending your unit for professional repair or replacing it yourself, you’ll need to remove it from your car’s dashboard. If you are not comfortable with car electronics or dashboard disassembly, it is highly recommended to have a professional car audio installer or mechanic remove the unit for you.
If you are proceeding with DIY removal, proceed with caution and consult your vehicle’s service manual or online resources specific to your car model for dashboard disassembly instructions. The general steps are as follows:
Step 1: Disconnect the Car Battery: Crucially, disconnect the negative terminal of your car battery before working on any car electronics. This prevents electrical shorts and potential damage.
Step 2: Remove Dashboard Trim: Carefully remove the dashboard trim pieces surrounding the car stereo. These are usually held in place by clips or screws. Use plastic trim removal tools to avoid damaging the dashboard.
Step 3: Unscrew and Remove the Head Unit: Once the trim is removed, you’ll see screws holding the head unit in place. Unscrew these and carefully pull the head unit out.
Step 4: Disconnect Wiring Harnesses and Antenna: Reach behind the head unit and disconnect all wiring harnesses and the antenna cable. Note the locations of each connector for easier reinstallation. Taking pictures can be helpful.
Step 5: Remove Mounting Brackets (If Applicable): If you are sending the unit for repair only, remove any mounting brackets attached to the sides of the head unit. These are not needed for repair and should be kept for reinstallation.
Step 6: Prepare for Shipping or Repair: If sending for repair, package the head unit securely with bubble wrap and cushioning in a sturdy box. Include a note with your contact information, a description of the problem (“Pioneer White Screen of Death”), and any relevant details.
Reinstalling Your Repaired or Replacement Pioneer Car Stereo
Once you have your repaired unit back or a new replacement, reinstallation is essentially the reverse of the removal process.
Step 1: Reconnect Wiring Harnesses and Antenna: Carefully reconnect all wiring harnesses and the antenna cable to the back of the head unit. Ensure they are securely plugged in.
Step 2: Reinstall Mounting Brackets (If Removed): If you removed mounting brackets, reattach them to the head unit.
Step 3: Slide Head Unit Back into Dashboard: Carefully slide the head unit back into the dashboard opening, aligning it with the mounting holes.
Step 4: Reinstall Screws: Reinstall the screws to secure the head unit to the dashboard.
Step 5: Reinstall Dashboard Trim: Snap the dashboard trim pieces back into place.
Step 6: Reconnect Car Battery: Reconnect the negative terminal of your car battery.
Step 7: Test the Unit: Turn on your car’s ignition and test the car stereo to ensure it is working correctly.
Conclusion
The Pioneer “White Screen of Death” issue is a known problem affecting certain models, stemming from manufacturing defects. While Pioneer’s initial courtesy repair program is no longer widely available for out-of-warranty units, understanding the problem and your repair options is crucial. Consider contacting Pioneer, exploring professional repair services, or, if necessary, replacing the head unit. Remember, if you’re not comfortable with DIY car electronics work, professional installation and repair services are always recommended to ensure proper and safe handling of your vehicle’s electrical system.