
Automatic PC restarts can be incredibly frustrating. Imagine working on a crucial document, engrossed in a game, or watching a movie, only for your Windows system to suddenly reboot without warning. This abrupt interruption can lead to data loss, corrupted files, and general disruption to your workflow. If you’re experiencing the annoyance of your PC restarting on its own, you’re not alone. Many users encounter this issue, and thankfully, there are effective ways to diagnose and fix it. This guide, brought to you by Car Repair Online, will walk you through the common causes of automatic PC restarts and provide step-by-step solutions to get your system running smoothly again.
Understanding Why Your PC Restarts Automatically
Before diving into solutions, it’s helpful to understand why your computer might be restarting unexpectedly. Windows PCs are complex systems relying on a delicate balance of software and hardware. An automatic restart is often a symptom of an underlying problem, triggered by various factors. These can broadly be categorized into software and hardware issues.
On the software side, conflicts within system files, including registry errors or corruption, can destabilize Windows, leading to sudden shutdowns and restarts. Malware or viruses can also tamper with system settings and cause instability. Similarly, installing incompatible or poorly written software can introduce conflicts. Outdated drivers, especially for critical components like your graphics card, can also be a culprit.
Hardware problems are another significant cause. Issues with your RAM, hard drive, or even newly installed hardware can lead to system instability and automatic restarts. Overheating of the CPU or GPU due to inadequate cooling can also trigger shutdowns to prevent component damage. Power supply problems, while less common, can also cause unexpected restarts if the system isn’t receiving stable power.
Common scenarios where you might experience automatic restarts include:
- Blue Screen of Death (BSOD): Often accompanied by error messages, indicating a critical system failure.
- Black Screen: A sudden black screen followed by a restart.
- Frozen Screen: The system becomes unresponsive before restarting.
- Random Restarts during Operation: The PC restarts without any apparent trigger, even during normal use.
- Restarts After Sleep or Lock Screen: The system restarts when waking up from sleep mode or after being locked.
Identifying the root cause is the first step in effectively addressing the “how to repair pc auto restart” issue. Let’s explore practical troubleshooting methods to diagnose and resolve this problem.
Troubleshooting Steps to Fix PC Auto Restart
Here are several methods, starting with basic checks and progressing to more advanced solutions, to help you repair PC auto restart problems.
1. Unplug Peripheral Devices
Sometimes, a faulty peripheral device connected to your computer can be the unexpected source of automatic restarts. Devices like printers, scanners, external hard drives, USB hubs, and card readers can occasionally cause conflicts that lead to system instability.
To rule out a peripheral device as the cause, systematically disconnect all non-essential external devices from your PC. This includes USB devices, printers, scanners, and any other peripherals you’ve recently connected. Leave only the essential devices like your monitor, keyboard, and mouse connected.
After disconnecting the peripherals, restart your computer. Observe if the automatic restart issue persists. If the problem disappears after disconnecting the devices, reconnect them one by one, restarting your system after each reconnection. This process helps pinpoint the specific peripheral that might be causing the conflict. Once you identify the problematic device, try updating its drivers, replacing it, or consulting the manufacturer’s support for further assistance.
2. Boot Your PC in Safe Mode
Safe Mode is a diagnostic mode in Windows that starts your operating system with a minimal set of drivers and programs. This stripped-down environment can help you determine if the automatic restarts are caused by third-party software, drivers, or startup programs. If your PC runs stable in Safe Mode, it indicates that the issue likely lies with software or drivers.
To boot into Safe Mode, follow these steps:
- Power off your PC. If it’s currently on, hold down the power button until it completely shuts down.
- Power on and Force Shutdown Repeatedly. Press the power button to turn on your PC. As soon as you see the manufacturer’s logo or the Windows logo appear, forcefully shut down your system again by holding the power button. Repeat this process three times.
- Enter Windows Recovery Environment (WinRE). After the third forced shutdown and restart, your system should automatically boot into the Windows Recovery Environment (WinRE).
- Navigate to Startup Settings. In WinRE, select Troubleshoot > Advanced options > Startup Settings.
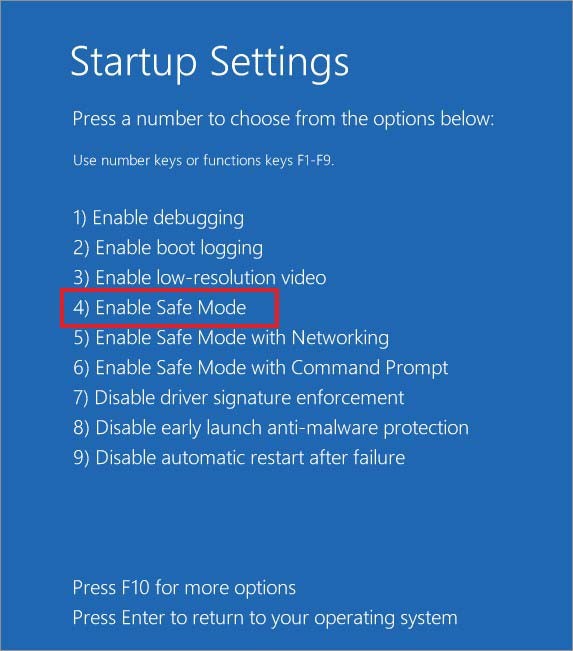
- Enable Safe Mode. Click Restart. After your PC restarts again, you’ll see a list of Startup Settings options. Press F4 on your keyboard to select Enable Safe Mode.
Alt text: Startup Settings screen in Windows Recovery Environment, highlighting the ‘Enable Safe Mode’ option, user is prompted to press F4.
Once your system boots into Safe Mode, use your computer as you normally would for a while. If the automatic restarts do not occur in Safe Mode, you can proceed with troubleshooting software and driver issues. If the restarts still happen in Safe Mode, it might indicate a more fundamental hardware problem.
3. Disable Sleep or Hibernate Mode
Sleep and Hibernate modes are power-saving features that put your computer into a low-power state. However, sometimes issues within these modes can trigger automatic restarts, especially when waking the system from sleep or hibernation. Disabling these modes can help determine if they are contributing to the problem.
Here’s how to disable Sleep and Hibernate modes:
- Open Control Panel. Press Windows key + Q or Windows key + S to open the search bar, type “Control Panel,” and click Open from the search results.
Alt text: Windows search bar displaying ‘Control Panel’ being typed, with the Control Panel App highlighted as the top result.
- Change View to Large Icons. In the Control Panel window, find the “View by” dropdown menu in the top right corner and select Large icons.
Alt text: Control Panel window with the ‘View by’ dropdown menu set to ‘Category’, user is instructed to change it to ‘Large icons’.
- Go to Power Options. Locate and click on Power Options.
Alt text: Control Panel window displaying various options in ‘Large icons’ view, the ‘Power Options’ item is highlighted with a red box.
-
Change Plan Settings. Click on Change plan settings next to your currently selected power plan.
-
Set Sleep and Display to Never. On the “Edit Plan Settings” screen, for both “Turn off the display” and “Put the computer to sleep” options, select Never from the dropdown menus.
Alt text: Power Plan settings screen, showing dropdown menus for ‘Turn off the display’ and ‘Put the computer to sleep’ options, both set to ‘Never’.
- Save Changes and Reboot. Click Save changes. Close the Control Panel and restart your computer.
After disabling Sleep and Hibernate, monitor your system to see if the automatic restarts have stopped. If this resolves the issue, you might consider keeping these modes disabled or investigate further into power management settings for potential conflicts.
4. Update GPU Drivers
Outdated or corrupted graphics card (GPU) drivers are a common cause of system instability, including automatic restarts. Ensuring you have the latest and compatible drivers for your graphics card is crucial for system stability.
You can update your GPU drivers in two main ways:
Method 1: Device Manager
- Open Device Manager. Press Windows key + X and select Device Manager from the menu.
- Expand Display Adapters. In the Device Manager window, find and expand the Display adapters category.
- Update Driver. Right-click on your graphics card (it will likely be listed under Display adapters, e.g., NVIDIA GeForce, AMD Radeon, Intel UHD Graphics) and select Update driver.
Alt text: Device Manager window, with ‘Display adapters’ category expanded, highlighting a graphics card driver ready to be updated.
- Search Automatically for Drivers. In the “Update Drivers” window, select Search automatically for drivers. Windows will search your system and the internet for the latest drivers.
Alt text: Update Drivers dialog box with two options: ‘Search automatically for drivers’ and ‘Browse my computer for drivers’, ‘Search automatically for drivers’ is highlighted.
- Install and Reboot. If Windows finds updated drivers, it will download and install them automatically. Once the installation is complete, close Device Manager and restart your computer.
Method 2: Manufacturer’s Website
For more control and to ensure you get the latest official drivers, you can download them directly from the GPU manufacturer’s website (NVIDIA, AMD, or Intel).
- NVIDIA: Go to the NVIDIA driver download page and select your graphics card model and operating system.
- AMD: Go to the AMD support and drivers page and select your graphics card model and operating system.
- Intel: Go to the Intel Download Center and search for drivers for your Intel integrated graphics.
Download the latest driver package, run the installer, and follow the on-screen instructions. After installation, restart your PC.
After updating your GPU drivers, check if the automatic restart issue is resolved.
5. Update BIOS
The BIOS (Basic Input/Output System) is firmware that initializes your hardware during system startup. An outdated BIOS can sometimes lead to compatibility issues and system instability, potentially causing automatic restarts. Updating your BIOS can resolve such issues, but it’s a more advanced procedure that should be done carefully.
Caution: BIOS updates are risky. Incorrectly updating your BIOS can render your motherboard unusable. Refer to your motherboard manufacturer’s manual or website for specific instructions on how to update your BIOS.
Generally, the process involves:
- Identify your BIOS version. You can usually find this information in the BIOS settings menu (accessed during startup, often by pressing Del, F2, or F12 keys) or using system information tools in Windows.
- Download the latest BIOS update. Visit your motherboard manufacturer’s website, find your motherboard model, and download the latest BIOS update file.
- Follow the manufacturer’s instructions. Each manufacturer has a specific method for updating the BIOS, often involving a USB drive and a utility within the BIOS settings. Refer to their guide carefully. Intel provides a general guide on updating BIOS here.
Note: Due to the risk of data loss or system damage during BIOS updates, it’s crucial to back up your important data before proceeding. Consider using professional data recovery software like Stellar Data Recovery Professional as a precautionary measure.
6. Run SFC Scan
System File Checker (SFC) is a built-in Windows utility that scans for and repairs corrupted or damaged system files. Corrupted system files can be a significant cause of system instability and automatic restarts. Running an SFC scan can help identify and fix these issues.
Here’s how to run an SFC scan:
- Open Command Prompt as Administrator. Press Windows key + S, type “cmd,” right-click on Command Prompt in the search results, and select Run as administrator.
Alt text: Windows search results for ‘cmd’, the ‘Command Prompt’ app is highlighted, and the context menu option ‘Run as administrator’ is open.
- Run SFC Command. In the elevated Command Prompt window, type the command
sfc /scannowand press Enter.
The SFC scan will begin, and it may take some time to complete. Ensure your computer remains powered on and uninterrupted during the scan.
Once the scan is finished, SFC will display the results. If it finds and repairs corrupted files, it will notify you. Restart your computer after the scan to implement any repairs.
7. Uninstall Problematic Third-Party Software
Newly installed or recently updated third-party software can sometimes conflict with your system or other applications, leading to automatic restarts. If you suspect a particular program might be the cause, uninstalling it can help resolve the issue.
To uninstall software:
- Open Settings App. Press Windows key + I to open the Settings app.
- Go to Apps. Click on Apps.
Alt text: Windows Settings window, the ‘Apps’ category is highlighted in the left-hand navigation menu.
- Go to Apps & features. Select Apps & features from the left sidebar.
- Locate Problematic Software. Scroll through the list of installed apps to find the software you suspect is causing the issue. You can also sort the list by installation date to find recently installed programs.
- Uninstall. Click on the problematic software, and then click the Uninstall button. Confirm your action when prompted by clicking Uninstall again.
Follow any on-screen instructions to complete the uninstallation process. After uninstalling the software, restart your computer and check if the automatic restarts persist.
8. Update Windows
Running an outdated version of Windows can lead to various issues, including system instability and automatic restarts. Windows updates often include bug fixes, performance improvements, and security patches that can resolve such problems.
To update Windows:
- Open Settings App. Press Windows key + I to open the Settings app.
- Go to Update & Security. Click on Update & Security.
- Go to Windows Update. Select Windows Update from the left sidebar.
- Check for Updates. Click the Check for updates button. Windows will scan for available updates.
- Install Updates. If updates are found, Windows will download and install them automatically. If you see an “Install now” button, click it to start the installation.
Alt text: Windows Update settings page showing available updates and a prominent ‘Install now’ button to begin the update process.
Allow Windows to install all updates, and then restart your computer when prompted. After updating Windows, check if the automatic restart issue is resolved.
9. Scan Your PC for Malware
Malware and viruses can cause a wide range of system problems, including automatic restarts. Running a full system scan with your antivirus software is essential to rule out malware as the cause.
To scan your PC for malware using Windows Security (Windows Defender):
- Open Settings App. Press Windows key + I to open the Settings app.
- Go to Update & Security. Click on Update & Security.
- Go to Windows Security. Select Windows Security from the left sidebar.
- Open Virus & threat protection. Click on Virus & threat protection.
- Run a Scan. Click on Quick scan or Scan options to choose a more thorough scan like Full scan. Follow the on-screen prompts to start the scan.
If the scan detects any malware, follow the recommended actions to remove or quarantine the threats. After the malware removal process, restart your computer and check if the automatic restarts have stopped.
Still Cannot Fix the Computer Auto Restart Problem?
If you’ve tried all the above troubleshooting steps and your computer is still restarting automatically, a more drastic measure might be necessary: reinstalling the Windows operating system. However, be aware that reinstalling Windows will erase all data on your system drive.
Data Backup is Crucial: Before reinstalling Windows, ensure you have a complete backup of all your important data. If you don’t have a backup and cannot access your system normally due to the restarts, you might need to use data recovery software to retrieve your files before proceeding with a clean installation.
Data Recovery: In situations where data loss occurs due to system issues or OS reinstallation, Stellar Data Recovery Professional for Windows can be a valuable tool. This software is designed to recover data from formatted, corrupted, crashed, or unbootable Windows PCs.
Conclusion
Dealing with a PC that automatically restarts can be a major headache, but by systematically troubleshooting, you can often pinpoint and resolve the underlying cause. From checking peripheral devices and power settings to updating drivers and scanning for malware, the steps outlined in this guide provide a comprehensive approach to repairing PC auto restart issues.
For advanced users, resetting power settings to default via Command Prompt using the powercfg –restoredefaultschemes command can also be helpful. Additionally, adjusting Windows Update settings to notify you before automatic reboots can give you more control over system restarts.
Remember, if data loss is a concern, especially when considering more advanced solutions like BIOS updates or OS reinstallation, having a data recovery tool like Stellar Data Recovery Professional can provide peace of mind and help you recover valuable files if needed.
By following these steps, you can effectively address the “how to repair pc auto restart” problem and restore stability to your Windows PC.