
That moment when you spot a scratch on your car paint can be frustrating. It might seem like a major issue, especially if you take pride in keeping your vehicle in pristine condition. Often, these blemishes are just minor clear coat scratches, the kind that happen from everyday wear and tear, like brushing against bushes or accidental key scrapes. The good news is, if the scratch is only in the clear coat, you don’t need to rush to a professional body shop. You can actually fix these shallow paint scratches yourself, right at home, with a few simple tools and a bit of know-how. It’s not as daunting as it looks! Learning how to make those minor surface scratches vanish is easier than you might think. All you’ll need is an affordable scratch repair kit and a drill to get started.
Let’s dive into the process of repairing those minor scratches and get your car looking its best again.
Determining If It’s a Minor Clear Coat Scratch
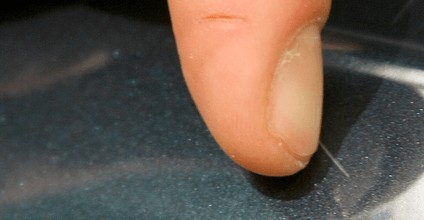
Before you start any repair work, it’s crucial to identify whether the scratch is indeed a minor clear coat issue or something more serious. The easiest way to check is using the fingernail test.
Run your fingernail gently across the scratch.
Here’s how to interpret the results:
-
If you can’t feel the scratch at all: This is the best-case scenario. It’s likely a very superficial scratch that might even buff out with just a polishing compound.
-
If you can feel the scratch, but your fingernail doesn’t catch: This is still considered a minor clear coat scratch. It means the damage is within the clear coat layer and hasn’t penetrated deeper. This type of scratch is perfect for DIY repair using a scratch removal kit.
However, if your fingernail catches noticeably in the scratch, or if you can see the color primer or even bare metal beneath, then the scratch is deeper and requires a different repair approach. For those types of damage, you’d need to look into techniques for repairing paint chips and deep scratches, which involve filling in the scratch with touch-up paint.
For minor scratches where your fingernail doesn’t catch, rest assured, these are fully repairable at home. The method involves using fine-grit sandpaper and polishing compounds to carefully level and restore the clear coat.
The 3M Scratch Removal System: Your DIY Solution
For effective and user-friendly DIY scratch repair, the 3M Scratch Removal System stands out as an excellent option. This kit is specifically designed for addressing clear coat scratches that haven’t gone beyond the color coat.
What makes the 3M Scratch Removal System so convenient is that it’s a comprehensive kit. It includes everything you need for the repair process:
- 3000 grit sandpaper: For gently leveling the clear coat.
- Two grades of foam polishing discs: A purple compounding pad and a black polishing pad for different stages of scratch removal and shine restoration.
- Backup plate for a drill: To attach the polishing discs to your drill for efficient buffing.
- Two car polish grades: Rubbing compound and scratch remover, formulated to work with the pads and restore your car’s paint finish.
These components are exactly what professionals use, just conveniently packaged for car owners to use at home. The system is designed to tackle common clear coat damage like fine scratches around door handles, on doors, or the trunk.
The way it works is by carefully removing a very thin layer of the clear coat, just enough to level out the scratch and surrounding area. Don’t worry, it’s a controlled process that’s safe for your car’s paint when done correctly.
To use the 3M system effectively, you’ll also need a few additional items:
- A drill (1200-1600 RPM): A standard corded or a dual-speed cordless drill will work perfectly.
- Microfiber cloths: For cleaning, applying compound and polish, and wiping away residue.
- Spray bottle with water: To keep the sanding area wet during the sanding process.
With the right tools and the 3M Scratch Removal System, you’re well-equipped to tackle those minor clear coat scratches.
5-Step Process to Remove Minor Car Scratches
Think of this process like refinishing wood or smoothing out drywall – it’s about gradually refining the surface. The scratch repair process is straightforward and typically takes around an hour to complete.
Here are the five key steps to follow:
-
Prepare the Surface: Begin by thoroughly cleaning the scratched area. Wash away any dirt, grime, or wax. Make sure the area is completely clean and dry before proceeding.
-
Sand the Scratch: Take the 3000 grit sandpaper and lightly wet it with water from your spray bottle. Gently sand the scratched area by hand using light pressure in straight, back-and-forth motions. Continue sanding until the scratch is no longer visually apparent. Keep the area slightly wet while sanding.
-
Refine the Sanded Area (Compounding): Attach the disc pad holder to your drill and then attach the purple compounding pad to the holder. Apply a small, quarter-sized amount of 3M Rubbing Compound onto the center of the purple pad. Using the drill at a moderate speed (around 1200-1600 RPM), buff the sanded area using overlapping passes. This step refines the sanding marks and further removes the scratch. Continue until sanding marks are gone and the area looks more uniform.
-
Polish and Restore Shine: Switch to the black polishing pad and apply a quarter-sized amount of 3M Scratch Remover onto the black pad. Buff the compounded area with the black pad and scratch remover, using the same technique as in the compounding step. This polishing step will remove any remaining fine scratches and restore the clear coat’s shine and clarity.
-
Protect the Repaired Area: For extra protection and to enhance the shine, apply a coat of quality car wax to the repaired section. You can wax the entire vehicle for consistent protection and shine.
Remember to focus on one small scratched area at a time. Don’t try to fix multiple scratches all at once. Working in sections ensures you’re addressing each scratch effectively.
By following these steps, you can effectively repair minor clear coat scratches and bring back the flawless finish to your car’s paintwork. With a little patience and the right tools, you can achieve professional-looking results right in your garage.