
Leather car seats bring a touch of luxury and comfort to any vehicle. However, daily use, sun exposure, and accidental spills can take their toll, leading to issues like fading, cracks, scratches, stains, discoloration, peeling, and tears. Knowing how to repair leather car seats is essential for maintaining your car’s interior and preserving its value. This comprehensive guide will walk you through common leather car seat problems and provide step-by-step repair solutions, ensuring your leather seats look and feel their best for years to come.
Common Leather Car Seat Problems and How to Identify Them
Before you start any repair work, it’s crucial to identify the specific type of damage affecting your leather car seats. Each issue requires a different approach and specific products. Here are some of the most common problems:
Fading Leather
Fading is often the first sign of aging and sun damage. Leather car seats exposed to prolonged sunlight and heat can lose their vibrant color, appearing dull and washed out.
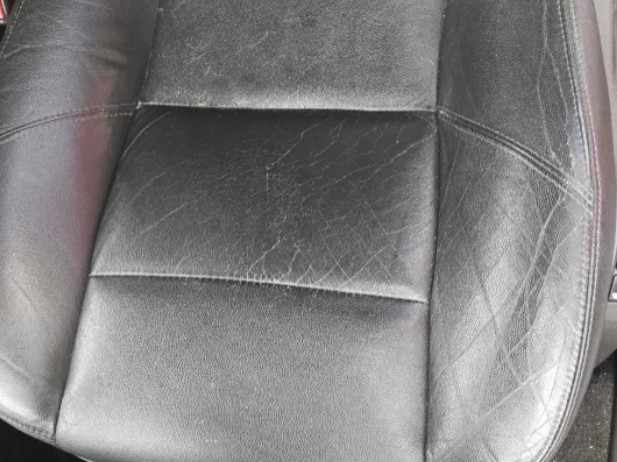
Cracked Leather
Cracking occurs as leather loses its natural oils and moisture, becoming brittle and inflexible. Age, wear and tear, and temperature fluctuations contribute to leather cracking.
Scratched Leather
Scratches are surface-level damages often caused by sharp objects, pets’ claws, or even clothing rubbing against the leather. They can range from minor scuffs to deeper gouges.
Stained Leather
Stains result from spills, food residue, sweat, or dyes transferring from clothing. Leather is porous and can readily absorb liquids, making stain removal a common repair task.
Discolored Leather
Discoloration is uneven color fading or patches appearing on the leather surface. Prolonged sun exposure and inconsistent cleaning can lead to discoloration.
Peeling Leather
Peeling is a more severe form of damage where the top protective layer of the leather separates from the underlying material. This is often caused by age, dryness, and wear.
Torn Leather
Tears are physical rips or punctures in the leather, usually caused by sharp objects or excessive stress. Tears require more involved repair techniques to restore the seat’s integrity.
Step-by-Step Guides to Repairing Leather Car Seats
Once you’ve identified the problem, you can proceed with the appropriate repair method. Here’s how to tackle each common leather car seat issue:
Repairing Faded Leather Car Seats
Faded leather can often be revitalized with leather dye or color restorer.
- Clean the Leather: Use a leather cleaner to remove dirt and grime.
- Apply Leather Dye or Restorer: Choose a dye that matches your original seat color. Apply it sparingly with a sponge or cloth, working in thin layers.
- Test in an Inconspicuous Area: Before applying to the entire seat, test the dye on a hidden area to ensure color match and desired result.
- Apply Multiple Coats: Allow each coat to dry completely before applying the next, until the desired color depth is achieved.
- Condition the Leather: After dyeing, apply a leather conditioner to restore moisture and suppleness.
Restoring Cracked Leather Car Seats
Cracked leather needs to be filled and conditioned to regain its smooth surface.
- Clean the Leather: Thoroughly clean the cracked area with a leather cleaner.
- Trim Loose Fibers: Carefully trim any loose threads or peeling edges around the cracks.
- Apply Leather Filler: Use a leather repair compound or filler paste to fill the cracks. Apply with a palette knife, working the filler into the cracks.
- Smooth the Filler: Allow the filler to dry, then gently sand it smooth with fine-grit sandpaper.
- Re-Color if Needed: If the filler is a different color, use leather dye to match the surrounding leather.
- Condition the Leather: Apply a leather conditioner to soften the repaired area and prevent further cracking.
Fixing Scratches on Leather Car Seats
Minor scratches can often be buffed out or concealed with leather conditioners and repair kits.
- Clean the Area: Clean the scratched area with a leather cleaner.
- Apply Leather Conditioner: For light scratches, apply a leather conditioner and rub it in using a circular motion with a soft cloth. This can often make minor scratches disappear.
- Use a Leather Repair Kit: For deeper scratches, use a leather scratch repair kit. These kits typically include a filler, colorant, and sealant.
- Apply Filler (if needed): For deeper gouges, apply a small amount of leather filler into the scratch, smooth it, and let it dry.
- Apply Colorant: Use the colorant from the kit to match the original leather color and blend the repaired area.
- Seal and Condition: Apply a leather sealant and then a conditioner to protect and moisturize the repaired scratch.
Removing Stains from Leather Car Seats
Stain removal requires prompt action and appropriate cleaning agents.
- Identify the Stain: Determine the type of stain (water-based, oil-based, ink, etc.) to choose the right cleaner.
- Clean Immediately: Act quickly for fresh stains. Blot (don’t rub) the stain with a clean cloth to absorb as much of the spill as possible.
- Use Leather Cleaner: Apply a leather cleaner specifically designed for stain removal. Follow the product instructions carefully.
- For Stubborn Stains: For ink stains, try an alcohol-based leather cleaner cautiously, testing in an inconspicuous area first.
- Condition After Cleaning: After stain removal, always apply a leather conditioner to replenish the leather’s moisture.
Revitalizing Discolored Leather Car Seats
Discoloration can be addressed with cleaning, conditioning, and sometimes re-dyeing.
- Gentle Cleaning: Clean the discolored area with a mild leather cleaner and a soft, damp cloth.
- Leather Conditioner: Apply a generous amount of leather conditioner and let it soak in. This can often even out minor discoloration.
- Re-Dyeing (if necessary): For severe discoloration, consider re-dyeing the leather following the steps for faded leather repair. Ensure you choose a color that blends seamlessly with the original seat color.
- Protective Treatment: After revitalizing, apply a leather protector to shield against future discoloration.
Repairing Peeling Leather Car Seats
Peeling leather requires re-adhering the loose layers and protecting the repaired area.
- Clean the Peeling Area: Clean the affected area to remove dirt and loose flakes.
- Apply Leather Glue: Use a specialized leather glue to carefully apply adhesive to the underside of the peeling leather and the exposed seat surface.
- Reattach and Press: Gently press the peeling leather back into place, ensuring a secure fit. Hold pressure or use tape to keep it in place while the glue dries.
- Apply Leather Filler (if needed): Fill any gaps or unevenness with leather filler.
- Re-Color and Condition: If needed, re-color the filled area to match, and then apply leather conditioner to protect and soften the repaired section.
Fixing Tears in Leather Car Seats
Tears require patching or stitching, depending on the size and location.
- Assess the Tear: Determine the size and severity of the tear. Small tears can be glued, larger tears may need patching or stitching.
- Clean the Area: Clean around the tear to remove dirt and debris.
- Trim Frayed Edges: Carefully trim any frayed edges for a cleaner repair.
- Apply Leather Glue (for small tears): For small, clean tears, apply leather glue to the edges and press them together, holding until dry.
- Use a Leather Patch (for larger tears): For larger tears, cut a leather patch slightly larger than the tear. Insert it under the tear if possible, or place it over the tear. Secure with leather glue.
- Stitching (for stress areas or large tears): For tears in high-stress areas, stitching may be necessary for added strength. Stitch the tear closed using a leather needle and thread, or stitch the patch in place.
- Apply Filler and Colorant (if needed): Fill any gaps or unevenness with leather filler, then re-color to match the surrounding leather.
- Condition the Leather: Finish with leather conditioner to restore moisture and flexibility.
Maintaining Your Leather Car Seats After Repair
Repairing leather car seats is only half the battle. Proper maintenance is crucial to prevent future damage and keep your leather looking its best.
- Regular Cleaning and Conditioning: Clean and condition your leather seats every 1-3 months, or more frequently in harsh climates.
- Protect from Sunlight: Park in shaded areas or use sunshades to minimize UV exposure, which causes fading and cracking.
- Promptly Clean Spills: Address spills immediately to prevent staining.
- Avoid Sharp Objects: Be mindful of sharp objects that can scratch or tear the leather.
- Use Leather Protectors: Apply leather protectors to create a barrier against stains and wear.
DIY Leather Car Seat Repair: Is It Worth It?
Repairing leather car seats yourself is definitely achievable and cost-effective for most common issues. With the right tools, products, and a little patience, you can restore your leather seats and avoid expensive professional repairs or replacements. Investing in a quality leather repair kit and dedicating some time to maintenance can significantly extend the life and beauty of your car’s leather interior, ensuring you enjoy the luxury and comfort for years to come.