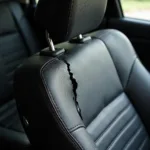
Leather car seats add a touch of luxury and sophistication to any vehicle. However, over time, the stitching on leather seats can become worn, torn, or damaged, detracting from the overall appearance of your car’s interior. Fortunately, repairing leather car seat stitching is a manageable task that can be done at home with the right tools and techniques. This comprehensive guide will walk you through the process step-by-step, providing you with the knowledge and confidence to restore your leather car seats to their former glory.
Assessing the Damage and Gathering Your Supplies
Before you begin the repair, it’s essential to assess the extent of the damage to your leather car seat stitching. This will help you determine the best course of action and gather the necessary supplies.
Types of Stitching Damage:
- Loose Stitches: This is the most common type of damage, where the thread has become loose over time.
- Torn Stitches: The thread itself has broken, leaving a gap in the stitching.
- Worn Stitches: The thread has become frayed or weakened, making it prone to tearing.
Supplies Needed:
- Leather Repair Kit: These kits are readily available online or at auto parts stores and typically include a curved needle, heavy-duty thread, and other essential tools.
- Leather Cleaner and Conditioner: Clean and condition the leather before and after the repair to ensure optimal results and longevity.
- Scissors: For cutting thread and any loose fibers.
- Masking Tape: Optional, but helpful for holding the edges of the tear together while you stitch.
Step-by-Step Guide to Repairing Leather Car Seat Stitching
Once you have assessed the damage and gathered your supplies, follow these steps to repair the stitching on your leather car seats:
- Clean the Area: Thoroughly clean the area around the damaged stitching with a leather cleaner to remove any dirt, grime, or debris. Allow the leather to dry completely before proceeding.
-
Prepare the Thread: Select a heavy-duty thread from your leather repair kit that closely matches the color of your car’s stitching. Cut a length of thread that is long enough to complete the repair, leaving a few inches of extra thread at each end.
-
Thread the Needle: Thread the curved needle with the prepared thread. If your kit includes a threading tool, use it to make the process easier.
-
Begin Stitching: If the stitching is torn, use masking tape to temporarily hold the edges of the tear together. Starting from the inside of the seat, carefully insert the needle through the existing stitch hole. If there is no existing hole, use the needle to create a new one, ensuring it aligns with the other stitch holes.
-
Continue Stitching: Continue stitching along the damaged area, using a simple straight stitch or a more durable saddle stitch. Ensure the stitches are evenly spaced and pulled taut, but not too tight.
-
Finishing the Repair: Once you reach the end of the damaged area, tie off the thread securely on the underside of the leather. Trim any excess thread.
-
Condition the Leather: Apply a leather conditioner to the repaired area and the surrounding leather to keep it moisturized and protected.
Tips from a Car Upholstery Expert
Johnathan Miller, a seasoned car upholstery expert with over 20 years of experience, shares his insights on leather car seat stitching repair:
“Many car owners overlook the importance of using a curved needle for this type of repair. The curved needle allows you to easily follow the contour of the seat and achieve a professional-looking result.”
He also emphasizes the significance of using high-quality materials:
“Investing in a reputable leather repair kit and using heavy-duty thread specifically designed for leatherwork can make a significant difference in the durability and longevity of your repair.”
Maintaining Your Repaired Leather Car Seats
To prolong the life of your repaired leather car seats and prevent future damage, consider these maintenance tips:
- Regular Cleaning: Clean your leather seats regularly with a pH-neutral leather cleaner to remove dirt and grime that can cause wear and tear.
- Conditioning: Use a high-quality leather conditioner to keep the leather moisturized and prevent cracking or drying.
- UV Protection: Park your car in the shade or use a sunshade to protect your leather seats from harmful UV rays that can fade and damage the leather.
Conclusion
Repairing the stitching on your leather car seats is an achievable task that can significantly enhance the appearance and value of your vehicle. By following the steps outlined in this guide and using the right tools and techniques, you can restore your leather car seats to their former glory and enjoy a more comfortable and stylish driving experience.


