
Discovering a large hole in your car body can be frustrating. Whether it’s from rust, an old accident, or in the case of some grey market imports, modifications for now-removed accessories, you’re likely looking for a solution. While welding is often considered the most robust repair method, it’s not always accessible or practical for every DIY enthusiast. If you’re not equipped for welding or prefer a no-weld approach, don’t worry. There are effective methods to repair a large hole in your car body and restore its appearance. This guide from Car Repair Online will walk you through the best techniques for repairing those unsightly holes without picking up a welding torch.
Assessing the Damage and Choosing Your Repair Method
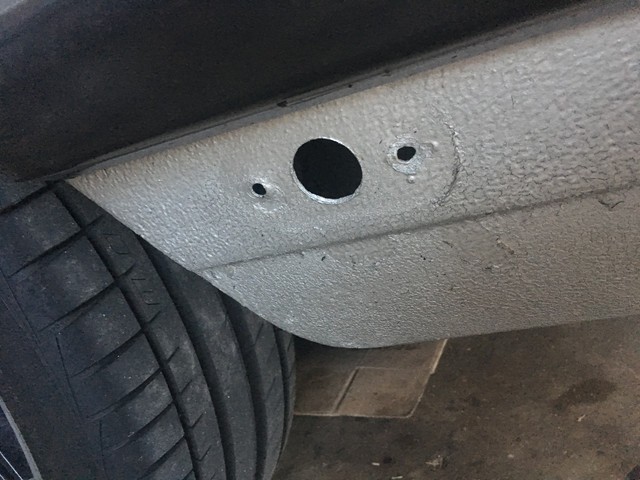
Before diving into the repair, it’s crucial to assess the size and location of the hole. A “large hole” can be subjective, but for the purpose of this guide, we’re addressing holes roughly 30mm (1 inch) or larger in diameter, like the one shown below, often found after removing items like aftermarket lights or trim.
For these larger holes, simply filling with body filler alone isn’t advisable as it lacks structural integrity and can crack or fail over time, especially in areas prone to vibration or stress. We need to provide a solid backing and reinforcement. Here are the primary methods we’ll explore for a durable, no-weld repair:
- Panel Adhesive and Metal Patch: This method involves bonding a metal patch to the backside of the hole using panel adhesive, providing a strong and permanent repair.
- Fiberglass Patching: Fiberglass is another excellent material for creating a strong backing for body filler, particularly suitable for complex curves or larger, irregular holes.
Let’s delve into each method step-by-step.
Method 1: Panel Adhesive and Metal Patch – A Strong and Seamless Solution
Panel adhesive has revolutionized auto body repair, offering incredible bonding strength without the heat and potential distortion of welding. This method is ideal for creating a robust repair that will last.
Materials You’ll Need:
- Sheet metal patch (slightly larger than the hole)
- Panel adhesive (automotive-grade, two-part epoxy) and applicator gun
- Wax and grease remover
- Sandpaper (various grits, e.g., 80, 180, 320)
- Body filler
- Spreader for body filler
- Grinder or rotary tool with a metal cutting wheel
- Safety glasses and gloves
- Rust preventative primer
- Paint (primer, base coat, clear coat) matching your car’s color
Step-by-Step Guide:
-
Prepare the Area: Thoroughly clean the area around the hole, both inside and out, with wax and grease remover. Remove any rust, dirt, or loose paint using sandpaper or a wire brush. The goal is to have clean, bare metal for optimal adhesion.
-
Create a Metal Patch: Cut a piece of sheet metal to create a patch that is larger than the hole, extending at least an inch beyond all edges of the hole. You can use the grinder or metal cutting wheel for this. Ensure the patch is clean and free of grease.
-
Apply Panel Adhesive: Following the manufacturer’s instructions, apply panel adhesive to the backside of the car panel around the hole and to the metal patch. Be generous but avoid excessive application that will squeeze out and create a mess.
-
Bond the Patch: Carefully position the metal patch over the hole from the backside, pressing firmly to ensure good contact and adhesion. You can use clamps or weights to hold the patch in place while the adhesive cures. Allow the adhesive to cure completely according to the product instructions (usually several hours).
-
Shape and Sand the Patch: Once the adhesive is cured, the patch will provide a solid backing. You may need to lightly hammer and dolly the patch to match the contour of the surrounding panel. Sand down any excess adhesive and blend the edges of the patch with 80-grit sandpaper, gradually moving to finer grits (180, 320) to smooth the area.
-
Apply Body Filler: Apply a thin layer of body filler over the patched area to smooth out any imperfections and create a seamless transition with the original panel. Apply in thin coats, allowing each coat to dry completely before sanding.
-
Sand the Body Filler: Sand the body filler using progressively finer grits of sandpaper (180, 320, 400) until you achieve a perfectly smooth and level surface that matches the surrounding panel.
-
Prime and Paint: Apply a rust preventative primer to the repaired area and let it dry. Then, apply your car’s color-matched base coat and clear coat according to the paint manufacturer’s instructions. Blend the paint into the surrounding area for a seamless finish.
Method 2: Fiberglass Patching – Versatile and Durable
Fiberglass is another excellent option for repairing large holes, especially when dealing with irregular shapes or areas where you need to build up strength and contour.
Materials You’ll Need:
- Fiberglass cloth or mat
- Fiberglass resin and hardener
- Mixing cups and stir sticks
- Wax and grease remover
- Sandpaper (various grits, e.g., 80, 180, 320)
- Body filler
- Spreader for body filler
- Scissors or utility knife
- Paintbrushes or disposable brushes
- Safety glasses, respirator, and gloves
- Rust preventative primer
- Paint (primer, base coat, clear coat) matching your car’s color
Step-by-Step Guide:
-
Prepare the Area: Clean the area around the hole thoroughly with wax and grease remover, both inside and out. Remove any rust, loose paint, or debris. Sand the area around the hole to create a rough surface for the fiberglass resin to adhere to.
-
Cut Fiberglass Patch: Cut pieces of fiberglass cloth or mat slightly larger than the hole. It’s best to cut several layers of varying sizes, with each layer slightly larger than the last, to create a tapered and stronger patch.
-
Mix Fiberglass Resin: In a well-ventilated area and wearing a respirator and gloves, mix the fiberglass resin and hardener according to the manufacturer’s instructions. Work in small batches as fiberglass resin has a limited working time.
-
Apply Fiberglass Patch: Using a brush, apply a coat of resin to the area around the hole on the backside of the panel. Lay the first layer of fiberglass cloth over the hole and saturate it with resin using the brush. Continue layering fiberglass cloth and resin, saturating each layer until you have built up a solid patch that extends beyond the edges of the hole.
-
Allow Fiberglass to Cure: Let the fiberglass resin cure completely according to the product instructions. This may take several hours or overnight.
-
Sand and Shape Fiberglass: Once cured, sand the fiberglass patch to remove any rough edges and high spots. Start with 80-grit sandpaper and gradually move to finer grits (180, 320) to shape and smooth the fiberglass patch.
-
Apply Body Filler and Finish: Apply body filler over the fiberglass patch to fill any remaining imperfections and create a smooth, seamless surface. Sand the body filler as described in Method 1, prime, and paint to match your car’s finish.
Important Considerations for a Lasting Repair
Regardless of the method you choose, keep these points in mind for a successful and long-lasting repair:
- Rust Prevention: Always address any rust thoroughly before beginning the repair. Apply a rust preventative primer to bare metal surfaces to prevent future corrosion.
- Surface Preparation is Key: Proper cleaning, sanding, and degreasing are essential for good adhesion of panel adhesive, fiberglass resin, and body filler.
- Patience is a Virtue: Allow ample time for adhesives, resins, and fillers to cure completely before sanding or applying subsequent layers. Rushing the process can lead to weaker repairs and potential issues down the line.
- Paint Matching: For a truly seamless repair, take the time to properly color match your paint and blend it into the surrounding panels.
By following these methods and taking your time, you can effectively repair a large hole in your car body without welding, restoring its appearance and protecting it from the elements. Remember to always prioritize safety and follow the manufacturer’s instructions for all products used in the repair process.
This guide from Car Repair Online provides you with the knowledge to tackle this repair yourself. With the right materials and techniques, you can achieve professional-looking results and get your car looking its best again.