
Weather stripping, often overlooked, plays a crucial role in maintaining your car’s comfort and integrity. This humble rubber lining acts as a barrier against the elements, noise, and even pests, ensuring a pleasant and protected driving experience. However, like any car component exposed to the elements, weather stripping can suffer from wear and tear, including developing holes that compromise its effectiveness. Understanding how to repair these holes is a valuable skill for any car owner looking to maintain their vehicle and avoid more costly replacements.
Weather stripping, similar to often-ignored parts like spare tires or sway bar links, becomes noticeable only when it malfunctions. As Bob Lacivita, a master technician and automotive instructor, explains, “Weather stripping… are totally ignored until they go bad or are damaged. But they are important to your driving experience, comfort, and health.”
Damage to car door weather stripping is common. It can occur from freezing to the door frame, leading to tears upon opening, or from prolonged exposure to ultraviolet (UV) rays, causing the rubber to degrade and develop cracks or holes. Regular wear and tear, such as friction from entering and exiting the vehicle or loading items into the trunk, can also contribute to damage.
While significant damage might necessitate professional replacement, repairing small holes in weather stripping is often a straightforward DIY task. This guide will walk you through the steps to effectively repair holes in your car door’s weather stripping, saving you money and maintaining your car’s weather seal.
Understanding Car Weather Stripping and Its Vital Functions
Car weather stripping is the flexible rubber or foam material that lines the edges of your car doors, windows, trunk, hood, and even windshield. Its primary function is to create a tight seal when these components are closed, effectively isolating the interior of your vehicle from the outside world. This seal provides numerous benefits:
- Keeps out the Elements: Weather stripping prevents rain, snow, wind, and dust from entering your car, ensuring a dry and clean interior.
- Reduces Noise Intrusion: It significantly minimizes road noise and wind noise, contributing to a quieter and more comfortable cabin.
- Maintains Interior Climate: By sealing air gaps, weather stripping helps your car’s heating and cooling systems work more efficiently, saving energy and maintaining a comfortable temperature inside.
- Prevents Mold and Mildew: By keeping moisture out, weather stripping helps prevent the growth of mold and mildew, which can cause unpleasant odors and health issues.
- Protects Vehicle Integrity: It helps protect the car’s body from water damage and corrosion by preventing water from seeping into crevices and seams.
- Enhances Driving Comfort: A well-sealed cabin is crucial for overall driving comfort, especially during long journeys or in harsh weather conditions.
- Maintains Vehicle Value: Properly functioning weather stripping contributes to the overall condition and resale value of your vehicle.
To check the effectiveness of your weather stripping, try the “dollar bill test.” As Lacivita suggests, “To test weather stripping fit, place a dollar bill between the weather strip and the part being sealed. Feeling resistance when pulling the bill out signifies a good seal.” If the bill pulls out easily, your weather stripping may be worn or damaged, and if you notice holes, repair is necessary.
Identifying Holes and Assessing Damage in Weather Stripping
Before you begin any repair, it’s essential to thoroughly inspect your car door’s weather stripping to identify the extent and nature of the damage. Look for:
- Visible Holes: These are often the most obvious signs of damage. Holes can range from small punctures to larger tears or gaps in the rubber.
- Cracks and Tears: Examine the weather stripping for any cracks or tears in the rubber. These can also compromise the seal and may eventually develop into holes.
- Dry Rot: Dry rot is a common issue, especially in older vehicles or those exposed to harsh sunlight. It makes the rubber brittle, cracked, and prone to breaking, often leading to holes.
- Loose or Detached Stripping: Check if the weather stripping is properly attached to the door frame. Loose or detached sections won’t seal effectively and may be more susceptible to damage.
- Signs of Leaks: Water stains inside the car door frame or a musty smell can indicate water leaks due to damaged weather stripping, possibly with holes you haven’t yet located.
- Increased Wind Noise: Noticeably louder wind noise while driving, especially around doors or windows, can be a symptom of damaged weather stripping with holes allowing air to pass through.
Once you’ve assessed the damage, determine if repairing the holes is feasible. Small, isolated holes in otherwise good condition weather stripping are ideal candidates for DIY repair. However, if the weather stripping is extensively damaged, brittle from dry rot, or has multiple large holes, replacement might be a more practical and long-lasting solution.
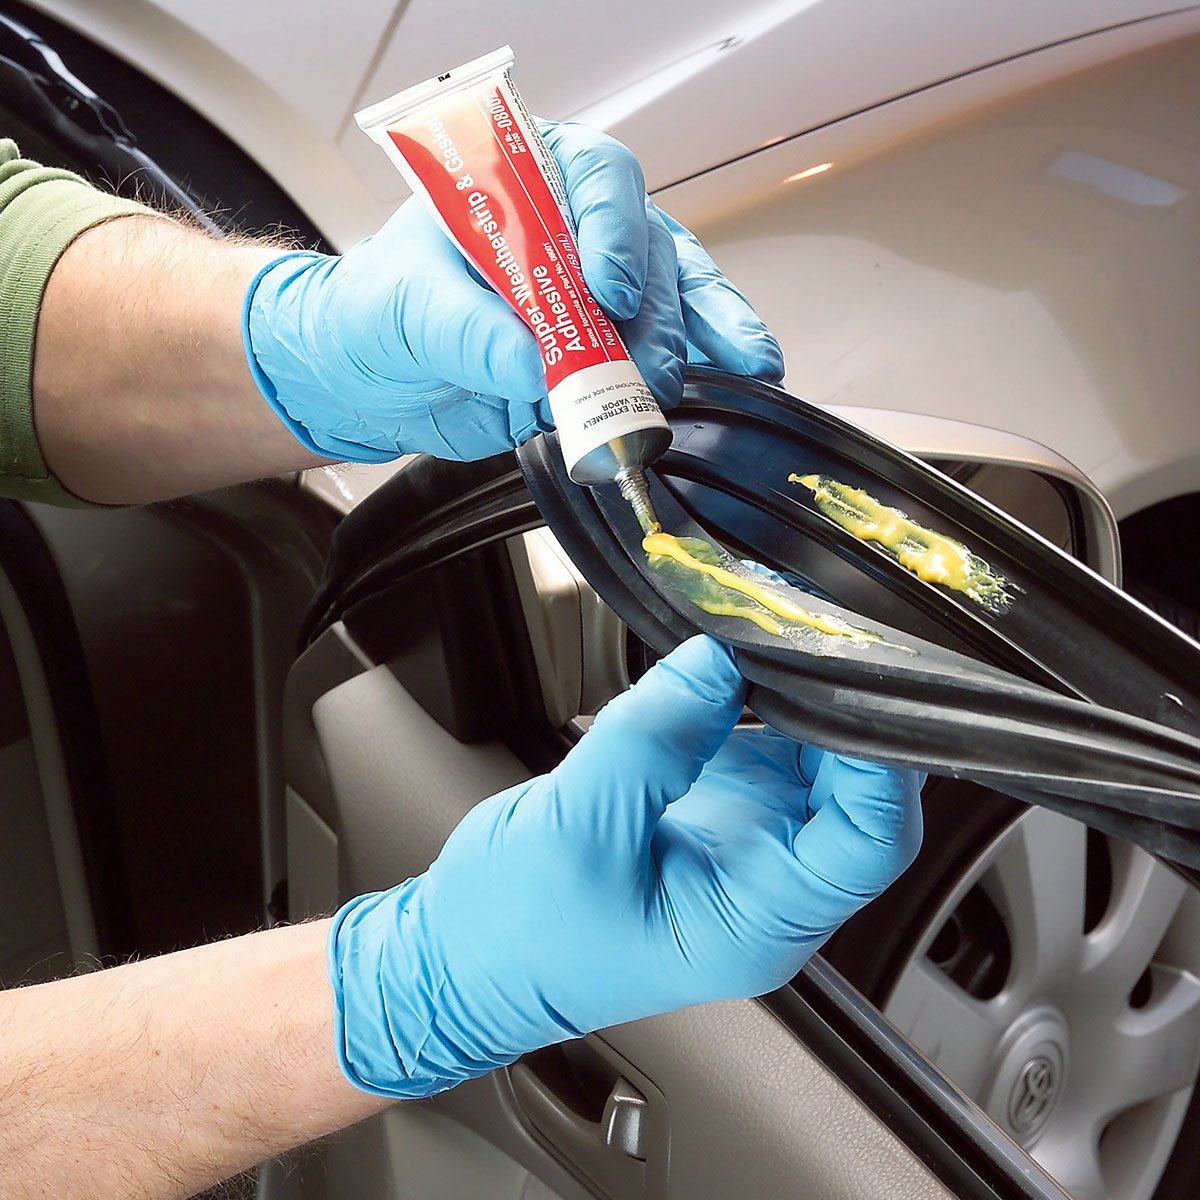 Applying glue on the stripping of the car door
Applying adhesive to car door weather stripping for repair.
Step-by-Step Guide: Repairing Holes in Car Door Weather Stripping
For minor holes, patching is an effective way to restore the integrity of your weather stripping. Here’s how to repair holes on weather stripping on your car door:
Tools You’ll Need:
- Flathead screwdriver (for gently prying if needed)
- Clean, dust-free rags or microfiber towels
- Utility knife or sharp scissors (for trimming repair materials if needed)
Materials You’ll Need:
- Weather strip adhesive (specifically designed for rubber weather stripping)
- Silicone spray lubricant (optional, for inserting foam backer rod)
- Foam backer rod (optional, for larger holes)
- Adhesive remover (for cleaning old adhesive residue, if necessary)
- Sandpaper (fine-grit, for lightly prepping the surface, optional)
Step 1: Clean the Damaged Area
- Thoroughly clean the area around the hole on the weather stripping. Use a clean, damp rag to remove any dirt, dust, or debris.
- If there is old, flaky rubber around the hole, gently remove it with a soft brush or your fingers. Be careful not to enlarge the hole.
- For best adhesion, ensure the area is completely dry before proceeding.
Step 2: Prepare the Adhesive
- Read the instructions on your weather strip adhesive carefully. Some adhesives require a specific application method or drying time.
- Have your adhesive ready for application.
Step 3: Apply Adhesive to Repair Small Holes
- For small holes or punctures, apply a small amount of weather strip adhesive directly into the hole.
- Use a toothpick or a small applicator to carefully push the adhesive into the hole and ensure it fills the gap.
- If the hole is more like a tear, carefully bring the edges of the tear together and apply adhesive along the seam to bond them.
- Wipe off any excess adhesive immediately with a clean rag and a solvent-based cleaner as recommended by the adhesive manufacturer. Adhesive remover can also be used carefully to clean up excess.
Step 4: Patch Larger Holes with Foam Backer Rod (Optional)
- For larger holes where simply filling with adhesive isn’t sufficient, you can use a foam backer rod as filler.
- Cut a small piece of foam backer rod slightly larger than the hole.
- Lubricate the foam backer rod with silicone spray to make it easier to insert.
- Carefully insert the foam backer rod into the hole, pushing it in until it fills the gap and sits flush with the surface of the weather stripping. You might use a small tool like a blunt metal rod or even a capped pen to gently push it in.
- Apply weather strip adhesive around the edges of the patch to secure it and seal the hole completely.
Step 5: Allow Adhesive to Cure
- Allow the weather strip adhesive to cure completely according to the manufacturer’s instructions. This usually takes a few hours.
- Keep the car door closed during the curing time to avoid disturbing the repair and ensure proper bonding.
- Avoid touching or testing the repair until the adhesive is fully cured.
Step 6: Test and Clean Up
- Once the adhesive is cured, gently open and close the car door to test the repair. Check if the seal is restored and if the door closes smoothly.
- Inspect the repaired area for any gaps or excess adhesive.
- Clean up any remaining excess adhesive with a clean rag and adhesive remover, if needed.
Maintaining Your Car Weather Stripping to Prevent Holes
Preventative maintenance is key to extending the life of your car weather stripping and minimizing the chances of developing holes or other damage. Regular maintenance is simple and can save you from premature replacements. Follow these tips:
- Regular Cleaning: Clean your weather stripping regularly, especially the back side where dirt and debris accumulate. Use car wash soap and a soft brush or sponge.
- Thorough Drying: After washing, dry the weather stripping completely with a microfiber towel. Moisture can contribute to degradation over time.
- Apply Silicone Protectant: Apply a silicone-based rubber protectant or silicone paste every few months. This keeps the rubber soft, flexible, and resistant to drying and cracking, which are precursors to holes. Bob Lacivita recommends a spray-pump protectant over aerosol sprays, as some aerosol propellants can harm rubber. Apply a second coat if the weather stripping is older or appears dry.
- Avoid Harsh Chemicals: Do not use harsh chemicals or solvents to clean weather stripping, as these can damage the rubber. Stick to car wash soap and water.
- Inspect Regularly: Periodically inspect your weather stripping for signs of wear, cracks, or loose sections. Catching minor issues early can prevent them from developing into larger problems like holes.
- Lubricate in Winter: In cold climates, apply silicone spray lubricant to the weather stripping before winter to prevent it from freezing to the door frame, which can cause tears when you open the door.
Thomas Patterson from Glass Doctor emphasizes the importance of protectants: “A good coating of any silicone-based protectant can always extend the life of the weatherstrip. When detailing the inside of the car, use the same protectant on the seals you used on the leather or vinyl trim.”
When to Consider Weather Stripping Replacement
While repairing holes is effective for minor damage, there are situations where replacing the weather stripping is the better option:
- Extensive Damage: If the weather stripping has multiple large holes, tears, or is significantly deteriorated over a large area, replacement is more practical than trying to patch numerous sections.
- Dry Rot: If the rubber is brittle, cracked throughout, and shows signs of extensive dry rot, it’s likely nearing the end of its lifespan. Replacement will provide a more reliable and long-term solution.
- Loose or Warped Stripping: If the weather stripping is significantly warped, misshapen, or no longer fits properly in its channel, it won’t seal effectively even after patching holes. Replacement ensures a proper fit and seal.
- Difficulty Finding Matching Material: For some vehicles, especially older or specialized models, finding a compatible weather stripping adhesive and patching material might be challenging. In such cases, sourcing and installing a new, vehicle-specific weather stripping might be more straightforward.
- Professional Recommendation: If you are unsure about the extent of the damage or the best course of action, consult a professional mechanic or auto glass specialist. They can assess the weather stripping and recommend whether repair or replacement is necessary.
Replacing weather stripping can range in cost. Generic rolls of self-stick or friction weather stripping are relatively inexpensive. However, vehicle-specific weather stripping, especially for areas like sunroofs or requiring trim removal, can be significantly more costly, as Bob Lacivita notes, potentially reaching up to $800 for complex replacements.
Repairing holes in your car door weather stripping is a cost-effective DIY solution for minor damage. By following these steps and practicing regular maintenance, you can keep your car’s weather stripping in good condition, ensuring a comfortable, quiet, and protected driving experience for years to come.