
A sagging car headliner can be an eyesore and a nuisance, but it’s a common problem many car owners face. Beyond aesthetics, a drooping headliner can also indicate underlying issues like moisture damage. If you’re wondering how to fix a sagging headliner without the hassle and expense of complete removal, you’ve come to the right place. This comprehensive guide will walk you through effective DIY methods to restore your car’s headliner, saving you time and money. Let’s dive in!
Understanding Your Car Headliner
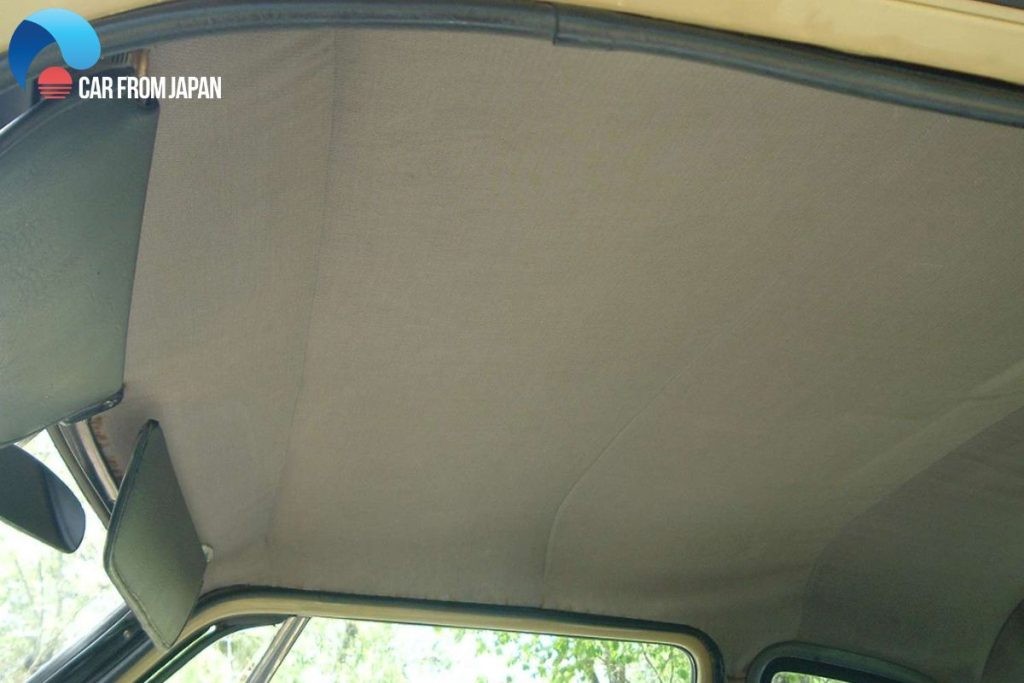
First, let’s clarify what a headliner is and why it’s important. The headliner is the fabric material that lines the interior roof of your car. It’s not just for looks; it plays several crucial roles:
- Aesthetics: It provides a smooth, finished look to the car’s interior.
- Noise Reduction: The headliner helps absorb road noise and vibrations, contributing to a quieter cabin.
- Insulation: It acts as a thermal barrier, helping to keep the car cooler in hot weather and warmer in cold weather.
- Comfort: It provides a softer, more pleasant surface than the bare metal roof.
A typical car headliner is constructed with multiple layers. The visible fabric is often bonded to a foam backing, usually polyurethane, which is then attached to a rigid headliner board. This board is secured to the car’s roof frame. The foam layer is key for both comfort and insulation.
Why Car Headliners Sag: Common Causes
Over time, you might notice your car’s headliner starting to sag or droop. This happens when the adhesive holding the fabric to the backing board weakens. Here are the primary culprits behind a sagging car headliner:
- Heat and Sunlight: Extreme heat, especially from direct sunlight beating down on your car roof, is the most common cause. Heat degrades the adhesive, causing it to lose its bond and the fabric to detach.
- Humidity and Moisture: Moisture, whether from humidity or leaks, can penetrate the headliner and foam backing. This moisture can break down the adhesive and cause the foam to deteriorate, leading to sagging and warping.
- Age: Like any material, the adhesive in your car headliner degrades over time. Even without extreme heat or moisture, the natural aging process can cause the bond to weaken.
- Poor Initial Installation: In some cases, a sagging headliner can be attributed to poor installation at the factory or during a previous repair. Insufficient adhesive or improper techniques can lead to premature sagging.
- Physical Damage: While less common, physical strain from passengers, especially children or pets pulling or scratching at the headliner, can contribute to it coming loose.
DIY Methods: How to Repair Sagging Headliner Without Removing It
Replacing the entire headliner can be a costly and time-consuming job, often requiring professional installation. Fortunately, for many cases of sagging, you can achieve excellent results with DIY methods that don’t require removing the headliner. These methods are budget-friendly and can restore the look of your car’s interior.
Here are several effective techniques for repairing a sagging headliner in your car without removal:
1. Fabric Adhesive Spray: The Glue Solution
For minor sagging, particularly around the edges or corners, fabric adhesive spray is a simple and effective solution. This method is best for localized areas where the fabric is starting to detach.
Materials You’ll Need:
- Headliner Adhesive Spray: Specifically designed for automotive headliners. Avoid general-purpose glues as they may not withstand heat and can damage the fabric.
- Painter’s Tape: To protect surrounding areas from overspray.
- Clean Cloth or Rag: For wiping away excess adhesive.
Steps to Follow:
- Preparation: Clean the sagging area of the headliner with a soft brush or vacuum to remove any loose dirt or debris.
- Protect Surrounding Areas: Use painter’s tape to carefully mask off the trim, windows, and any other areas around the sagging headliner to prevent getting adhesive on them.
- Apply Adhesive: Shake the adhesive spray can well. Hold the can about 6-8 inches away from the headliner and apply a light, even coat of adhesive to both the back of the sagging fabric and the exposed backing board. Avoid saturating the fabric.
- Wait and Reattach: Allow the adhesive to become tacky, as per the product instructions (usually a minute or two). Gently press the fabric back into place, starting from one edge and smoothing outwards to avoid wrinkles or air bubbles.
- Apply Pressure: Use a clean cloth to apply even pressure to the repaired area for a few minutes to ensure a strong bond.
- Cure Time: Allow the adhesive to fully cure according to the manufacturer’s directions, typically a few hours. Avoid touching or disturbing the repaired area during this time.
2. Headliner Pins or Twist Pins: The Quick Fix
For more significant sagging, or for a temporary fix, headliner pins or twist pins (also known as saggy stoppers) offer a fast and straightforward solution. These pins are designed to discreetly hold the fabric back in place.
Materials You’ll Need:
- Headliner Pins or Twist Pins: These are available online and at auto parts stores. Clear-headed twist pins are less visible.
Steps to Follow:
- Identify Sagging Areas: Locate the areas where the headliner is sagging most prominently.
- Push Fabric Back Up: Gently push the sagging fabric back up into its original position against the headliner board.
- Insert Pins: Carefully insert the headliner pins or twist pins through the fabric and into the foam backing board above. Twist pins usually require a slight twisting motion to secure them.
- Distribute Pins Evenly: Space the pins evenly across the sagging area to distribute the support and create a more uniform appearance. You can arrange them in a pattern for a neater look.
- Check for Secureness: Ensure the pins are firmly in place and holding the fabric securely.
While pins are a quick fix, they are more visible than adhesive and may not be a permanent solution. However, they are effective for temporarily resolving sagging and preventing further drooping.
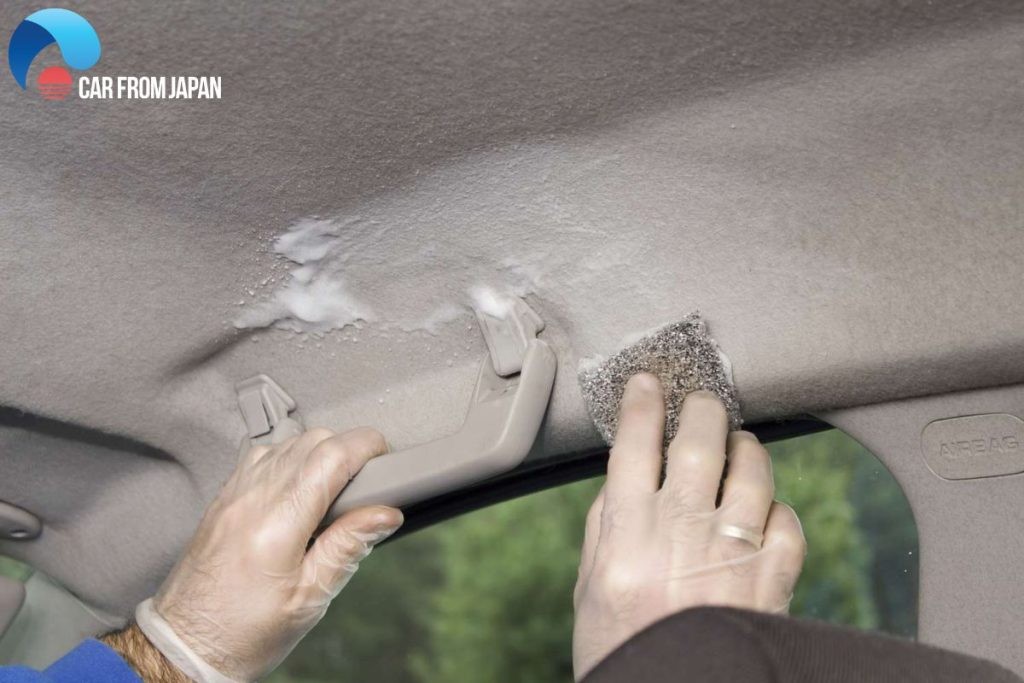
3. Steam Cleaner and Paint Roller: Re-activating Adhesive with Steam
This method utilizes steam to reactivate the original headliner adhesive. It’s particularly effective when the sagging is due to heat-weakened glue, especially around the edges and larger areas of the headliner.
Materials You’ll Need:
- Steam Cleaner: A handheld steam cleaner is ideal for this task. Ensure it’s clean and filled with water.
- Paint Roller (Soft Foam): A clean, soft foam paint roller.
- Clean Cloth or Rag: For wiping away any moisture or excess adhesive.
Steps to Follow:
- Prepare the Area: Clean the sagging headliner area to remove loose debris.
- Apply Steam: Using the steam cleaner, gently apply steam to the sagging fabric in small sections. Hold the steam cleaner nozzle a few inches away from the fabric and move it slowly and evenly. The goal is to warm the adhesive, not soak the fabric.
- Roll and Reattach: Immediately after steaming a section, use the soft foam paint roller to gently roll over the fabric, pressing it back against the headliner board. Work from the center of the sagging area outwards.
- Repeat and Overlap: Repeat steps 2 and 3, overlapping steamed sections slightly, until the entire sagging area is addressed.
- Allow to Dry: Allow the headliner to air dry completely. Avoid touching or disturbing the repaired area until it’s dry.
Important Note: Be cautious not to overheat or over-saturate the headliner fabric with steam, as excessive moisture can damage the materials. Work in small sections and monitor the fabric carefully.
[Video demonstrating headliner repair tips and tricks (Video: Troy’s Garage – Link to be embedded if available)]
Preventing Headliner Sagging: Proactive Tips
Prevention is always better than cure. While some sagging is inevitable over time, you can take steps to prolong the life of your car’s headliner and minimize the risk of sagging.
- Park in the Shade: Whenever possible, park your car in shaded areas or use a car sunshade, especially during hot and sunny weather. This reduces the amount of direct heat exposure to the roof and headliner.
- Regularly Check and Repair Leaks: Address any water leaks promptly. Check door and window seals, sunroof drains, and windshield seals regularly to prevent moisture from entering the car and damaging the headliner.
- Avoid Extreme Interior Heat: Try to minimize prolonged exposure to extreme interior heat. Ventilate your car after parking in the sun to release trapped hot air.
- Gentle Cleaning: When cleaning your car’s interior, be gentle around the headliner. Avoid harsh chemicals or abrasive cleaners. Use a soft brush or vacuum with a soft brush attachment to remove dust and debris.
- Protect from Physical Strain: Discourage children and pets from pulling or scratching at the headliner.
Headliner Replacement Cost: When DIY Isn’t Enough
While DIY methods can effectively repair many cases of sagging headliners, there are situations where replacement might be necessary. If the headliner is severely damaged, torn, or the foam backing is extensively deteriorated, replacement is the best option for a lasting solution.
The cost of headliner replacement varies depending on several factors, including:
- Vehicle Make and Model: Luxury vehicles and those with complex headliner designs often have higher replacement costs.
- Type of Headliner Material: The choice of replacement fabric can affect the price.
- Labor Costs: Professional installation labor rates vary by location and shop.
- Sunroof/Moonroof: Vehicles with sunroofs or moonroofs often have more complex headliner assemblies, increasing replacement costs.
Estimated Headliner Replacement Costs:
| Vehicle Type | Estimated Cost Range |
|---|---|
| Simple Sedan/Hatchback/Coupe (e.g., Accord, Corolla) | $300 – $750 |
| Typical SUV/Crossover (e.g., RAV4, X-Trail) | $500 – $900 |
| Luxury Vehicle (e.g., BMW, Mercedes) | $1,000 – $6,000+ |
These are just estimates. Always get a quote from a reputable auto upholstery shop or mechanic for your specific vehicle.
Conclusion: Restore Your Car’s Interior with DIY Headliner Repair
A sagging headliner doesn’t have to be a permanent problem. By understanding the causes and utilizing these simple DIY repair methods – adhesive spray, headliner pins, or the steam cleaner technique – you can effectively fix a sagging headliner without removal and restore the clean, comfortable interior of your car. If you’re not comfortable with DIY, professional headliner replacement is always an option. Choose the method that best suits your needs and enjoy a renewed car interior!
FAQs About Sagging Car Headliners
How do you know if your ceiling is sagging?
Signs of a sagging car headliner include:
- Visible drooping or looseness of the fabric.
- The fabric pulling away from the edges or corners.
- A “bubbling” or uneven appearance.
- In severe cases, the headliner may start to hang down and obstruct vision.
Is it OK to fix the headliner sagging myself?
Yes, in many cases, DIY repair of a sagging headliner is perfectly feasible and can save you a significant amount of money compared to professional replacement. The methods outlined in this guide are designed for DIYers.
Can I paint a headliner?
While technically possible, painting a headliner is generally not recommended. Paint can stiffen the fabric, alter its texture, and may not adhere well long-term due to temperature fluctuations inside the car. It’s usually better to repair or replace the headliner fabric.
Does car insurance cover the cost of car headliner replacement?
Generally, standard car insurance policies do not cover headliner replacement due to wear and tear or cosmetic issues. Headliner damage is usually considered a maintenance issue, not a covered accident or damage claim. Extended warranties may or may not cover headliner issues, depending on the specific terms of the warranty. Check your policy for details.