It’s a common sight in parking lots everywhere: cars with paint that has lost its luster, appearing dull and faded. This issue isn’t typically with the paint itself, but rather the clear coat, the protective layer on top. Whether due to relentless sun exposure, harsh weather conditions, or simply the passage of time, a faded clear coat can significantly detract from your car’s appearance and value.
But don’t despair! If your car’s paint is suffering from a faded clear coat, you’re in the right place. This guide will delve into the primary causes of this problem, help you assess the damage, and, most importantly, provide you with actionable steps on how to repair faded clear coat on a car and restore its original shine. We’ll explore DIY methods to revitalize your car’s finish and keep it looking its best.
Understanding Faded Clear Coat: The Root Causes
Modern car manufacturing often prioritizes efficiency, sometimes at the expense of material quality. While paint technology has advanced, the clear coats applied to many vehicles can be relatively thin and vulnerable. In the past, car owners were more accustomed to regular car maintenance, including waxing and polishing, which provided a degree of protection. Today, while vehicles boast sophisticated paint application processes, the clear coat remains susceptible to several damaging factors.
Here are the main culprits behind a faded clear coat:
UV Radiation from the Sun
Just as prolonged sun exposure can damage your skin, the sun’s ultraviolet (UV) rays are a major enemy of your car’s clear coat. While clear coat is designed to offer some UV protection, it’s not impenetrable. The heat generated by sunlight, known as infrared radiation, combined with UV radiation (specifically UVA and UVB), accelerates the breakdown of the clear coat. Flat surfaces like the hood and roof bear the brunt of this exposure, making them the most prone to fading.
Corrosion and Environmental Fallout
If you live near the ocean, salt air is a significant concern. Salt deposits on your car’s surface can trigger oxidation, which eats away at the clear coat. This corrosion often leads to paint chipping and peeling, requiring more extensive repairs.
Beyond coastal areas, environmental contaminants and pollution play a significant role. Acid rain, smog, industrial fallout (iron particles), bird droppings, bug splatter, tree sap, and pollen all contain chemicals that can degrade the clear coat over time. Industrial fallout, consisting of ferrous particles from brake dust and industrial emissions, can embed itself in the clear coat, accelerating damage.
Abrasive Cleaners and Harsh Chemicals
Using the wrong cleaning products can be detrimental to your car’s clear coat. Household cleaners, dish soaps, and degreasers that are not pH-balanced for automotive paint can strip away the protective layer and contribute to fading. Similarly, abrasive cleaning methods and harsh chemicals in some car wash detergents can scratch and weaken the clear coat. Even frequent visits to automatic car washes with harsh brushes can inflict micro-scratches that dull the finish over time.
Neglect and Lack of Maintenance
Regular car washing and waxing are crucial for maintaining the integrity of the clear coat. Dirt, grime, and contaminants left on the surface can accelerate oxidation and clear coat degradation. A lack of regular waxing or sealant application means the clear coat is left exposed and vulnerable to environmental damage.
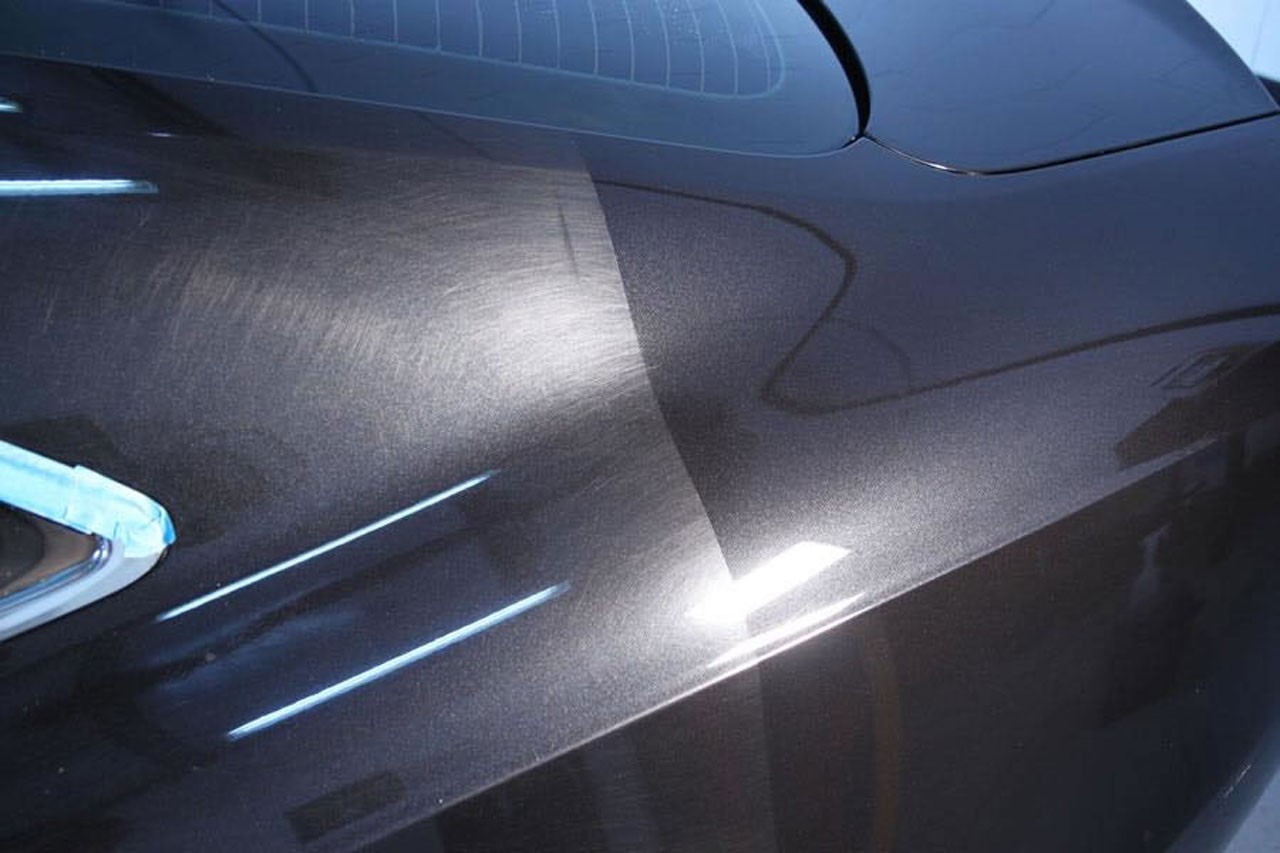
This image illustrates the visual contrast between faded car paint and paint that has undergone correction, highlighting the transformative effect of clear coat repair and paint restoration techniques.
Assessing the Damage: Is it Just Faded Clear Coat?
Before diving into repairs, it’s important to determine if the fading is indeed limited to the clear coat and not the underlying paint. Here’s how to check:
- Visual Inspection: Faded clear coat typically appears as a cloudy, hazy, or milky white film on the surface. The paint underneath may still have color, but the overall shine is gone.
- The Tape Test: Apply masking tape to a faded area and a non-faded area. Remove both. Compare the adhesive side of the tape. If the tape from the faded area has a chalky residue, it’s likely oxidized clear coat.
- Professional Opinion: If you’re unsure, consult a professional detailer or auto body shop. They can accurately diagnose the issue and advise on the best course of action.
If the fading is superficial and limited to the clear coat, DIY repair methods can be effective. However, if the damage is severe, or if the paint itself is compromised, professional refinishing might be necessary.
DIY Guide: How to Repair Faded Clear Coat at Home
For minor to moderate clear coat fading, you can often achieve impressive results with DIY methods. Here’s a step-by-step guide on how to repair faded clear coat on a car:
Step 1: Gather Your Supplies
Before you begin, assemble all the necessary materials:
- Car Wash Soap and Supplies: Buckets, wash mitts, grit guards, and pH-balanced car wash soap for thorough cleaning.
- Clay Bar and Lubricant: To remove embedded contaminants from the clear coat surface.
- Rubbing Compound (Medium and Fine Cut): For heavier oxidation removal and initial clear coat correction.
- Polishing Compound: To refine the finish and enhance gloss after rubbing compound.
- Polishing Pads (Foam Cutting and Polishing Pads): For use with a machine polisher.
- Microfiber Towels: For wiping away residue and buffing.
- Machine Polisher (Dual-Action Recommended): Significantly speeds up and improves the polishing process.
- Spray Detailer or Isopropyl Alcohol (IPA): For cleaning the surface between polishing stages and inspecting your work.
- Paint Protection Product (Wax, Sealant, or Ceramic Coating): To protect the restored clear coat and prevent future fading.
Step 2: Thoroughly Wash and Decontaminate Your Car
Start by washing your car using the two-bucket method to remove loose dirt and grime. Pay extra attention to the faded areas. After washing, use a clay bar with lubricant to remove embedded contaminants. This step is crucial for ensuring a smooth surface for polishing.
Step 3: Compounding – Removing the Faded Clear Coat Layer
Apply a medium-cut rubbing compound to a foam cutting pad. Work in manageable sections (e.g., 2ft x 2ft). Using your machine polisher on a medium speed setting, apply even pressure and work the compound across the faded area in overlapping passes. The goal is to gently remove the oxidized layer of clear coat.
After the first pass with medium compound, clean the section with spray detailer or IPA and inspect your progress. If the fading is still noticeable, repeat the compounding step, potentially moving to a more aggressive compound if needed, but proceed cautiously to avoid removing too much clear coat. For lighter fading, you might be able to start directly with a fine-cut rubbing compound or polishing compound.
Step 4: Polishing – Refining and Restoring Gloss
Once the faded clear coat is largely removed with compounding, switch to a polishing pad and polishing compound. This step refines the surface, removes any compounding haze, and brings back the gloss and clarity to the clear coat. Use a machine polisher on a lower speed setting and work the polishing compound in the same manner as the rubbing compound, with overlapping passes.
Again, clean the section and inspect your work. Repeat polishing as needed to achieve a high-gloss, swirl-free finish.
Step 5: Final Cleaning and Paint Protection
After polishing, do a final wipe-down with spray detailer or IPA to ensure a clean surface. Now it’s time to protect your newly restored clear coat. Apply a high-quality wax, paint sealant, or ceramic coating according to the product instructions. These protective layers will shield the clear coat from UV rays, contaminants, and oxidation, helping to prevent future fading. For DIY repairs, a high-quality carnauba wax or paint sealant provides excellent protection and ease of application. For longer-lasting and superior protection, consider a ceramic coating.
Maintaining Your Restored Clear Coat and Preventing Future Fading
Repairing faded clear coat is an investment of time and effort. To maintain your results and prevent future fading, follow these best practices:
- Regular Washing: Wash your car every two weeks, or more frequently if exposed to harsh conditions or contaminants.
- Waxing or Sealing: Apply a coat of wax or paint sealant every 3-4 months to maintain a protective barrier against UV rays and environmental damage.
- Promptly Remove Contaminants: Immediately remove bird droppings, bug splatter, tree sap, and other contaminants to prevent them from etching into the clear coat.
- Park in Shade or Use a Car Cover: Whenever possible, park your car in shaded areas or use a car cover to minimize sun exposure, especially during peak UV hours.
- Use pH-Balanced Car Care Products: Always use pH-balanced car wash soaps and detailing products to avoid stripping away protective waxes and sealants.
- Consider Ceramic Coating: For the ultimate in long-term protection against fading and environmental damage, consider a professional-grade ceramic coating like Ceramic Pro 9H.
This image showcases a vibrant red supercar with a ceramic coating, emphasizing the enhanced gloss and protection that ceramic coatings offer to automotive paint finishes.
By understanding the causes of faded clear coat and following these repair and maintenance steps, you can effectively restore your car’s shine and keep it looking its best for years to come. While DIY repair is possible for many cases of faded clear coat, remember that for severe damage or if you are not comfortable with these procedures, seeking professional help from a reputable detailer or auto body shop is always a wise choice.


