Discovering a scratch, chip, or blemish on your car’s paint can be disheartening. Your car’s paint isn’t just about aesthetics; it acts as a protective shield against rust and corrosion. Fortunately, you don’t always need a professional to address minor paint damage. This comprehensive guide will equip you with the knowledge and techniques to repair damaged paint on your car yourself, saving you time and money.
Assessing the Damage: What Kind of Repair Do You Need?
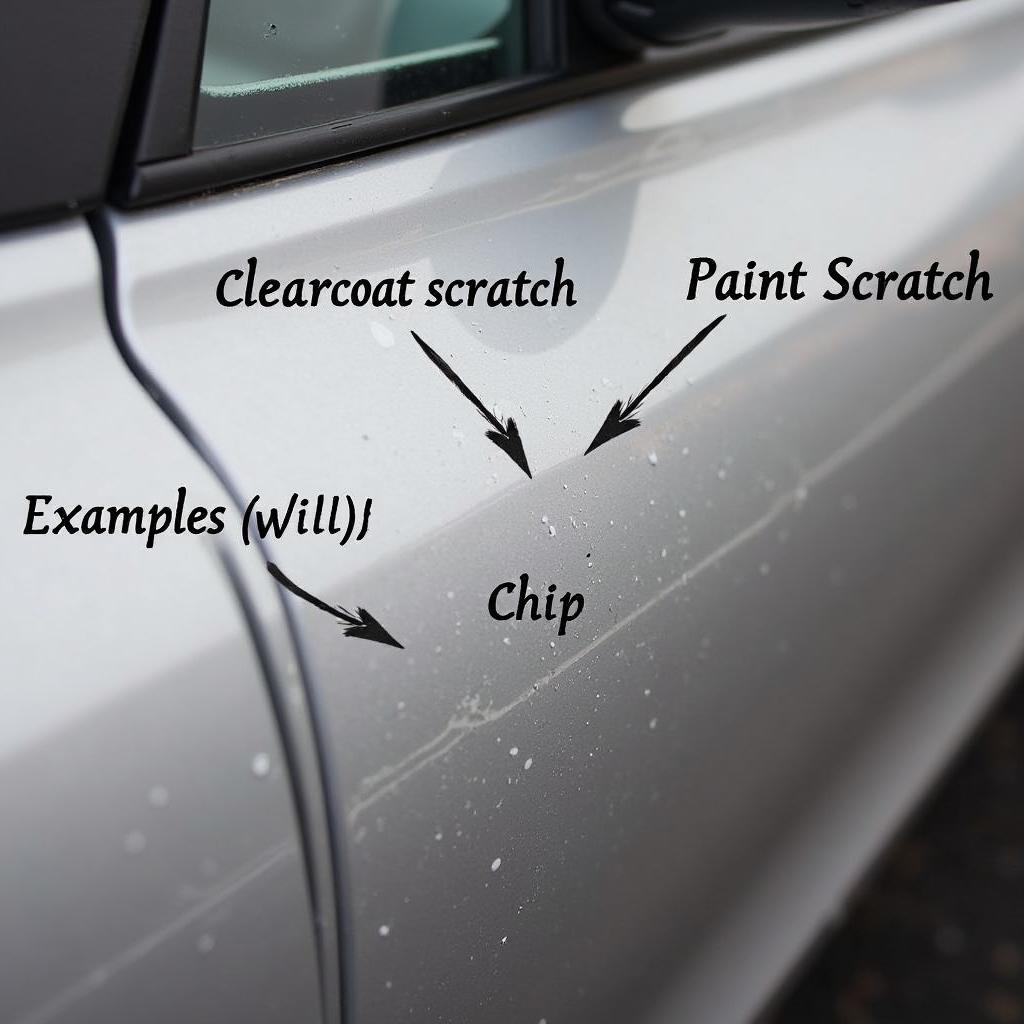
Before you grab your tools, it’s crucial to assess the extent of the damage. This evaluation will determine the appropriate repair method:
- Clearcoat Scratches: These are light, superficial scratches that only penetrate the clear coat layer. You can typically buff these out with a polishing compound.
- Paint Scratches: Deeper scratches that go through the clear coat and into the colored paint layer will require touch-up paint.
- Chips and Gouges: These are more severe forms of damage that expose the bare metal underneath. Addressing them involves multiple steps, including priming and layering paint.
DIY Car Paint Repair: Essential Tools and Materials
Gathering the right tools and materials is crucial for a successful DIY car paint repair. Here’s what you’ll need:
- Cleaning Supplies: Car wash soap, microfiber cloths, wax remover, masking tape, and plastic sheeting
- Sandpaper: 2000-grit, 3000-grit sandpaper (for sanding and smoothing)
- Touch-Up Paint: Obtain the exact color match for your car from a dealership or an auto parts store.
- Primer: (For chips and gouges)
- Clear Coat: (For sealing and protecting the repair)
- Polishing Compound: For buffing and removing swirl marks
- Applicators: Foam brushes, microfiber applicators, or toothpicks (for precise application)
Step-by-Step Guide to Repairing Damaged Paint
1. Preparation is Key:
- Wash your car thoroughly to remove dirt and grime.
- Allow it to dry completely.
2. Mask the Area:
- Apply masking tape around the damaged area to protect the surrounding paint.
- Use plastic sheeting to cover larger areas.
3. Repairing Clearcoat Scratches:
- Clean the Area: Use a microfiber cloth and rubbing alcohol to remove wax and debris from the scratch.
- Apply Polishing Compound: Apply a small amount of polishing compound to a clean microfiber cloth.
- Buff in Circular Motions: Gently buff the compound into the scratch using circular motions. Continue until the scratch is less noticeable.
- Wipe Away Excess: Use a clean microfiber cloth to remove any excess compound.
4. Repairing Paint Scratches and Chips:
- Clean and Sand (If Necessary): For deeper scratches, use 2000-grit sandpaper to lightly smooth the edges of the scratch.
- Prime (If Necessary): For chips or gouges that expose bare metal, apply a thin coat of primer and allow it to dry completely.
- Apply Touch-Up Paint: Dip a toothpick or a fine-tip brush into the touch-up paint, and carefully dab a small amount into the scratch or chip. Allow it to dry completely (this may take several hours or overnight).
- Apply Additional Coats: Apply additional thin coats of touch-up paint, allowing each coat to dry completely before applying the next. Build up the paint slightly higher than the surrounding area.
5. Sanding and Leveling (For Paint Scratches and Chips):
- Wet Sand: Once the touch-up paint is completely dry (24 hours or more), wet sand the area with 2000-grit sandpaper. Use very light pressure and keep the area wet to avoid sanding through the paint.
- Fine Sand: Gradually increase the sandpaper grit (3000-grit) and continue wet sanding until the repair area is smooth and level with the surrounding paint.
6. Applying Clear Coat (For Paint Scratches and Chips):
- Clean the Area: Thoroughly clean the area with soap and water, then dry it completely.
- Apply Clear Coat: Using a foam brush or applicator, apply a thin and even coat of clear coat to the repair area. Slightly overlap the surrounding paint to ensure a good seal. Allow it to dry completely.
- Apply Additional Coats: Apply additional coats of clear coat (2-3), allowing each coat to dry completely before applying the next.
7. Polishing and Buffing:
- Compound and Polish: Once the clear coat is completely dry (24 hours or more), use a polishing compound and a buffer or microfiber cloth to polish the area. Work in small sections using circular motions.
- Wax: Apply a coat of wax to the entire area to protect the finish.
Tips from the Pro: John Smith, Master Automotive Technician
“When it comes to DIY car paint repair, patience is your best friend,” advises John Smith, a seasoned automotive technician with over 20 years of experience. “Take your time with each step, and don’t rush the drying process. Also, remember that less is more when it comes to applying touch-up paint and clear coat – you can always add more later.”
“Another crucial tip is to work in a well-ventilated area and wear a respirator when sanding or painting,” Smith adds. “Safety should always be your top priority.”
Conclusion
Repairing damaged paint on your car is a task you can tackle yourself with the right information and a little patience. While this guide provides a comprehensive overview, remember that practice makes perfect. Start with minor scratches and gradually work your way up to more complex repairs.
By following these steps, you can restore your car’s paint to its former glory and prevent further damage. And if you’re ever unsure about a repair, don’t hesitate to consult a professional.
FAQ
1. Can I use nail polish to repair car paint?
No, nail polish is not designed for automotive paint and will not provide a durable or long-lasting repair.
2. How long does it take for touch-up paint to dry completely?
Touch-up paint typically takes several hours to dry to the touch, but it’s essential to allow it to cure completely (24-48 hours) before sanding or applying clear coat.
3. What is the difference between polishing compound and rubbing compound?
Rubbing compound is more abrasive and is used to remove deeper scratches and imperfections, while polishing compound is finer and is used to create a smooth, glossy finish.
4. Can I repair dents and paint damage at the same time?
If you have dents with paint damage, it’s best to address the dents first before repairing the paint.
5. When should I consult a professional for car paint repair?
For extensive paint damage, such as large areas of peeling paint, significant rust, or damage to multiple body panels, it’s best to consult a professional auto body shop.
Need further assistance with your car repair? Contact us via WhatsApp at +1(641)206-8880 or email us at cardiagtechworkshop@gmail.com. Our team of experts is available 24/7 to help you with all your car repair needs.


