
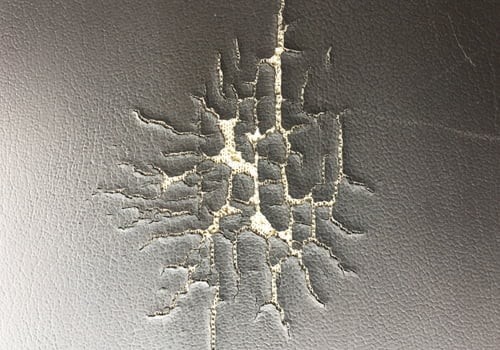
Cracked vinyl car armrests are a common problem that can detract from the overall look and feel of your vehicle’s interior. Over time, exposure to sunlight, temperature fluctuations, and regular use can cause vinyl to dry out and crack. Fortunately, repairing a cracked vinyl car armrest is a DIY project that can save you money and restore the comfort and appearance of your car. This guide will walk you through the process using heat-cure filler for a durable and professional-looking repair.
Tools and Materials You’ll Need
Before you begin, gather the necessary tools and materials. Having everything on hand will make the repair process smoother and more efficient. Here’s what you’ll need:
- Heat-cure filler: This is crucial for a long-lasting repair. Unlike low-temperature putties, heat-cure fillers create a stronger bond and are more durable in high-stress areas.
- Heat gun: A heat gun is essential for curing the filler and melting sharp vinyl edges. Opt for a dual temperature heat gun for more control.
- Reducer nozzle: This attachment for your heat gun concentrates the heat, allowing for more precise application, especially in tight areas.
- Graining pads or papers: These pads are used to emboss texture into the filler, helping the repair blend seamlessly with the surrounding vinyl. Professional graining pads are a worthwhile investment for frequent repairs.
- Razor blade: A sharp razor blade is needed to carefully shave away sharp, curled edges of the cracked vinyl.
- Palette knife or needle tool: These tools are used for precise application of the heat-cure filler into the cracks.
- Plastic spreader: A plastic spreader helps to level the filler and remove any excess, creating a smooth surface.
- Denatured or rubbing alcohol: Use alcohol to clean the vinyl surface before applying the filler, ensuring proper adhesion.
- Subpatch material (if needed): For larger holes, you may need a subpatch to provide backing before applying filler.
- Glue (if needed): To adhere the subpatch material.
- Wooden block or small board: This is used to apply even pressure when embossing the grain pad, ensuring a consistent texture.
- Gloves: To protect your hands and for final texturizing.
- Spray grain (optional): For further blending of texture, a spray grain like SEM Chip Guard can be used.
- Rub ‘n Restore® color and Clear Prep+Finish™ (optional): For color matching and added protection to the repaired area.
Step-by-Step Guide to Repairing Your Cracked Vinyl Car Armrest
Follow these steps carefully to repair your cracked vinyl car armrest and restore its original look and feel:
Step 1: Prepare the Surface
Begin by thoroughly cleaning the cracked area with denatured or rubbing alcohol. This removes any dirt, grease, or protectants that could interfere with the filler’s adhesion.
Next, using a clean, new razor blade held almost parallel to the surface, carefully shave away any sharp, curling edges of the cracked vinyl. The goal is to create a smoother, more level surface for the filler to adhere to.
For edges that are too low-profile to shave or are in risky areas, you can gently melt them using the heat gun. Apply heat at around 550°F (288°C) from a distance of 2-6 inches (5-15 cm) for 5 to 15 seconds. Observe the vinyl closely; it will become glossier as it heats up. Be cautious not to overheat and melt the vinyl excessively.
Step 2: Apply Heat-Cure Filler
Once the surface is prepared and at room temperature, use a palette knife or needle tool to apply a thin, even coat of heat-cure filler directly into the cracks. Work the filler into the cracks to ensure it fills them completely.
Use a plastic spreader to level the filler and remove any excess. Aim for a smooth, even surface that is slightly higher than the surrounding vinyl to account for shrinkage during curing.
Step 3: Emboss the Texture
Now, use the heat gun to warm the filled area. Apply heat at around 550°F (288°C) from a distance of 8-10 inches (20-25 cm). Heat the filler until it transitions from a glossy white cream to a more translucent, frosted appearance. Be careful not to overheat it to the point where it becomes glossy again, as this can melt the surrounding vinyl.
Immediately after heating, firmly press a graining pad onto the warmed filler using a wooden block or small board to apply even pressure. Hold the graining pad in place for 5 to 10 seconds to emboss the texture into the filler as it cools. The pressure also helps to level any remaining ridges or high spots.
Allow the repaired area to cool completely to room temperature. You can speed up the cooling process with a chill block or by gently applying a damp cloth.
Step 4: Repeat and Refine
Repeat steps 2 and 3 as needed, applying thin coats of filler and embossing with the graining pad until the repaired surface is level with the surrounding vinyl and the cracks are no longer visible.
For the final coat, you can use a gloved hand to lightly texturize the filler to further blend any lines or inconsistencies in texture. Heat and emboss with the graining pad one last time.
If desired, you can use a spray grain like SEM Chip Guard to further refine the texture and blend the repair seamlessly.
Step 5: Finishing Touches (Optional)
For color matching, apply Rub ‘n Restore® color to the repaired area, following the product instructions. Finally, apply Clear Prep+Finish™ for added protection and to enhance the durability of the repair.
If you need to rework the repair at any point, use Flite™ cleaner or rubbing alcohol to remove the color before applying more heat-cure filler.
Tips for a Successful Vinyl Armrest Repair
- Work in thin layers: Applying filler in thin coats and curing each layer is crucial for a strong and smooth repair.
- Don’t overheat the vinyl: Excessive heat can damage the surrounding vinyl. Use controlled heat and observe the vinyl’s reaction carefully.
- Practice your graining technique: Experiment with different graining pads and pressure to achieve a texture that closely matches your armrest.
- Patience is key: Allow each layer of filler to cool completely before proceeding to the next step. Rushing the process can compromise the quality of the repair.
- Consider a graining mold kit: For unique or hard-to-match vinyl textures, a graining mold kit can be a worthwhile investment for creating custom graining pads.
Conclusion
Repairing a cracked vinyl car armrest is a rewarding DIY project that can significantly improve your car’s interior. By using heat-cure filler and following these steps, you can achieve a durable, professional-looking repair that will last. With a little patience and attention to detail, you can restore the comfort and appearance of your armrest and enjoy your car’s interior once again.