
Cracked armrests are a common problem in vehicles, often detracting from the overall interior appearance and comfort. Over time, the vinyl or leather that covers your car’s armrests can dry out and develop unsightly cracks, sometimes with sharp, raised edges. Fortunately, repairing a cracked car armrest is a manageable DIY project that can restore its look and feel. This guide will walk you through the process of how to repair cracked armrest in your car, using effective techniques and readily available materials.
Understanding the Problem: Cracked Car Armrests
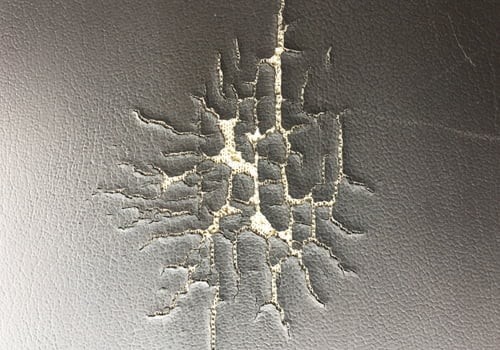
Armrests in cars are typically made of vinyl or leather, materials chosen for their durability and comfort. However, exposure to sunlight, temperature fluctuations, and regular use can cause these materials to degrade. As vinyl and leather age and lose moisture, they become brittle and prone to cracking. These cracks not only look bad but can also be uncomfortable, especially if the edges are sharp or curling upwards. Addressing these cracks promptly can prevent further damage and maintain the value and comfort of your vehicle’s interior.
Tools and Materials You’ll Need for Repair
To effectively repair a cracked armrest, you’ll need to gather the right tools and materials. Here’s a comprehensive list to get you started:
- Heat Gun: Essential for melting and shaping the repair putty. Consider a dual temperature heat gun for versatility. (Heat Gun Example on Amazon)
- Reducer Nozzle: Focuses the heat, crucial for precise application. (Reducer Nozzle Example on Amazon)
- Heat-Cure Putty: Specifically designed for vinyl and leather repairs, offering a durable and flexible fix. (Heat-Cure Putty Example)
- Graining Pads or Mats: Used to imprint texture onto the filler, helping it blend seamlessly with the surrounding material. (Graining Pads Example) or (Graining Papers Example)
- Razor Blade: For carefully shaving away sharp, raised edges of the cracks.
- Palette Knife or Needle Tool: For precise application of the heat-cure filler.
- Plastic Spreader: To level and remove excess filler, ensuring a smooth finish.
- Denatured or Rubbing Alcohol: For cleaning the repair area and removing any residue.
- Subpatch Material (if needed): For larger holes or tears that require backing.
- Glue (if needed): To secure subpatch material.
- Wooden Block or Small Board: To apply even pressure when using graining pads.
- Optional: Chill Block or Water: To quickly cool down the repaired area.
- Optional: Colorant and Clear Finish: To restore color and protect the repaired area (like Rub ‘n Restore® products).
- Optional: Spray Grain: For further blending texture. (SEM Chip Guard Example)
Having these tools and materials at hand will streamline the repair process and help you achieve professional-looking results when you repair cracked armrest in your car.
Step-by-Step Guide to Repairing Cracked Car Armrests
Follow these detailed steps to effectively repair cracked armrests in your car and restore their appearance and comfort.
-
Preparation and Subpatching (if necessary): Begin by thoroughly cleaning the cracked area with denatured or rubbing alcohol to remove dirt, grease, and protectants. If there are any holes or tears accompanying the cracks, you’ll need to subpatch them. Cut a piece of subpatch material slightly larger than the hole and glue it underneath the damaged area to provide support.
-
Shaving Sharp Edges: Using a clean, new razor blade, carefully shave away any sharp, curling edges around the cracks. Hold the blade almost parallel to the surface to prevent further damage. The goal is to level the edges as much as possible for a smoother repair.
-
Melting and Leveling Remaining Edges: For edges that are too low-profile to shave or too risky to approach with a blade, use a heat gun. Apply heat at around 550°F (290°C) from a distance of 2-6 inches (5-15 cm) for 5 to 15 seconds. Use a reducer nozzle for better heat control. The vinyl will become glossy as it softens. Immediately after heating, press a grain pad onto the softened vinyl using a wooden block to apply even pressure. Hold for 10-15 seconds. This helps to flatten and level the edges.
-
Cleaning and Applying Heat-Cure Filler: Clean the prepared area again with denatured or rubbing alcohol to ensure it’s free of any residue. Using a palette knife or needle tool, carefully apply a thin layer of heat-cure filler to the cracks. Level the filler and remove any excess with a plastic spreader to create a smooth, even surface.
-
Heat Curing and Embossing the Filler: Use the heat gun again, this time holding it 8-10 inches (20-25 cm) away from the repair area. Warm the filler until it transitions from a glossy white cream to a more translucent, frosted appearance. Be cautious not to overheat and melt the surrounding vinyl. Quickly apply a grain pad over the heated filler, pressing firmly and evenly with a wooden block for 5-10 seconds. This will emboss the grain pattern onto the filler as it cools and help level any imperfections.
-
Cooling and Repeating: Allow the repaired area to cool completely to room temperature. You can speed up this process with a chill block or by dabbing with a damp cloth. Once cooled, inspect the repair. If the surface is not yet even or the cracks are not fully filled, repeat steps 4 and 5, applying additional thin layers of filler as needed.
-
Final Texturing and Finishing: For a seamless blend, apply a final thin coat of heat-cure filler and texturize it with a gloved finger to match the surrounding texture. Heat and emboss with a grain pad one last time. For further texture blending, consider using a spray grain product. Once satisfied with the texture, you can apply a vinyl or leather colorant to match the original armrest color, followed by a clear protective finish for added durability and longevity.
Tips for a Successful Armrest Repair
- Work in a Well-Ventilated Area: Ensure good ventilation when using solvents, adhesives, and heat-cure products.
- Test Heat Application: Before applying heat to the repair area, test the heat gun on an inconspicuous part of the armrest to get a feel for how the material responds.
- Apply Thin Layers of Filler: It’s better to apply multiple thin layers of heat-cure filler than one thick layer. This allows for better control and prevents cracking or uneven curing.
- Be Patient and Take Your Time: Repairing cracks effectively requires patience. Don’t rush through any step, and allow sufficient cooling time between applications.
- Consider Professional Help for Extensive Damage: If the armrest is severely damaged with large tears or extensive cracking, or if you’re uncomfortable performing the repair yourself, consider seeking professional automotive upholstery repair services.
Conclusion
Repairing a cracked armrest in your car is a rewarding DIY task that can significantly improve your vehicle’s interior. By following these steps on how to repair cracked armrest in car, and using the right tools and materials, you can restore the appearance and comfort of your armrests, saving money and gaining satisfaction from doing it yourself. With careful preparation, precise application, and a bit of patience, your car’s armrests can look as good as new.