
Car wheels, especially alloy wheels, are often the most visually appealing part of a vehicle. However, they are constantly exposed to damage from various sources, including kerbs, potholes, and road debris. Scuffed, scratched, or damaged wheels can significantly detract from a car’s appearance and even impact its resale value. Knowing how to repair car wheels, whether through a do-it-yourself approach or professional services, is essential for maintaining your vehicle’s aesthetics and value.
DIY Car Wheel Repair: Step-by-Step Guide
For minor damage such as light kerb scratches or small chips, repairing your car wheels at home is a viable and cost-effective option. A DIY approach can save you money and time, and with the right tools and patience, you can achieve impressive results. Here’s a step-by-step guide on how to repair car wheels yourself:
What You’ll Need:
- Alloy Wheel Repair Kit: These kits typically include sandpaper (various grits), body filler, primer, and alloy wheel paint. Some kits also include lacquer for a more durable finish.
- Cleaning Supplies: Wheel cleaner, degreaser, soap, water, and cloths.
- Masking Tape: For protecting areas you don’t want to paint.
- Tack Cloth: For removing dust particles before painting.
- Gloves and Safety Glasses: For personal protection.
- Optional: Heat gun or hairdryer (to speed up drying times), lacquer for extra protection.
Step 1: Cleaning and Preparation
Begin by thoroughly cleaning the damaged wheel. Use a wheel cleaner and degreaser to remove brake dust, dirt, and grime. Wash the wheel with soap and water and ensure it is completely dry before proceeding. Proper cleaning is crucial for the repair materials to adhere correctly.
Step 2: Sanding and Shaping
Identify the damaged areas and begin sanding with coarse grit sandpaper to remove loose paint, corrosion, and smooth out rough edges. Gradually move to finer grit sandpaper to refine the surface and feather the edges of the damage into the surrounding area. The goal is to create a smooth transition for the filler to bond to.
Step 3: Applying Filler
Mix the body filler according to the manufacturer’s instructions. Apply a thin, even layer of filler to the damaged area, slightly overfilling it to allow for sanding later. Use a plastic spreader to apply the filler and shape it to match the original contour of the wheel. Allow the filler to cure completely as per the kit’s instructions.
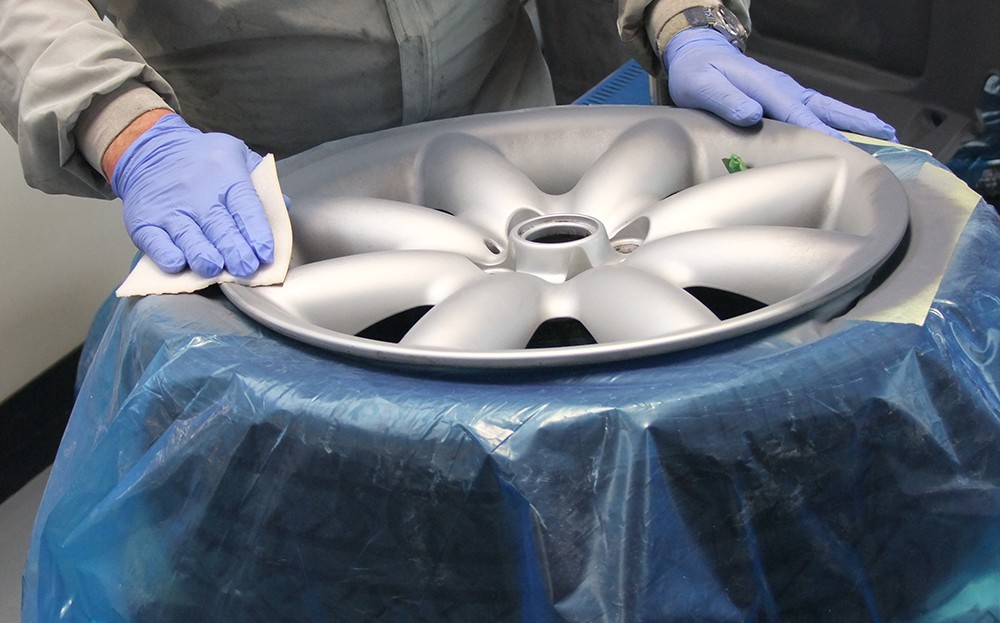
Step 4: Sanding the Filler
Once the filler is fully cured, begin sanding it down to the level of the surrounding wheel surface. Start with medium-grit sandpaper and gradually move to finer grits to achieve a smooth, seamless finish. Take your time and be careful not to sand away too much filler. The aim is to create a perfectly smooth surface ready for priming and painting.
Alt text: Applying car wheel filler to repair kerb damage on an alloy wheel during a DIY repair process.
Step 5: Priming
After sanding, clean the wheel again with a tack cloth to remove any dust particles. Apply a thin, even coat of primer to the repaired area and feather it slightly onto the surrounding paint. Primer helps the paint adhere better and provides a uniform base colour. Allow the primer to dry completely. Inspect for any imperfections at this stage; if necessary, apply a thin layer of spot filler, sand again, and re-prime.
Step 6: Painting
Shake the alloy wheel paint can well and apply several thin, even coats to the primed area, allowing each coat to dry slightly before applying the next. Building up thin layers prevents runs and ensures even colour distribution. Match the paint to the original wheel colour as closely as possible for a seamless repair.
Alt text: Painting a car wheel with silver alloy paint to repair scratches during a DIY wheel refurbishment.
Step 7: Lacquering (Optional but Recommended)
For added protection and a finish closer to the original wheel, apply a coat of lacquer once the paint is completely dry. Lacquer provides a clear, protective layer that enhances shine and durability. Apply thin, even coats, just like with the paint, and allow it to dry thoroughly.
Time and Cost for DIY Repair:
- Time: Approximately 3-5 hours, depending on the extent of the damage and your experience.
- Cost of Materials: £20-£30 for an alloy wheel repair kit.
Professional Car Wheel Refurbishment: When to Seek Expert Help
While DIY repair is suitable for minor wheel damage, more severe issues require professional car wheel refurbishment services. Consider professional help for:
- Bent Wheels: Impacts from potholes or accidents can bend the wheel structure, affecting alignment and safety.
- Extensive Kerb Damage: Deep gouges or damage across a large area of the wheel.
- Corrosion: Significant rust or corrosion that has compromised the wheel’s integrity.
- Cracks or Fractures: Any visible cracks or fractures in the wheel structure are serious safety concerns.
- Diamond-Cut Wheels: These wheels have a special machined finish that is difficult to replicate with DIY methods.
- Premium Vehicles: For high-end cars, maintaining a factory-standard finish often necessitates professional refurbishment to ensure the wheels look brand new.
The Professional Refurbishment Process:
Professional wheel refurbishment companies employ a more intensive process to restore wheels to their original condition. This typically involves:
- Chemical Stripping: The wheel is immersed in a chemical bath to remove old paint, lacquer, and corrosion, exposing the bare alloy.
- Inspection and Damage Assessment: The wheel is carefully inspected for cracks, bends, and structural damage.
- Repair and Reshaping: Bent wheels are straightened using specialized hydraulic equipment. Welds are performed to repair cracks or fractures (if deemed safe and feasible).
- Powder Coating or Painting: Wheels are primed, powder coated or painted in a controlled environment to ensure a durable and even finish. Powder coating offers superior durability compared to traditional paint.
- Baking/Curing: Painted or powder-coated wheels are baked in an oven at high temperatures to cure the finish and enhance its hardness and longevity.
- Lacquering (Clear Coat): A clear coat lacquer is applied for added protection and shine, and then baked again.
- Quality Check: The refurbished wheel undergoes a final inspection to ensure it meets quality standards and is safe for use.
Benefits of Professional Refurbishment:
- Like-New Finish: Professionals can restore wheels to a factory-fresh appearance.
- Durability: Professional finishes, especially powder coating, are highly durable and resistant to damage.
- Safety: Professionals address structural damage, ensuring wheel safety and integrity.
- Convenience: While it may take longer than DIY, professional service saves you time and effort.
How Much Does Car Wheel Repair Cost?
The cost to repair car wheels varies depending on the repair method:
- DIY Repair: £20-£30 for a repair kit.
- Professional Repair:
- Mobile Repair: For minor damage, mobile services can cost £50-£150 per wheel.
- Workshop Refurbishment: For more extensive damage or full refurbishment, costs range from £80-£300 per wheel, and potentially more for diamond-cut finishes or larger wheel sizes.
Factors influencing professional repair costs include the extent of damage, wheel size, finish type (standard painted, diamond-cut, etc.), and whether you drop off the wheels or require mobile service.
How Long Does It Take to Repair Car Wheels?
- DIY Repair: A few hours to half a day, depending on your pace and the complexity of the damage.
- Professional Repair:
- Mobile Repair: Typically 1-4 hours per wheel.
- Workshop Refurbishment: Can range from one working day to several days, depending on the workload and complexity of the refurbishment process.
Where to Buy Alloy Wheel Repair Kits
You can find alloy wheel repair kits at various retailers:
- Online Marketplaces: Amazon, eBay, and specialized automotive parts websites.
- Automotive Parts Stores: Halfords, Euro Car Parts, and local car parts retailers.
- DIY and Home Improvement Stores: Some larger DIY stores may stock basic repair kits.
How to Clean Alloy Wheels
Once your car wheels are repaired, proper cleaning is essential to maintain their appearance and protect the finish. Regularly cleaning alloy wheels removes corrosive brake dust and road grime, preventing further damage and keeping them looking their best. Refer to guides on how to clean alloy wheels, and the best cleaning products for detailed instructions and product recommendations.