Leather car seats exude luxury and class, but they require proper care to maintain their pristine condition. Over time, wear and tear can lead to scratches, cracks, and fading, diminishing the overall aesthetic appeal of your car’s interior. Fortunately, with a little effort and the right techniques, you can revitalize your car seat leather and restore its former glory. This comprehensive guide will delve into the intricacies of how to repair car seat leather, providing you with expert insights and practical tips to tackle various types of damage.
Understanding Leather Damage
Before diving into the repair process, it’s crucial to identify the type of damage your leather car seats have sustained. This will determine the appropriate repair method and materials needed. Here are some common types of leather damage:
- Scratches: Superficial scratches are often caused by sharp objects or abrasive materials rubbing against the leather surface.
- Cracks: Prolonged exposure to heat and sunlight can dry out the leather, leading to cracks and splits.
- Fading: UV rays from the sun can cause the leather’s color to fade over time, resulting in a dull and lifeless appearance.
- Stains: Spills and accidents can leave unsightly stains on your leather car seats, especially if not addressed promptly.
- Tears and Holes: Sharp objects, rough use, or accidents can cause tears and holes in the leather, requiring more involved repair techniques.
Essential Tools and Materials
Gathering the necessary tools and materials beforehand will streamline the repair process. While the specific items may vary depending on the type and extent of damage, here’s a general list of essentials:
- Leather cleaner and conditioner: These products are crucial for preparing the leather surface for repair and maintaining its suppleness.
- Leather repair kit: A leather repair kit typically includes a variety of tools and materials, such as leather filler, adhesive, colorant, and applicators.
- Heat gun or hairdryer: Heat can help to soften the leather and activate certain repair products.
- Microfiber cloths: Soft and lint-free microfiber cloths are ideal for cleaning and applying products to leather.
- Scissors or utility knife: These tools are helpful for trimming loose leather fibers or cutting repair patches.
- Masking tape: Masking tape can be used to protect surrounding areas during the repair process.
Step-by-Step Guide to Repairing Leather Car Seats
Now, let’s walk through the steps involved in repairing different types of leather car seat damage:
Repairing Scratches and Minor Cracks
- Clean the affected area: Begin by thoroughly cleaning the scratched or cracked area with a dedicated leather cleaner to remove dirt, grime, and any previously applied leather conditioners.
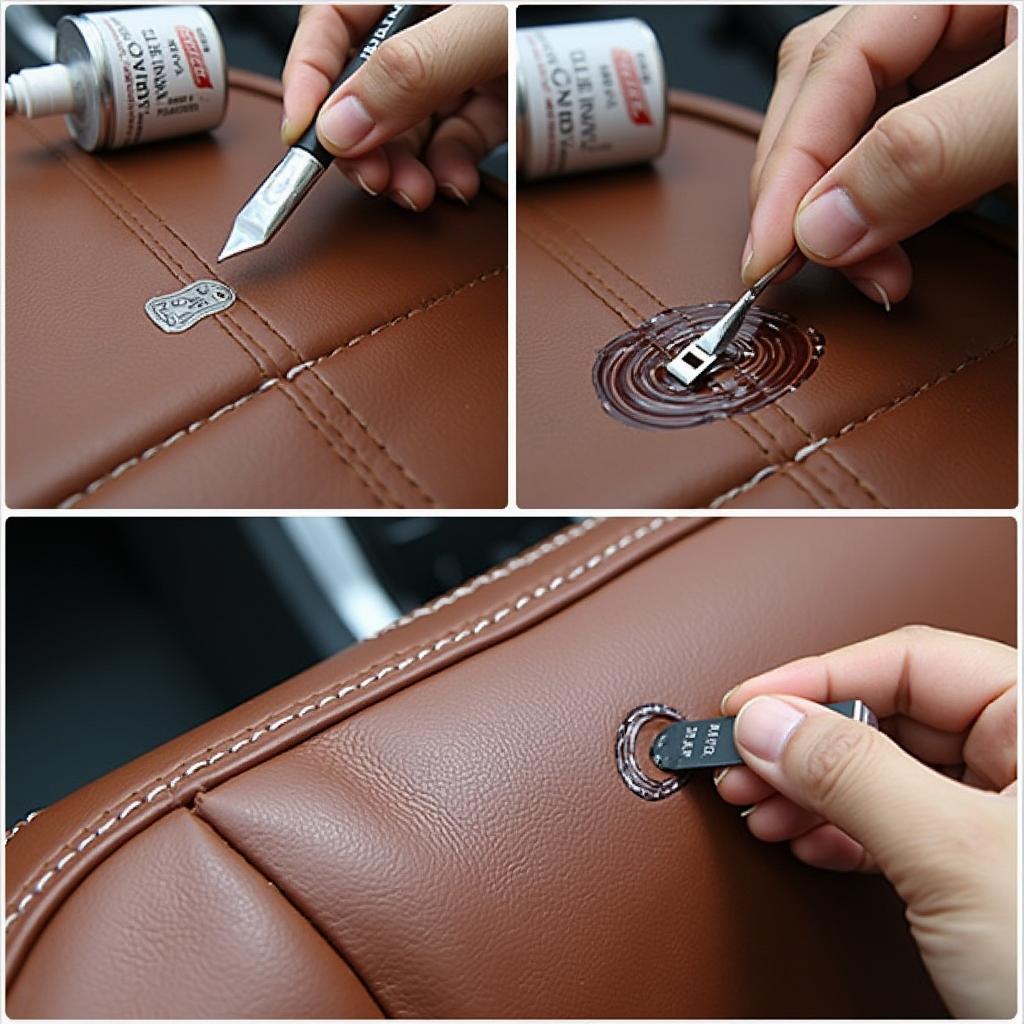
- Apply leather filler (if necessary): For deeper scratches or cracks, use a leather filler to level out the surface. Apply the filler sparingly and evenly, using a putty knife or applicator tool. Allow it to dry completely.
- Sand the filler smooth: Once the filler is dry, gently sand the area with fine-grit sandpaper until it’s flush with the surrounding leather.
- Apply leather colorant: Using a leather colorant that closely matches the color of your car seats, carefully apply a thin coat to the repaired area. Blend the colorant outward to create a seamless transition.
- Apply leather conditioner: After the colorant has dried, apply a high-quality leather conditioner to the entire seat to restore its moisture and protect it from future damage.
“When choosing a leather filler, opt for a flexible formula that can withstand the constant flexing and movement of car seats,” advises John Peterson, a seasoned automotive upholstery expert.
Repairing Tears and Holes
- Assess the damage: Examine the tear or hole to determine its size and severity. For larger tears, you may need to use a leather repair patch.
- Clean the area: Clean the damaged area thoroughly with leather cleaner, ensuring it’s free from dirt and debris.
- Prepare the patch (if needed): If using a leather repair patch, cut it to a size slightly larger than the tear or hole, ensuring it matches the texture and grain of your car seats.
- Apply leather adhesive: Apply a thin layer of leather adhesive to the back of the patch and the edges of the tear or hole.
- Position the patch: Carefully align the patch over the damaged area, pressing it firmly into place.
- Clamp or weigh down the patch: Use clamps or weights to hold the patch securely in place while the adhesive dries.
- Trim excess patch material: Once the adhesive is dry, carefully trim away any excess patch material using scissors or a utility knife.
- Apply leather filler and colorant: Follow steps 2-4 from the “Repairing Scratches and Minor Cracks” section to conceal the repair and restore the leather’s color.
Addressing Faded Leather
- Clean the seats: Thoroughly clean the faded leather seats using a leather cleaner to remove dirt, grime, and any residual products.
- Apply leather dye: Choose a leather dye that matches the original color of your car seats. Apply the dye evenly to the faded areas using a sponge or applicator pad.
- Allow the dye to dry: Let the dye dry completely before applying additional coats, if needed, to achieve the desired color intensity.
- Apply leather conditioner: Once the dye is dry, apply a leather conditioner to moisturize and protect the leather.
Maintaining Your Repaired Leather Car Seats
After investing time and effort in repairing your leather car seats, it’s essential to adopt a regular maintenance routine to preserve their restored beauty. Here are some tips for long-lasting results:
- Regular cleaning: Clean your leather car seats regularly using a dedicated leather cleaner to remove dirt, dust, and spills.
- Conditioning: Condition your leather seats every few months, or more frequently in harsh climates, to keep them supple and prevent cracking.
- UV protection: Park your car in the shade or use a windshield sunshade to protect your leather seats from damaging UV rays.
- Prompt stain removal: Address spills and stains immediately to prevent them from setting into the leather.
Conclusion
Repairing leather car seats might seem daunting, but with the right knowledge, tools, and a little patience, you can restore their former glory and maintain their luxurious appeal for years to come. Remember to assess the damage carefully, choose the appropriate repair methods, and follow the instructions diligently. By following the steps outlined in this comprehensive guide, you can confidently tackle various types of leather damage and keep your car’s interior looking its best.
FAQs
Q: Can I use household cleaners on my leather car seats?
A: It’s not recommended to use household cleaners on leather car seats as they can strip the leather of its natural oils, leading to dryness and damage. Always opt for dedicated leather cleaners that are specifically formulated for automotive leather.
Q: How often should I condition my leather car seats?
A: The frequency of conditioning depends on factors like climate and usage. As a general rule of thumb, conditioning every three to four months is a good starting point. However, if you live in a hot and dry climate or frequently park your car in the sun, you might need to condition more often.
Q: Can I repair a tear in my leather car seat myself?
A: While you can repair minor tears using a leather repair kit, larger tears or holes might require professional upholstery repair to ensure a seamless and durable fix.
Q: How can I prevent my leather car seats from fading?
A: Parking your car in the shade or using a windshield sunshade can significantly reduce UV exposure, which is the primary culprit behind leather fading. Additionally, using a leather conditioner with UV protectants can help to shield your seats from the sun’s harmful rays.
Q: What should I do if I spill something on my leather car seats?
A: Act quickly! Blot the spill immediately with a clean, dry cloth to absorb as much of the liquid as possible. Avoid rubbing, as this can spread the stain. If necessary, use a leather cleaner to gently lift the stain.
Q: Can I use shoe polish to cover scratches on my leather car seats?
A: Using shoe polish on leather car seats is not recommended. Shoe polish contains pigments and waxes that can build up on the leather, leading to discoloration and a sticky residue.
Q: Where can I find professional help for repairing my leather car seats?
A: If you’re unsure about tackling the repairs yourself or if the damage is extensive, it’s best to consult with a professional automotive upholstery specialist. They have the expertise and tools to deliver high-quality repairs that will restore your leather car seats to their former glory.
Need Help with Your Car?
Do you have more questions about car repairs or need assistance with your vehicle’s diagnostics? Our team of expert mechanics is here to help! Contact us via WhatsApp at +1(641)206-8880 or email us at [email protected]. We offer 24/7 customer support to address all your automotive needs.
For further information on repairing large tears in leather car seats, check out our comprehensive guide: how to repair large tears in leather car seats.
If you’re wondering, “Can a VW Golf squashed leather car seat be repaired?” we’ve got you covered. Visit our website for a detailed explanation: can a vw golf squashedd leather car seat be repaired.
For insights on repairing a small hole in your leather car seat, read our informative article: how to repair small hole in leather car seat.
Have a rip in your leather car seat? Learn how to repair it effectively: how to repair a rip in a leather car seat.
If you’re unsure whether your leather car seats can be repaired, our comprehensive article provides answers: can leather car seats be repaired.


