
Car interiors, especially the fabric upholstery, endure daily wear and tear. From accidental spills and pet scratches to sun damage and general aging, your car’s fabric can quickly lose its pristine look. Professional repairs can be costly, but fortunately, many fabric damages are easily fixable at home. This guide will walk you through the ins and outs of DIY car interior fabric repair, covering everything from minor scratches to more significant tears, empowering you to restore your car’s interior and save money.
The Advantages of DIY Car Fabric Repair
Opting for a DIY approach to repair your car’s interior fabric offers several compelling benefits:
1. Significant Cost Savings: This is arguably the most attractive aspect of DIY repairs. Professional fabric repair services can range from hundreds to thousands of dollars depending on the damage severity. By tackling the repair yourself, you can save a substantial amount, often reducing costs to just the price of a DIY repair kit and a few household items. The table below illustrates potential savings:
| FABRIC CAR INTERIOR DAMAGE | PROFESSIONAL REPAIR COST (EST.) | DIY REPAIR COST (EST.) |
|---|---|---|
| Fabric Scratches and Scuffs | $150 – $300 | $20 – $50 (DIY Fabric Repair Kit + basic tools) |
| Worn Fabric and Discoloration | $150 – $1,000 | $20 – $50 (DIY Fabric Repair Kit + basic tools) |
| Fabric Cuts, Rips, and Tears | $200 – $1,000 | $20 – $50 (DIY Fabric Repair Kit + basic tools) |
| Fabric Burn Marks and Holes | $200 – $1,000 | $20 – $50 (DIY Fabric Repair Kit + basic tools) |
| Fabric Depressed Damages | $500 – $2,000 | $20 – $50 + filler material (DIY Fabric Repair Kit + basic tools) |
2. Skill Development and Learning: DIY projects are fantastic opportunities to learn new skills. Repairing your car fabric interior will introduce you to different materials, useful tools, and effective repair techniques. These skills are transferable and can be applied to future DIY projects around your car and home.
3. Become Your Own Car Interior Expert: By understanding the repair process firsthand, you gain a deeper familiarity with your vehicle. This knowledge empowers you to handle future minor repairs yourself, making you a proficient DIY car care enthusiast. Achieving professional-looking results yourself is incredibly rewarding and eliminates the need to rely solely on professional services for minor fabric issues.
Potential Downsides of DIY Fabric Repair (And How to Overcome Them)
While DIY car fabric repair is generally advantageous, it’s important to be aware of potential challenges:
1. Time and Effort Investment: DIY projects require your time and effort. A successful repair is an investment of these resources. Think of it not as a loss, but as a trade-off – you’re exchanging time and effort for significant cost savings and valuable skills.
2. Outcome Variability: The final result of a DIY repair can vary based on factors like the quality of the repair kit, tools used, the doer’s skill level, and the time invested. For beginners, it’s crucial to remember that practice makes perfect. Your first attempt might not be flawless, but with each project, your skills will improve. Don’t be discouraged!
3. Unexpected Issues: DIY repairs can sometimes lead to unforeseen complications. There’s a chance things might not go exactly as planned, potentially costing more time or resources than initially anticipated. However, proper preparation and following instructions carefully can minimize these risks.
Overcoming Challenges: The key to successful DIY car fabric repair is preparation and access to guidance. High-quality DIY fabric repair kits, like the Coconix Fabric and Carpet Repair Kit, are designed to simplify the process and provide professional-grade results. Furthermore, resources like online tutorials and expert support (such as the Coconix support team at [email protected]) are readily available to assist you with any questions or challenges you encounter.
DIY Repair Guide for Common Car Fabric Damage Types
Here are step-by-step guides for repairing various types of fabric damage commonly found in car interiors:
1. How to Repair Fabric Scratches and Scuffs
Fabric scratches and scuffs are often minor and easily addressed with DIY methods.
DIY Repair Meter: Minor
Damage Types:
- Pet and Children Damage
- Worn Fabric and Discoloration (Minor cases)
- Sun Damage (Minor cases)
- Stain Damage from Solids and Liquids (Surface level)
Materials Needed:
- DIY Fabric Repair Kit (Recommended: Coconix Fabric and Carpet Repair Kit)
- Repair fibers
- Fabric glue
- Tweezers
- Mesh
- Backing fabric
- Mixing jar
- Mixing ball
- Other Tools:
- Scissors or Cutter
- Rubber band
- Clear hairspray (optional for added protection)
- Household cleaner
Step-by-Step Process:
- Prepare the Damaged Area: Trim any loose threads or jagged edges around the scratch or scuff. Clean the area thoroughly with a household cleaner to remove dirt and debris.
- Mix and Shake Repair Fibers: Fill the mixing jar with the color fibers from your repair kit. Add the metal mixing ball, close the lid tightly, and shake vigorously for at least 30 seconds to blend the fibers. Remove the metal ball and secure the mesh to the jar opening with a rubber band to create a sifter.
- Apply Fabric Glue: Apply a thin, even layer of fabric glue to the scratched or scuffed area. Work from the outside edges towards the center to avoid trapping air bubbles. Ensure the damaged area is evenly coated with glue. Apply a thin layer of glue slightly beyond the damaged area to help blend the repair seamlessly.
- Sift Repair Fibers: Hold the mixing jar with the mesh sifter upside down above the glued area. Gently tap the jar to sift the repair fibers onto the adhesive. Ensure the glue is completely covered with fibers. Use the spatula (often included in repair kits) to gently pat down the fibers and mimic the original fabric pattern (lines, swirls, etc.).
- Drying Time: Allow the glue to dry completely for 24 hours. Once dry, gently blow off any excess loose fibers. For areas prone to wear, apply a light coat of clear hairspray for added protection.
2. How to Repair Worn Fabric and Discoloration
Worn fabric and discoloration are common signs of aging in car interiors but can be effectively addressed with DIY repair techniques.
DIY Repair Meter: Minor
Damage Types:
- Worn Fabric and Discoloration
- Sun Damage
- Stain Damage from Solids and Liquids
Materials Needed: (Same as for Scratches and Scuffs)
- DIY Fabric Repair Kit (Recommended: Coconix Fabric and Carpet Repair Kit)
- Repair fibers
- Fabric glue
- Tweezers
- Mesh
- Backing fabric
- Mixing jar
- Mixing ball
- Other Tools:
- Scissors or Cutter
- Rubber band
- Clear hairspray (optional)
- Household cleaner
Step-by-Step Process:
- Prepare the Damaged Area: Trim loose threads and clean the worn or discolored area with a household cleaner.
- Mix, Shake, and Match Repair Fibers: Follow step 2 from the scratches and scuffs repair, but pay close attention to color matching. Use the color guide in your repair kit to mix and match fibers to achieve the closest possible color to your car’s interior fabric.
- Apply Fabric Glue: Apply fabric glue to the worn and discolored area, extending slightly beyond the damaged edges to ensure proper blending.
- Sift Repair Fibers: Sift the matched repair fibers over the glued area, ensuring complete coverage. Gently pack down the fibers with a spatula.
- Drying Time: Allow 24 hours for drying and apply clear hairspray for protection if desired.
3. How to Repair Fabric Cuts, Rips, and Tears
Fabric cuts, rips, and tears are more significant damage types but can still be successfully repaired using DIY methods, especially with a backing fabric for added support.
DIY Repair Meter: Moderate (DIY Repair + Professional Advice Recommended for Large Tears)
Damage Types:
- Fabric Cuts, Rips, and Tears
- Fabric Burn Marks and Holes (Similar repair process)
Materials Needed: (Similar to previous repairs, with the addition of a sewing kit for large repairs)
- DIY Fabric Repair Kit (Recommended: Coconix Fabric and Carpet Repair Kit)
- Repair fibers
- Fabric glue
- Tweezers
- Mesh
- Backing fabric
- Mixing jar
- Mixing ball
- Other Tools:
- Scissors or Cutter
- Rubber band
- Clear hairspray (optional)
- Household cleaner
- Sewing kit (needle and thread matching fabric color – for larger tears)
Step-by-Step Process:
- Prepare the Damaged Area: Trim loose threads and clean the area around the cut, rip, or tear.
- Insert Backing Fabric: Cut a piece of backing fabric slightly larger than the damage, with rounded edges. Use a spatula or tweezers to carefully insert the backing fabric underneath the tear, positioning it to provide support. For larger tears, consider sewing the backing fabric to the underside of the car fabric for enhanced durability before proceeding.
- Prepare Color Mixture: Refer to your color matching guide to create the appropriate fiber color blend for your repair.
- Apply Fabric Glue: Apply fabric glue to the edges of the cut, rip, or tear, and over the backing fabric. Ensure even coverage to bond the repair fibers effectively.
- Sift Repair Fibers: Sift the prepared repair fibers over the glued area, completely covering the damage and backing fabric. Gently press down the fibers with a spatula to blend them into the surrounding fabric.
- Drying Time: Allow 24 hours for complete drying and consider applying clear hairspray for added durability, especially in high-wear areas.
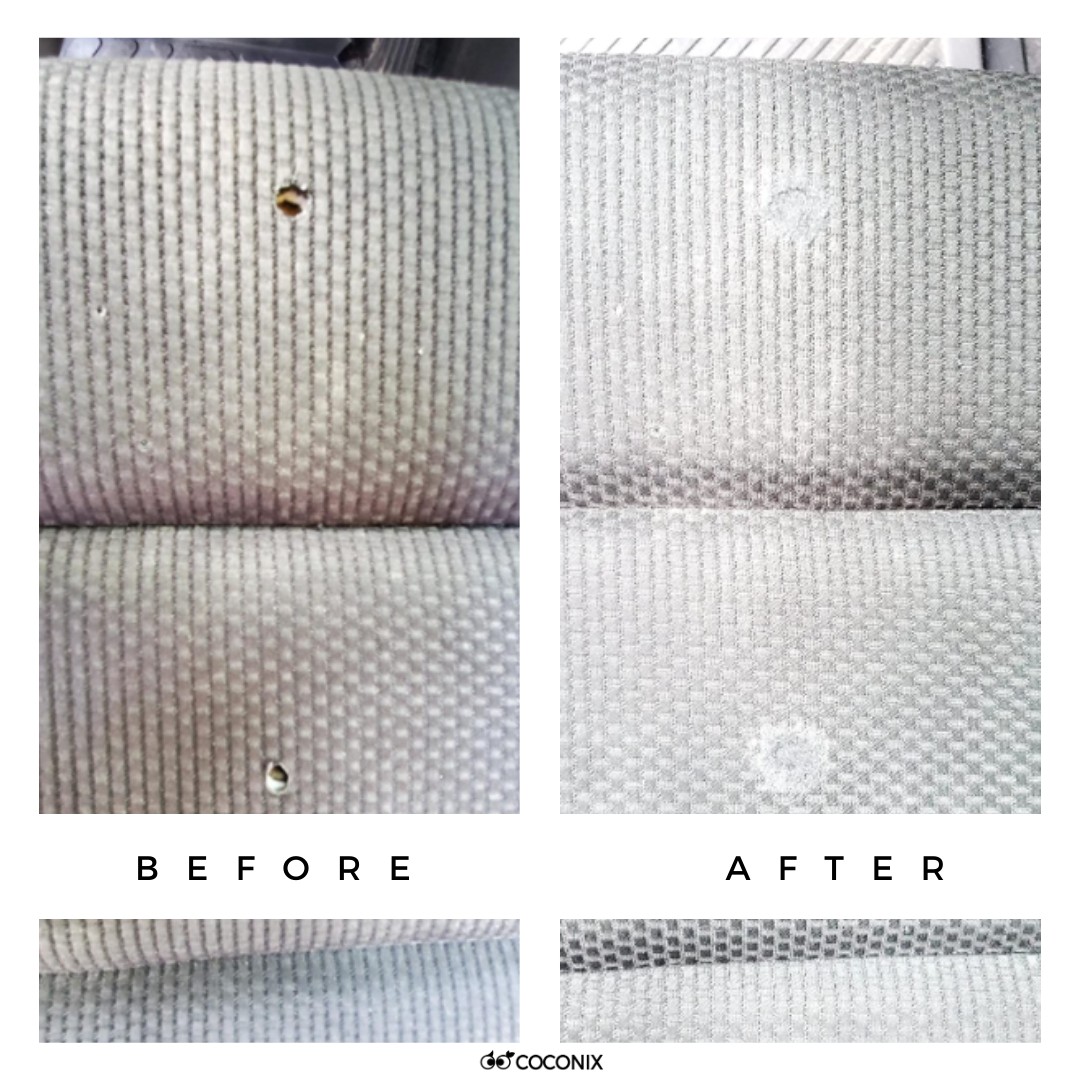
4. How to Repair Fabric Burn Marks and Holes
Repairing burn marks and holes in car fabric follows a similar process to repairing cuts and tears, often requiring a backing fabric and potentially filler material for deeper holes.
DIY Repair Meter: Moderate (DIY Repair + Professional Advice Recommended for Large Holes)
Damage Types:
- Fabric Burn Marks and Holes
Materials Needed: (Similar to cuts/tears, potentially adding cotton balls for filler)
- DIY Fabric Repair Kit (Recommended: Coconix Fabric and Carpet Repair Kit)
- Repair fibers
- Fabric glue
- Tweezers
- Mesh
- Backing fabric
- Mixing jar
- Mixing ball
- Other Tools:
- Household cleaner
- Scissors
- Cotton balls or cotton batting (filler for deeper holes)
- Rubber band
- Clear hairspray (optional)
- Sewing kit (for large holes)
Step-by-Step Process:
- Prepare the Damaged Area: Trim jagged edges and burn marks around the hole. Clean the area. If the burn has created a depression, fill the hole with cotton balls or cotton batting to provide a base for the repair. Spread the filler evenly.
- Insert Backing Fabric: Cut and insert backing fabric as described in the cuts/tears repair section. Sew for larger holes if needed.
- Mix and Shake Repair Fibers: Prepare your color-matched fiber mixture.
- Apply Fabric Glue: Apply fabric glue to the edges of the burn hole and over the backing fabric and filler (if used).
- Sift Repair Fibers: Sift the repair fibers over the glued area, ensuring complete coverage. Gently pat down.
- Drying Time: Allow 24 hours to dry and apply clear hairspray for protection.
5. How to Repair Fabric Depressed Damages
Depressed damages, often caused by heavy objects or pressure, are considered more severe and may require filler material to restore the fabric’s original shape and appearance.
DIY Repair Meter: Severe (Expert DIY Repair Recommended)
Damage Types:
- Fabric Depressed Damages
Materials Needed: (Similar to burn/holes, emphasize filler materials)
- DIY Fabric Repair Kit (Recommended: Coconix Fabric and Carpet Repair Kit)
- Repair fibers
- Fabric glue
- Tweezers
- Mesh
- Backing fabric
- Mixing jar
- Mixing ball
- Other Tools:
- Household Cleaner
- Scissors
- Foam, old cloth pieces, or cotton balls/batting (filler material)
- Fabric glue or foam adhesive (for securing filler)
- Rubber band
- Clear hairspray (optional)
- Sewing kit (for large damages)
Step-by-Step Process:
- Prepare the Damaged Area: Clean the depressed area. Insert cotton balls or batting to fill the depression, spreading it evenly.
- Fill Depression and Insert Backing Fabric: Use filler materials like foam, cloth pieces, or cotton to fill the depression, being careful not to overfill. Secure the filler with fabric glue or foam adhesive to prevent bulging. Insert backing fabric as described in previous sections, sewing for larger areas if needed.
- Mix and Shake Repair Fibers: Prepare your color-matched fiber mixture.
- Apply Fabric Glue: Apply fabric glue over the damaged area, filler, and backing fabric, working from the outside in to prevent air bubbles.
- Sift Repair Fibers: Sift the repair fibers to completely cover the glued area. Gently pack down and replicate fabric patterns.
- Drying Time: Allow 24 hours for drying and apply clear hairspray for protection.
Maintaining Damage-Free Car Fabric Interiors
Prevention is always better than cure. Here are tips to keep your car fabric interior in top condition:
- Park in Shaded Areas: Minimize direct sunlight exposure to prevent sun damage and fading of your car fabric.
- Vacuum Regularly: Vacuuming prevents dirt and dust buildup, which can damage fabric fibers over time.
- Avoid Eating and Drinking Inside: Food and drinks are major culprits for stains and odors. Minimize or avoid consuming them inside your car.
- Invest in Window Tint: Quality window tints, especially those with UV protection, can significantly reduce sun damage to your car interior.
- Be Mindful of Sharp Objects: Take care when transporting sharp or potentially damaging items. Cover sharp edges and secure items properly.
DIY car fabric repair is an accessible and rewarding way to maintain your vehicle’s interior. With the right tools, a bit of patience, and this guide, you can effectively repair various types of fabric damage, saving money and gaining valuable skills in the process. Remember, for any questions or personalized advice, the Coconix Support Team is always ready to assist you at [email protected].