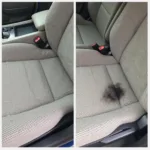
Discovering a burn hole in your leather car seat can be disheartening. Whether it’s from a dropped cigarette or a forgotten curling iron, that unsightly mark can feel like a major blemish on your car’s interior. Fortunately, you don’t have to live with the damage. There are effective DIY methods to repair burn holes in leather car seats, restoring their look and feel without breaking the bank.
Assessing the Damage: What Kind of Burn Do You Have?
Before you start gathering supplies, it’s important to assess the severity of the burn hole.
- Minor Burns: These are surface burns that haven’t fully penetrated the leather. They often appear as light scorch marks or discoloration.
- Deep Burns: These burns have penetrated through the top layer of leather, creating a hole or significant damage.
Knowing the extent of the damage will help you choose the appropriate repair method.
DIY Solutions for Minor Burns
For minor burns, you can often improve the appearance using simple household items.
1. Leather Cleaning and Preparation
- Clean the Area: Use a gentle leather cleaner and a microfiber cloth to remove dirt and debris from the burned area. Let it dry completely.
2. Using Olive Oil for Light Burns
- Apply Olive Oil: Dip a clean cotton swab into olive oil and gently rub it onto the burn mark. The oil helps to rehydrate the leather and minimize the appearance of the burn.
3. Leather Repair Kits for Deeper Surface Burns
- Leather Repair Kit: Purchase a leather repair kit that matches the color of your car seat. These kits typically include a color matching compound, a filler paste, and application tools. Follow the instructions on the kit to fill in and blend the burn mark.
Repairing Deep Burns in Leather Car Seats
Deep burns require more intensive repair techniques to fill the hole and restore the leather’s integrity.
1. Clean and Prepare the Area
- Thorough Cleaning: Use a leather cleaner to remove dirt, dust, and debris from the burned area. Allow it to dry completely.
2. Sub-Patching for Structural Support
- Sub-Patch (Optional): For larger holes, cut a small piece of leather or fabric slightly larger than the burn hole. This will act as a sub-patch to provide support. Use a leather adhesive to secure it underneath the burn hole.
3. Filling the Burn Hole
- Leather Filler: Apply a leather filler compound to the burn hole, pressing it in firmly and smoothing it out with a palette knife. Allow it to dry completely as per the manufacturer’s instructions.
4. Sanding and Shaping
- Sanding: Once dry, gently sand the filled area with fine-grit sandpaper to create a smooth, even surface.
5. Color Matching and Blending
- Leather Dye: Use a leather dye that closely matches your car seat’s color to cover the repaired area. Apply thin coats with a sponge or brush, allowing each coat to dry before applying the next.
6. Finishing Touches
- Leather Conditioner: Once the dye is dry, apply a leather conditioner to the entire seat to restore its softness and sheen.
Seeking Professional Help
While DIY repair methods can be effective, some burn holes are best left to the professionals. If you’re dealing with a large, complex burn hole or if you’re not confident in your DIY skills, it’s advisable to consult a professional car upholstery repair specialist.
Remember, preventing burns in the first place is always easier than repairing them. Be mindful of hot objects in your car and consider using seat covers to provide an extra layer of protection for your leather seats.
“Taking the time to properly repair a burn hole, even a small one, can significantly extend the life of your leather car seats and help maintain the overall value of your vehicle,” says John Davis, a veteran auto upholstery expert with over 20 years of experience.


