
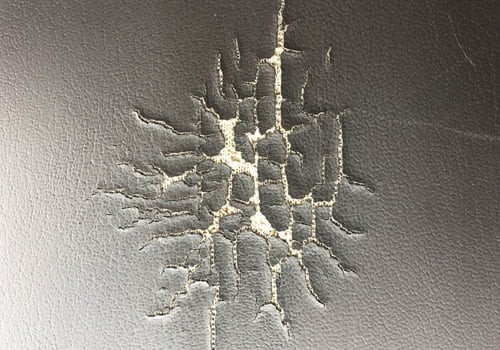
Vinyl car interiors, especially middle consoles, can suffer from cracks over time due to drying out and stress. These cracks not only look unsightly but can also feel rough and uncomfortable. Fortunately, repairing your vinyl middle console at home is achievable with the right techniques and materials. This guide will walk you through the process of repairing those cracks and restoring the look of your car’s interior, focusing on using heat-cure putty for a durable and professional finish.
While there are methods using low-temperature fillers, for a more robust and lasting repair, especially on high-stress areas like your car’s middle console, heat-cure putty is the superior choice. This type of filler creates a stronger bond and is more resistant to future cracking. You can use it on both vinyl and leather, though extra care is needed with leather due to its sensitivity to heat.
To effectively repair your vinyl console, you’ll need a few specialized tools and materials. Essential items include a heat gun, a reducer nozzle to concentrate the heat, and graining pads to replicate the original texture of your vinyl. While affordable graining papers exist, investing in a quality set of graining pads is recommended for enthusiasts or professionals for better durability and texture consistency. For unique vinyl textures, consider a graining mold kit to create custom pads. Remember that heat-cure compounds and catalysts have a limited shelf life, so purchase only what you need for your immediate project or commit to creating a variety of graining pads for future use.
Let’s dive into the step-by-step process of repairing your vinyl middle console using heat-cure filler.
-
Prepare the Damaged Area: Begin by addressing any holes or tears. Use a subpatch material and adhesive to reinforce the area from behind, ensuring a stable base for the filler.
-
Smooth Out Sharp Edges: Using a fresh razor blade held almost parallel to the vinyl surface, carefully shave away any sharp, raised, or curling edges of the cracks. The goal is to create a smoother, more even surface for the filler to adhere to.
-
Gently Melt Low-Profile Edges (Optional but Recommended): For edges that are too low to shave safely or are in tricky areas, a heat gun can be used to gently melt and soften them. Apply heat at around 550°F (290°C) from a distance of 2-6 inches (5-15 cm) for short bursts of 5 to 15 seconds. Observe the vinyl closely; it will become slightly glossy as it softens. For thicker vinyl, you might cautiously increase the heat, but always exercise caution to avoid burning or excessive shrinking.
-
Texturize Melted Areas Immediately: As soon as you remove the heat gun from a melted area, quickly press a graining pad onto the softened vinyl. Use a small, flat object like a wood block to apply even pressure, preventing dents in the surrounding console. Hold the graining pad firmly for 10 to 15 seconds to imprint the texture.
-
Cool and Repeat Preparation if Needed: Allow the vinyl to cool to room temperature. Assess the area and repeat steps 3 and 4 as necessary to achieve a level and smooth surface before applying the filler.
-
Clean the Repair Area: Thoroughly clean the prepared vinyl surface using denatured or rubbing alcohol. This removes any residue, grease, or contaminants, ensuring optimal adhesion of the heat-cure filler.
-
Apply Heat-Cure Filler: Using a palette knife or needle tool, carefully apply a thin, even coat of heat-cure filler into the cracks and damaged areas. Level the filler and remove any excess using a plastic spreader to create a smooth, flush surface.
-
Heat Cure the Filler: Apply heat from the heat gun at around 550°F (290°C), holding it 8-10 inches (20-25 cm) away from the repaired area. Warm the filler until it transitions from a glossy white cream to a more translucent, frosted appearance. Be cautious not to overheat; excessive heat will cause it to become glossy again and potentially melt the surrounding vinyl.
-
Emboss the Filler with Graining Pad: Immediately after heating, firmly press a graining pad onto the warmed filler using a wooden block and even pressure. Hold for 5 to 10 seconds. This step imprints the grain texture into the filler as it cools and helps to level any minor imperfections.
-
Cool Down: Allow the repaired area to cool completely to room temperature. While professional shops may use a chill block for rapid cooling, simply waiting a few minutes or applying a damp cloth works effectively.
-
Repeat Filler Application (If Necessary): Repeat steps 7-10, applying thin layers of filler and texturizing, until the repaired surface is perfectly level and smooth with the surrounding vinyl.
-
Final Texture Blending (Optional): For a seamless finish, apply a final, very thin coat of heat-cure filler and use a gloved finger to lightly stipple or texturize it, blending any lines or slight texture inconsistencies. Heat and emboss with the grain pad one last time.
-
Enhance Texture Further (Optional): For a more pronounced or blended texture, consider using a spray grain product like SEM Chip Guard to further refine the repaired area’s texture.
-
Color and Protect (Optional): If desired, apply a vinyl color restorer like Rub ‘n Restore® color to match the original console color, followed by a clear protective finish like Clear Prep+Finish™ for added durability and protection.
-
Reworking if Needed: If you need to rework the repair for any reason, use a cleaner like Flite™ or rubbing alcohol to remove any applied color before reapplying heat-cure filler.
By following these steps, you can effectively repair cracks in your vinyl middle console, restoring its appearance and extending its lifespan. With patience and careful execution, you can achieve professional-looking results right in your own garage.
For a visual guide, consider watching video demonstrations on vinyl and leather repair techniques using heat-cure fillers to further enhance your understanding and skills.
Shop Our Products