
Experiencing a flat tire can be a frustrating and inconvenient event for any driver. While roadside assistance or a professional tire shop are always reliable options, understanding how to perform a tire puncture repair yourself can be a valuable skill. However, it’s crucial to distinguish between temporary fixes and proper, industry-standard repairs to ensure your safety and the longevity of your tire. This guide will provide you with a detailed understanding of how to repair a tire puncture on your car safely and effectively, focusing on the correct methods and highlighting the limitations of temporary solutions.
Understanding Temporary vs. Permanent Tire Repairs
When faced with a flat tire, many drivers opt for quick fixes like tire plugs or string repairs. These methods are often marketed as convenient solutions to get you back on the road quickly. It’s important to understand that tire plugs and string repairs are only temporary measures. They are designed to provide a temporary seal, allowing you to reach a service center or your home where a proper repair can be performed.
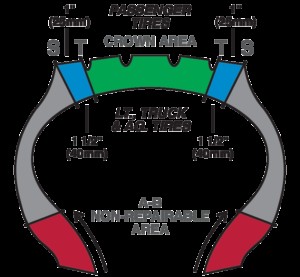 the repairable are of most tires is restricted to the crown
The primary issue with plug and string repairs is that they often fail to create a complete seal of the puncture injury. While they may effectively stop air from leaking out, they do not address the underlying damage within the tire structure. This incomplete seal can allow moisture and debris to penetrate the tire’s body over time. This intrusion can lead to internal damage to the steel belts and cords, potentially causing a dangerous tire blowout in the future. Ignoring a proper repair after using a plug can have serious consequences, compromising your safety on the road.
Why Patch-Only Repairs Are Insufficient
Another common misconception is that applying a patch to the inner tire is a sufficient and permanent repair. While a patch, when properly installed, can effectively hold air and prevent leaks, it also falls short of being a complete and safe repair on its own. Similar to plug-only repairs, a patch applied alone does not fill the puncture channel. This means that the pathway for air and moisture to enter the tire from the outside remains open.
Over time, this ingress of air and moisture through the injury channel can degrade the tire’s internal structure, leading to premature wear and an increased risk of tire failure. A patch-only repair, while seemingly addressing the immediate problem of air loss, neglects the crucial step of sealing the puncture channel itself, leaving your tire vulnerable to further damage.
The Industry-Standard Tire Repair Process: The Patch-Plug Combination
To ensure a safe and lasting tire repair, the industry standard and recommended method involves a combination of both a patch and a plug. This two-part repair system is designed to completely seal the puncture from the inside out, addressing both the air leak and the structural integrity of the tire. This method adheres to guidelines developed by tire manufacturers and industry experts to maximize safety and tire lifespan after a puncture.
The proper tire repair process can be remembered using the acronym R.E.P.A.I.R.:
R – Remove the Tire
The first crucial step is to remove the tire from the wheel assembly. This is essential for a thorough inspection of both the exterior and interior of the tire. Repairing a tire while it remains on the wheel is not possible for a proper patch-plug procedure and prevents a comprehensive assessment of the damage. Removing the tire allows for a complete examination to determine if a safe repair is even possible.
E – Evaluate the Damage
Once the tire is removed, the puncture can be thoroughly evaluated. This involves examining the size, angle, and location of the injury. A careful inspection will determine if the puncture has caused any significant damage to the tire’s internal components, such as the steel belts or fabric cords. Damage beyond a certain extent or in specific areas may render the tire irreparable and necessitate replacement.
P – Prepare the Tire
If the tire is deemed repairable after evaluation, the next step is to prepare the repair area. This involves cleaning and preparing both the puncture channel and the inner liner of the tire to ensure proper adhesion of the repair unit.
- Injury Preparation: Using a specialized tool like a carbide cutter, the injury channel is drilled out. This process removes any damaged cords, debris, and irregular edges around the puncture, creating a clean and consistent surface for the plug to properly seal.
- Inner Liner Preparation: The inner liner around the puncture area is cleaned and buffed to create a slightly rough texture. This roughening is crucial as it maximizes the adhesion of the patch to the inner liner, ensuring a strong and airtight seal.
A – Apply Vulcanizing Fluid
Apply vulcanizing fluid to both the prepared injury channel and the buffed area on the inner liner. Vulcanizing fluid is a chemical adhesive that is essential for creating a permanent bond between the repair unit and the tire rubber. After application, the vulcanizing fluid needs to air dry for approximately 5 to 10 minutes. This drying time is critical for the fluid to become tacky and ready for the repair unit installation.
I – Install the Patch-Plug
The next step involves installing the combination patch-plug repair unit. This unit is designed to be inserted through the puncture channel from the inside of the tire. The plug portion fills the puncture channel, while the patch portion is applied to the prepared inner liner. Once the repair unit is in place, a tire stitcher tool is used to firmly roll and press the patch onto the inner liner. This stitching process is vital for removing any trapped air bubbles and ensuring complete contact and adhesion of the patch to the tire.
R – Return to Service
The final step is to return the tire to service. This involves several actions to ensure the tire is safely put back into use:
- Sealant Application: The area around the applied patch on the inner liner is treated with a thin layer of rubber sealant. This provides an extra layer of protection and ensures a complete airtight seal.
- Excess Trim: Any excess material from the plug protruding beyond the tire’s tread surface is trimmed to approximately ¼ inch.
- Remounting and Inflation: The repaired tire is then remounted onto the wheel rim, inflated to the correct tire pressure, and balanced to ensure smooth driving.
- Reinstallation: Finally, the wheel and tire assembly is reinstalled back onto the vehicle.
When Tire Repair is Safe and Permissible
While the patch-plug method is the proper way to repair a tire puncture, not all punctures are safely repairable. Several factors determine whether a tire can be repaired or if it requires replacement. These factors primarily relate to the location and size of the puncture, as well as the overall condition of the tire.
Location of the Injury
For passenger car tires, repairs are only considered safe when the puncture is located within the crown area of the tire. The crown is the central tread area of the tire. Damage to the shoulder (the rounded edge of the tire between the crown and sidewall) or the sidewall itself is generally not repairable. The sidewall is a critical flexing zone of the tire, and repairs in this area are highly likely to fail, leading to dangerous blowouts.
Size of the Puncture
The size of the puncture also dictates repairability. For most passenger and light truck tires with fabric plies, the maximum allowable puncture size for repair is ¼ inch (6mm). For steel-belted tires found on light, medium, and heavy-duty trucks, a slightly larger puncture size of up to 3/8 inch (10mm) may be repairable. Punctures larger than these limits compromise the tire’s structural integrity too significantly for a safe and reliable repair.
Overall Tire Condition
The general condition of the tire is another crucial factor. Even if a puncture is within the repairable size and location limits, certain tire conditions can make repair unsafe. These conditions include:
- Excessive Wear: Tires that are nearing the end of their tread life or are already worn below legal limits should not be repaired, as their overall structural integrity is already compromised.
- Casing Separation: Any signs of casing separation, where the tire layers are beginning to delaminate, make repair unsafe.
- Impact Damage: Tires that have sustained significant impact damage, such as from hitting a curb or pothole, may have internal damage that is not visible and makes repair unreliable.
- Previous Improper Repairs: Tires that have been previously subjected to temporary or improper repairs may be compromised and unsuitable for proper repair.
- Run-Flat Damage: Tires that have been driven on while flat for an extended period may have internal sidewall damage that is not repairable.
For a more detailed understanding of repairable versus non-repairable tire conditions, consulting a tire specialist or referring to detailed resources is recommended.
Conclusion: Prioritize Proper Tire Repair for Safety
Dealing with a flat or leaky tire is an inevitable part of vehicle ownership. While quick fixes like plugs and patches may seem convenient in emergency situations, they are not substitutes for proper tire repair. Taking shortcuts and opting for temporary solutions can compromise your safety and the longevity of your tires. Investing the time and effort to ensure a proper patch-plug tire repair, either by doing it yourself with the correct knowledge and tools or by seeking a reputable tire repair shop, is essential for safe driving and peace of mind. Always prioritize industry-standard repair procedures and consult with tire professionals when in doubt to guarantee the safety and reliability of your vehicle.