Fixing a paint chip on your car is more than just a cosmetic concern. It protects your car’s body from rust and corrosion. Ignoring even a small chip can lead to costly repairs down the road. Fortunately, addressing this issue is often easier than you think, and you can frequently do it yourself without needing a professional. This guide will walk you through the process of how to repair a paint chip on your car, from assessing the damage to achieving a professional-looking finish.
Assessing the Damage: More Than Just a Scratch
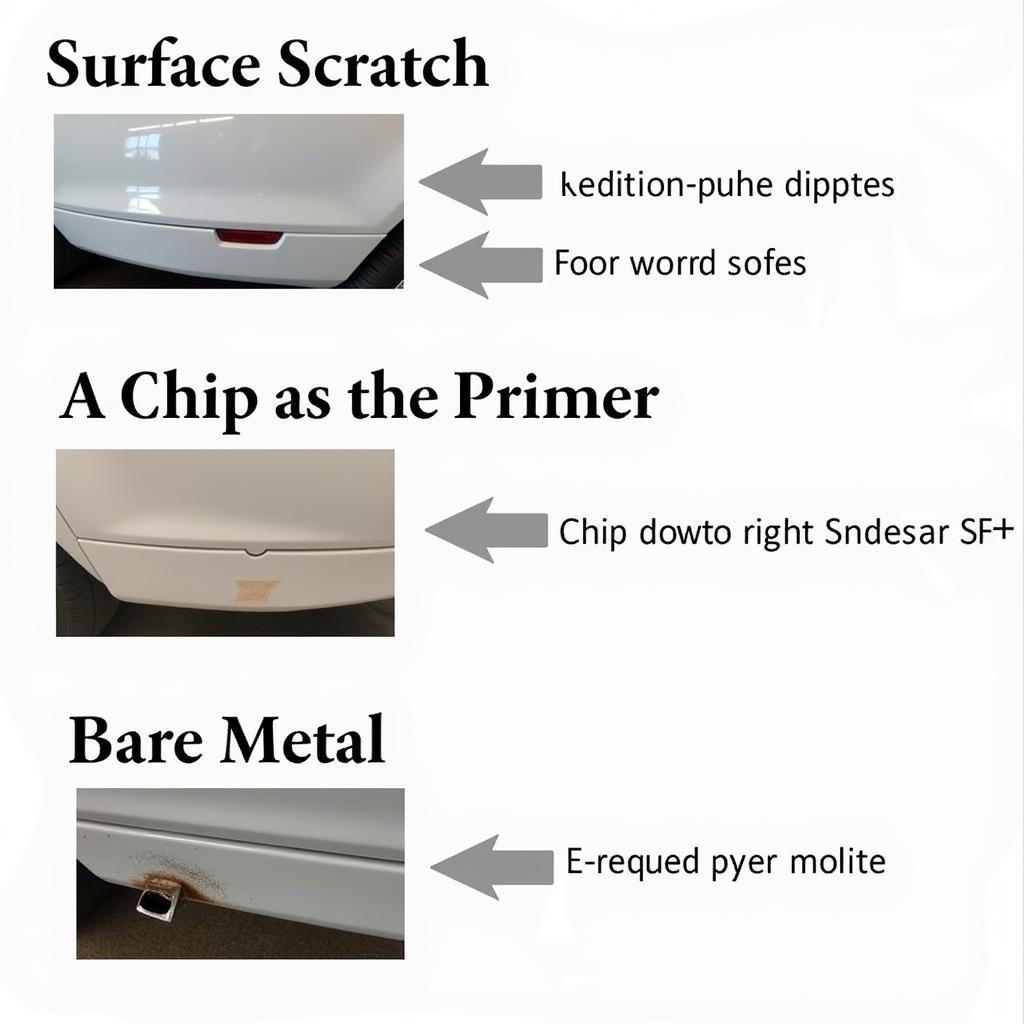
Before you start, it’s important to understand the extent of the damage. Is it a minor surface scratch, a chip that’s penetrated the primer, or something deeper that’s reached the bare metal? This determines the approach and materials you’ll need. A simple surface scratch might just need a good polishing, while a deeper chip requires more attention. Check the area carefully for any signs of rust. If rust is present, you’ll need to address it before proceeding with the paint repair. For simple paint chip repairs you can likely tackle the project yourself. However, if the chip is extensive or has caused significant damage, consider consulting with a professional car paint repair service. You can find many helpful resources online, including information on car paint chip repair service new york.
Identifying the Type of Chip: A Closer Look
There are generally three types of paint chips you might encounter:
- Surface Scratches: These are minor imperfections affecting only the clear coat.
- Chips to the Primer: These expose the primer underneath the paint, increasing the risk of rust.
- Deep Chips to the Metal: These are the most serious, as they expose the bare metal and require immediate attention.
Knowing the difference is crucial for selecting the correct repair method. A small surface scratch may be addressed with touch-up paint, while deeper damage might require sanding, priming, and a more involved approach.
Gathering Your Materials: The Right Tools for the Job
Once you’ve assessed the damage, gather the necessary materials. This might include:
- Touch-up paint: Match this precisely to your car’s color code, found on a sticker usually located in the driver’s side doorjamb or under the hood.
- Primer (if needed): Use an automotive primer if the chip has reached the metal.
- Sandpaper: Fine-grit sandpaper (2000-grit) is ideal for smoothing the area.
- Rubbing compound: This helps blend the repaired area seamlessly with the surrounding paint.
- Wax or sealant: Protects the repaired area and adds shine.
- Applicator: A touch-up paint pen or a fine-tipped brush works well.
- Masking tape: Protects the surrounding area during the repair process.
- Cleaning solution: Use a wax and grease remover to prepare the surface.
- Soft cloths: For applying and buffing.
Having the right materials ensures a smooth repair process and a professional-looking result. For more in-depth advice on bodywork repairs, you can find information on spray paint car body repair.
What if the Sun Has Damaged My Car’s Paint?
Sun damage can significantly affect your car’s paint, causing fading and peeling. If this is the case, you might want to consider the cost of professional repair. For more details, check out sun damage car paint repair cost.
The Repair Process: Step-by-Step Guide
- Clean the Area: Thoroughly clean the chipped area with a wax and grease remover and a soft cloth.
- Sand (If Necessary): If the chip is deep, carefully sand the area with fine-grit sandpaper to smooth any rough edges. Be gentle to avoid removing more paint than necessary.
- Apply Primer (If Necessary): If bare metal is exposed, apply a thin coat of automotive primer to the chipped area. Let it dry completely before proceeding.
- Apply Touch-Up Paint: Carefully apply the touch-up paint to the chip, using a touch-up pen or a fine-tipped brush. Apply multiple thin coats, allowing each coat to dry before applying the next. Avoid applying too much paint at once, as this can lead to drips and an uneven finish.
- Level the Paint: Once the paint is dry, use fine-grit sandpaper (2000-grit or higher) to carefully level the repaired area with the surrounding paint. Wet sanding is recommended for this step.
- Polish and Buff: Use rubbing compound and a soft cloth to polish the repaired area until it blends seamlessly with the original paint. Finish with a wax or sealant to protect the repair and enhance the shine.
Preventing Future Chips: Proactive Measures
Preventing paint chips is easier than repairing them. Consider these preventative measures:
- Regular Washing and Waxing: Keeps the paint protected and helps prevent minor scratches.
- Parking Strategically: Park away from other cars and potential hazards like shopping carts.
- Touch-Up Minor Chips Promptly: Addressing small chips immediately prevents them from becoming larger and more difficult to repair.
- Protective Film: Consider applying a clear protective film to vulnerable areas like the hood and fenders.
John Smith, an experienced auto body technician from New York, emphasizes, “Regular maintenance, including washing and waxing, is the first line of defense against paint damage. It helps to maintain the integrity of the clear coat, protecting the paint underneath.”
Conclusion: Maintaining Your Car’s Appearance
Repairing a paint chip on your car is a manageable DIY project that can save you money and maintain your car’s value. By following these steps and taking preventative measures, you can keep your car looking its best and protect it from future damage. Addressing even minor chips helps prevent rust and corrosion, saving you from potentially costly repairs down the road. Remember, a little effort goes a long way in preserving your car’s appearance and protecting your investment. If you’re looking for more information on car paint repair, be sure to visit car paint repair.com.
FAQ
- Can I use nail polish to repair a paint chip? No, nail polish is not formulated for automotive paint and will not adhere properly or provide adequate protection.
- How long does touch-up paint take to dry? Drying times vary depending on the product and environmental conditions, but generally, allow each coat to dry for at least 30 minutes before applying the next.
- What if I can’t find my car’s paint code? Contact your car dealer or an automotive paint supplier; they can usually help you identify the correct color code.
- Do I need to sand before applying touch-up paint? Sanding is only necessary if the chip is deep and has rough edges. For minor surface scratches, sanding may not be required.
- Can I repair a paint chip in direct sunlight? No, avoid repairing paint chips in direct sunlight or extreme temperatures, as this can affect the drying process and the final result. A shaded area with moderate temperatures is ideal.
- How much does professional paint chip repair cost? The cost varies depending on the extent of the damage, but you can get a general idea by researching car paint repair costs in your area. Resources like car paint repair airdrie can provide local insights.
- What is the best way to prevent paint chips? Regular washing and waxing, strategic parking, and prompt touch-ups are the most effective ways to prevent paint chips.
Need more help? Contact us via WhatsApp: +1(641)206-8880, or Email: [email protected]. We have a 24/7 customer support team ready to assist you.


