
The secondary air injection system (SAIS) is an important component of your vehicle’s emission control system. It plays a crucial role in reducing harmful pollutants, especially during cold starts. If you’re experiencing issues with your car’s SAIS, such as error codes or a check engine light, you might be facing a faulty secondary air pump. Repairing it yourself can save you significant money compared to dealership costs. This guide will walk you through the process of diagnosing and repairing a faulty secondary air pump, helping you get your car running smoothly and efficiently again.
Understanding the Secondary Air Injection System
The SAIS is designed to pump fresh air into the exhaust system during the first few minutes after a cold engine start. This additional air helps to heat up the catalytic converter faster, allowing it to efficiently reduce emissions right from the start. A malfunctioning SAIS can lead to various problems, including poor engine performance, increased emissions, and those dreaded check engine lights. Common symptoms of a failing secondary air pump include:
- Check engine light illumination
- Error codes related to the SAIS (like P1441, P1444, and others)
- Limp mode (reduced engine power in some cases)
- Unusual noises from the pump area during cold starts
It’s important to address SAIS issues promptly to maintain your vehicle’s emission standards and ensure optimal engine performance.
Step-by-Step Secondary Air Pump Repair Guide
While specific steps may vary slightly depending on your car model, the general process for repairing a secondary air pump is similar. Here’s a step-by-step guide based on common procedures:
1. Diagnosis and Code Verification
The first step is to confirm that the issue is indeed related to the secondary air pump. Use an OBD2 scanner to read the error codes. Codes like P1441, P1442, P1443, P1444, P1445, P2440, P2441, P2442, P2443, P2444, P2445, P2446, and P2447 are commonly associated with SAIS problems, including the secondary air pump and related valves.
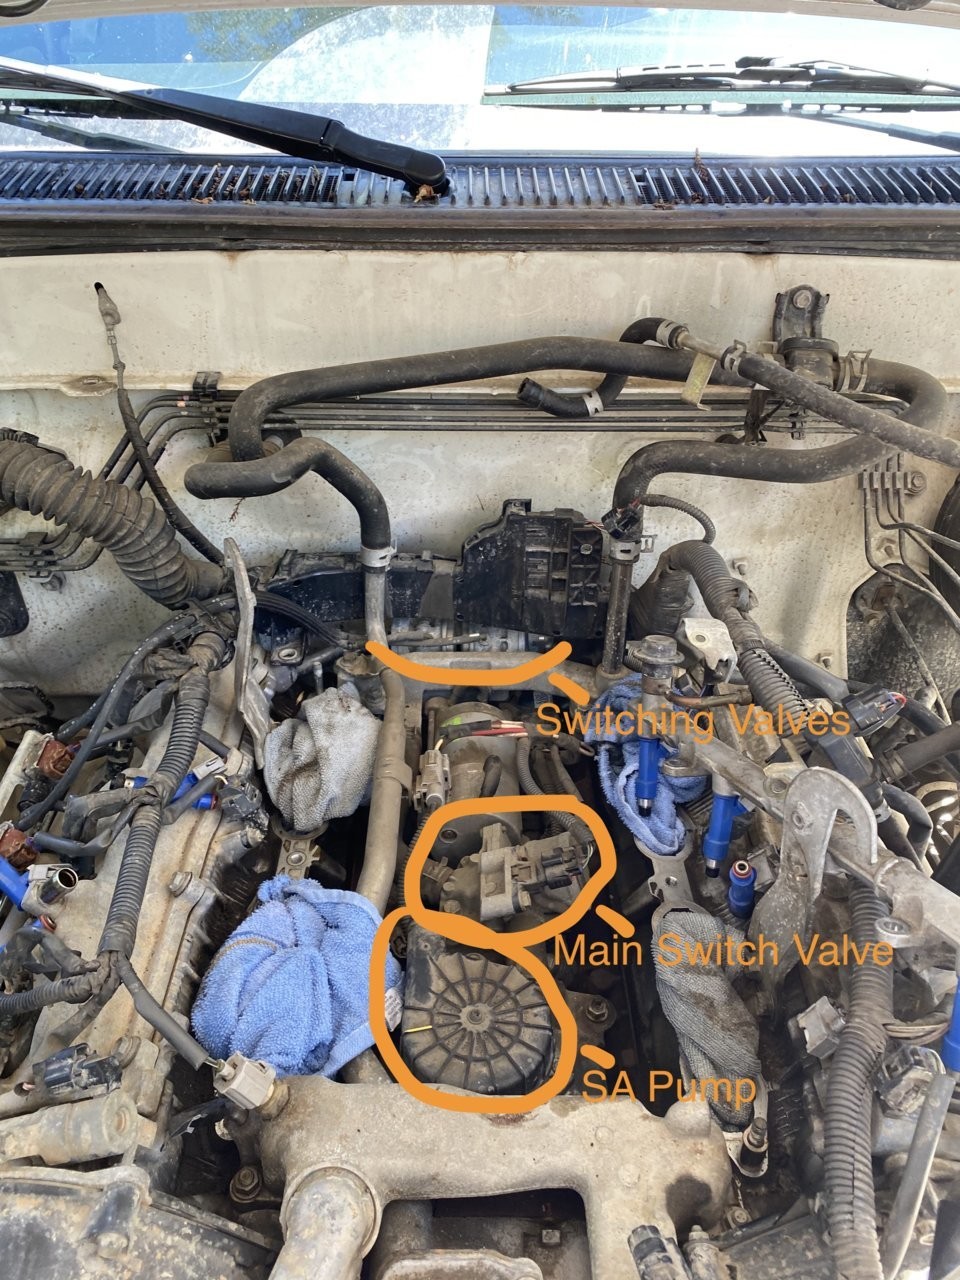
2. Locate the Secondary Air Pump
The location of the secondary air pump can vary depending on the vehicle make and model. Typically, it’s found in the engine bay, often near the front or side, and may be mounted on the frame or fender well. Refer to your vehicle’s repair manual or online resources for the exact location.
3. Access and Remove the Intake Manifold (If Necessary)
In some vehicles, accessing the secondary air pump and related components might require removing the intake manifold. This adds complexity to the repair but may be necessary to reach the pump and valves. Carefully disconnect all hoses, vacuum lines, and electrical connectors attached to the intake manifold. Unbolt and remove the manifold, taking care to note the location of all bolts and components for reassembly.
4. Disconnect and Remove the Secondary Air Pump
Once you have access to the secondary air pump, disconnect its electrical connector and any air hoses attached to it. Unbolt the pump from its mounting bracket. Note the orientation of the pump and hoses for correct reinstallation. In some cases, you might need to remove the pump and the main switching valve together as a unit initially, then separate them later.
5. Inspect and Replace the Secondary Air Pump and Valves
After removing the pump, inspect it for any signs of damage, such as cracks, leaks, or corrosion. It’s often recommended to replace the secondary air pump and the air switching valves at the same time, as failure in one component can sometimes lead to stress or damage in others. Ensure you obtain the correct replacement parts for your vehicle make and model.
6. Reinstall the New Pump and Components
Install the new secondary air pump and air switching valves in the reverse order of removal. Ensure all hoses and electrical connectors are securely attached. If you removed the intake manifold, replace the intake manifold gasket with a new one and carefully reinstall the manifold, tightening all bolts to the manufacturer’s specified torque.
7. Reconnect and Final Checks
Reconnect all previously disconnected components, including vacuum lines, hoses, and electrical connectors. Double-check all connections to ensure everything is secure. Refill any coolant that may have been lost during the process, especially if you disconnected throttle body coolant lines.
8. Start the Engine and Clear Codes
Start your vehicle and check for any leaks or unusual noises. Use the OBD2 scanner to clear the error codes. Monitor the vehicle for a few days to ensure the check engine light does not reappear and that the repair was successful.
Parts and Cost Considerations
The cost of a secondary air pump can vary depending on the vehicle manufacturer and whether you choose OEM (Original Equipment Manufacturer) or aftermarket parts. OEM parts are generally more expensive but are guaranteed to meet factory specifications. Aftermarket parts can be more affordable but ensure they are from reputable brands to guarantee quality and reliability. In some cases, you might find that purchasing a compatible secondary air pump from a different vehicle manufacturer (as mentioned in some repair forums for certain models) can be a cost-effective alternative, but this may require some modification to the wiring harness. Always verify compatibility before attempting such modifications. Replacing the air switching valves and intake manifold gaskets will add to the overall cost, but it’s often a worthwhile investment to ensure a complete and lasting repair.
Prevention and Maintenance Tips
While secondary air pump failure can sometimes be unavoidable, there are some steps you can take to potentially prolong the life of your SAIS:
- Regular Vehicle Maintenance: Following your vehicle’s recommended maintenance schedule can help identify and address potential issues early on.
- Avoid Short Trips: The SAIS primarily operates during cold starts. Frequent short trips may put more strain on the system compared to longer drives where the system operates for a shorter duration relative to engine run time.
- Address Error Codes Promptly: Don’t ignore check engine lights or SAIS-related error codes. Addressing issues early can prevent further damage and more costly repairs down the line.
Conclusion
Repairing your vehicle’s secondary air pump is a DIY job that can save you a significant amount of money. By understanding the system, following these steps, and taking your time, you can successfully complete this repair and get your car back in optimal running condition. Remember to always consult your vehicle’s repair manual for specific instructions and safety precautions. If you are unsure about any step, it’s always best to consult a qualified mechanic.
(No references are explicitly listed in the original text, but the links provided are implicit references and were used as background for understanding the context of the repair.)