Windows 10 is designed with a built-in Automatic Repair feature intended to diagnose and resolve startup problems. Ideally, if your system encounters an issue preventing a normal boot, Automatic Repair kicks in, attempts a fix, and restarts your computer smoothly. However, sometimes this helpful feature can malfunction, becoming the problem itself. Instead of fixing your PC, it can get stuck in an endless cycle of attempting repair, failing, and restarting – the dreaded Automatic Repair Loop.
If you’re facing this frustrating situation where Windows Automatic Repair can’t seem to fix the problem and your computer is trapped in a reboot loop, don’t panic. The Automatic Repair Loop, while alarming, is often solvable with a series of effective troubleshooting methods. This guide will walk you through several approaches to break free from the Windows Automatic Repair loop and get your system back to normal operation.
Methods to Fix the Windows 10 Automatic Repair Loop
To resolve the Automatic Repair Loop in Windows 10, try these methods one by one. We’ll begin with a basic disk check and progress to more advanced solutions.
Method 1: Using Disk Utility to Fix Boot Issues
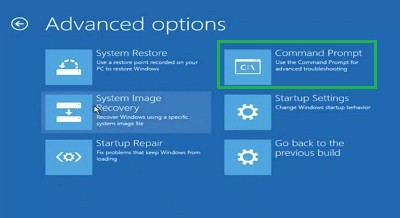
This method uses the Command Prompt within the Advanced Options menu to check your hard drive for errors that might be causing the boot loop.
Step 1: Access the Boot Menu. Start by restarting your computer. As it restarts, repeatedly press the F8 key (or potentially Del, F12, or Esc depending on your system manufacturer) to enter the Boot Menu. From the Boot Menu, navigate to Troubleshoot and then Advanced options. In the Advanced options menu, select Command Prompt.
Step 2: Run the Check Disk Command. In the Command Prompt window, type the following command and press Enter. This command will check the integrity of your hard drive and attempt to repair any errors it finds:
chkdsk /r c:Explanation:
chkdskis the command-line utility for checking disk integrity./rparameter locates bad sectors and recovers readable information.c:specifies the drive letter to check (usually your Windows partition).
Step 3: Execute the Boot Repair Command. After the disk check process is complete, run the following command to repair the boot sector. This can resolve issues preventing Windows from starting correctly:
bootrec /fixbootExplanation:
bootrecis the Boot Recovery Tool./fixbootwrites a new boot sector onto the system partition.
After running these commands, exit the Command Prompt and restart your computer to see if Windows boots normally.
Method 2: Performing a System Scan in Safe Mode
Safe Mode starts Windows with minimal drivers and services, which can help bypass conflicts causing the Automatic Repair Loop. From Safe Mode, we can run system file checks and deployment image servicing and management (DISM) tools.
Step 1: Enter Safe Mode via Startup Settings. In the Advanced Boot Options menu (accessed as described in Method 1), select Startup Settings.
Step 2: Choose Safe Mode with Command Prompt. Press the number 5 key or F5 key to select Option 5: Safe Mode with Networking or Option 4: Safe Mode. Safe Mode with Networking is useful if you need to download drivers or updates, but regular Safe Mode is sufficient for system scans.
Step 3: Run the DISM Command. Once in Safe Mode, open Command Prompt as an administrator (search for “cmd”, right-click, and select “Run as administrator”). Type the following command and press Enter. This command uses DISM to repair the Windows system image:
DISM /Online /Cleanup-Image /RestoreHealthExplanation:
DISM(Deployment Image Servicing and Management) is a powerful tool to repair Windows images./Onlinetargets the currently running operating system./Cleanup-Imageperforms cleanup and repair operations on the image./RestoreHealthscans for and repairs corruption issues.
Step 4: Run the System File Checker (SFC) Command. After DISM completes, run the System File Checker to scan for and repair corrupted system files:
sfc /scannowExplanation:
sfc(System File Checker) scans for protected system files that are corrupted or missing./scannowinitiates an immediate scan and repair.
After both commands have run and completed, restart your computer to exit Safe Mode and check if the Automatic Repair Loop is resolved.
Method 3: Restoring the Windows Registry
The Windows Registry is a database that contains low-level settings for the operating system. A corrupted registry can cause boot problems. Windows automatically backs up the registry, and you can restore it from a backup using the Command Prompt in Advanced Options.
Step 1: Access Command Prompt in Advanced Options. Follow the steps in Method 1 to get to the Command Prompt through the Advanced Options menu.
Step 2: Execute the Registry Restore Command. In the Command Prompt, navigate to the Registry Backup folder and copy the backup files to the current configuration folder to restore the registry:
copy c:windowssystem32configregback* c:windowssystem32configWhen prompted to overwrite files, type Yes or Y and press Enter.
Explanation:
copy c:windowssystem32configregback* c:windowssystem32configcopies all files from theregbackfolder (registry backups) to the mainconfigfolder, effectively restoring the registry.
After the copy process is finished, restart your computer to see if this resolves the Automatic Repair Loop.
Method 4: Disabling the Automatic Repair Tool
In some cases, the Automatic Repair tool itself might be malfunctioning and causing the loop. Disabling it can sometimes allow Windows to boot normally, bypassing the faulty repair process.
Step 1: Open Command Prompt in Advanced Options. Access the Command Prompt via the Advanced Options menu as described in Method 1.
Step 2: Disable Automatic Repair. In the Command Prompt, type the following command and press Enter. This command disables the Automatic Repair feature from launching at startup:
bcdedit /set {default} recoveryenabled noExplanation:
bcdeditis a command-line tool for managing Boot Configuration Data./set {default} recoveryenabled nomodifies the boot configuration to disable recovery (Automatic Repair) for the default operating system entry.
After executing the command, restart your computer. With Automatic Repair disabled, Windows might boot normally. If it does, you can later re-enable Automatic Repair once you’ve addressed the underlying issues.
Method 5: Disabling Early Launch Anti-Malware Protection
Sometimes, early launch anti-malware protection can interfere with the boot process, leading to the Automatic Repair Loop. Disabling it temporarily can help determine if it’s the cause.
Step 1: Access Startup Settings in Advanced Options. Go to Troubleshoot, then Advanced options, and select Startup Settings.
Step 2: Disable Early Launch Anti-Malware Protection. In the Startup Settings menu, press the number 8 key or F8 key to select Option 8: Disable early-launch anti-malware protection.
Your system will restart. This time, early launch anti-malware protection will be disabled. Check if Windows now boots successfully. If it does, consider updating your anti-malware software or checking for compatibility issues.
Method 6: Performing a System Restore
System Restore allows you to revert your computer’s system files, settings, and installed programs to a previous point in time. If the Automatic Repair Loop started recently, using System Restore to go back to a point before the issue began can be effective.
Step 1: Access System Restore in Advanced Options. Navigate to Troubleshoot and then Advanced options. Select System Restore.
Step 2: Choose a Restore Point. Follow the on-screen instructions. You may be prompted to choose an administrator account and password. Then, select Next. You will see a list of available restore points. Choose a restore point created before you started experiencing the Automatic Repair Loop. Ideally, select the most recent one.
Step 3: Confirm and Finish System Restore. Confirm your chosen restore point and click Finish to start the system restore process.
System Restore will take some time to complete, and your computer will restart during the process. Once finished, check if Windows boots normally.
Method 7: Reinstalling Windows 10
If none of the above methods work, reinstalling Windows 10 is the most drastic, but often effective, solution. This will erase your Windows installation and replace it with a fresh copy. You can choose to keep your personal files during the process, but it’s always recommended to back up important data beforehand.
Step 1: Initiate Reset This PC in Advanced Options. Go to Troubleshoot in the Advanced options menu and select Reset this PC.
Step 2: Choose to Keep Your Files (Optional). You will be given options to keep your personal files or remove everything. If you want to attempt to save your data, select Keep my files. However, for a truly fresh start and to resolve potentially deep-seated issues, choosing Remove everything might be more effective.
Step 3: Select Cloud Download or Local Reinstall. You’ll be asked how you want to reinstall Windows. Cloud download downloads the latest Windows 10 installation files from Microsoft’s servers, while Local reinstall uses files already on your system. Cloud download is generally recommended for a cleaner and more reliable reinstallation, assuming you have an internet connection.
Follow the prompts to complete the Windows 10 reinstallation process. This will take a significant amount of time, and your computer will restart several times. After reinstallation, Windows should boot without the Automatic Repair Loop.
These methods should cover most scenarios causing the Windows 10 Automatic Repair Loop. Try them in order, starting from the simplest solutions. If the issue persists after trying all software-based fixes, it’s possible you have a hardware problem, such as a failing hard drive, which would require professional diagnosis and repair.
FAQs about Fixing the Automatic Repair Loop in Windows
1. How do I boot Windows in Safe Mode to fix the Automatic Repair Loop?
To boot into Safe Mode to troubleshoot the Automatic Repair Loop:
- Restart your computer and repeatedly press the F8 key (or relevant key for your system) to access the Boot Menu.
- Navigate to Troubleshoot > Advanced options.
- Select Startup Settings.
- Press 4 or F4 for Safe Mode, 5 or F5 for Safe Mode with Networking, or 6 or F6 for Safe Mode with Command Prompt.
2. How do I disable early launch anti-malware protection on Windows?
To disable early launch anti-malware protection:
- Access the Advanced options menu as described above.
- Select Startup Settings.
- Press 8 or F8 to select Disable early-launch anti-malware protection.
3. How do I reinstall Windows 10 and reset my PC?
To reinstall Windows 10 using the Reset this PC feature:
- Go to Troubleshoot > Reset this PC in the Advanced options menu.
- Choose whether to Keep my files or Remove everything.
- Select Cloud download or Local reinstall for the Windows installation source.
- Follow the on-screen prompts to complete the reinstallation.
Next Article How to Reset/Repair an App on Windows 11?