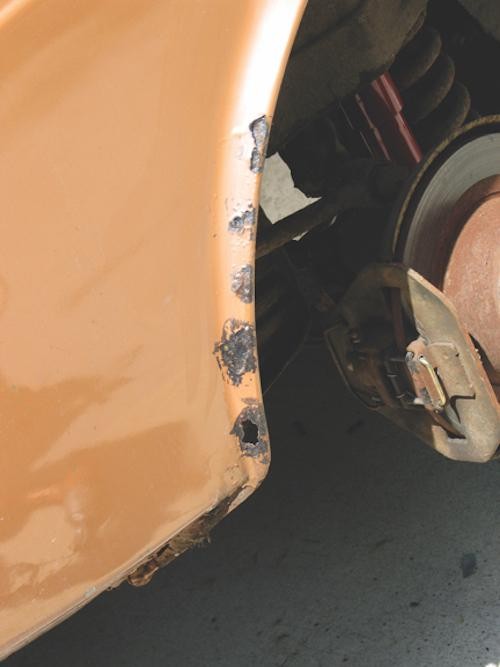
Typical fender lip rust on a car, indicating the need for sheet metal repair. Photography Credit: Per Shroeder
Dealing with rust on your car can be frustrating. Whether it’s bubbling paint on your fender or a hole in your wheel arch, rust is a common enemy for car owners. Before you panic and consider expensive body shop repairs, know that you can tackle many of these issues yourself with sheet metal repair. This guide will walk you through the process of how to do sheet metal repair on your car, focusing on patching rusted panels rather than full replacement. While replacing bolt-on parts like fenders or doors is straightforward, repairing welded panels or opting for a more cost-effective solution often involves patching. In this article, we’ll focus on fabricating a patch panel when pre-made options aren’t readily available or are too expensive to ship, allowing you to confidently address rust and restore your car’s bodywork.
Step 1: Prepare Your Work Area and Assess the Damage
Cleaning the work area to remove old paint, filler, and rust before starting sheet metal repair. Photography Credit: Per Shroeder
Before you start cutting and welding, preparation is key for effective sheet metal repair. Begin by thoroughly cleaning the area around the rust. This involves removing all traces of old paint, body filler (like Bondo), and loose rust. A wire cup brush attached to an angle grinder is an efficient tool for this task. Work outwards from the visible rust, as corrosion often extends further than it initially appears. It’s important to wear safety glasses and a respirator mask during this step, and throughout the repair process, to protect yourself from flying debris and dust. As you clean, be prepared for the possibility that the initial small rust spot may reveal a larger area of damage underneath layers of filler, as was the case with our Saab 99 project car. Understanding the true extent of the rust is crucial before moving forward with the repair.
Step 2: Cut Away the Rusted Metal
Using a grinding wheel to remove rust and prepare the area for a patch panel in sheet metal repair. Photography Credit: Per Shroeder
Once the area is clean, you need to remove all the rusted metal to create a solid base for your patch. Switch to a grinding wheel on your angle grinder to aggressively remove the remaining rust and to shape the damaged area into a clean, patchable form. Alternatively, you could use a plasma cutter for faster cutting, a reciprocating saw for more controlled cuts, or a die grinder for detailed work, depending on the tools you have and the nature of the repair. The goal is to cut back the sheet metal until you reach solid, rust-free metal around the entire perimeter of the hole. This ensures that you are welding your patch to healthy metal, preventing future rust issues from spreading from the edges of the repair.
Step 3: Create a Patch Panel Template and Cut the Patch
Creating a cardboard template to ensure accurate size and shape for the sheet metal patch panel. Photography Credit: Sarah Young
Creating an accurate patch panel is essential for a good sheet metal repair. Start by making a template of the area you need to patch. Cardboard works exceptionally well for this. Hold the cardboard against the prepared opening and trace the shape, making it slightly larger than the hole. Carefully cut out the cardboard template and test fit it against the car body. Trim and adjust the cardboard until it fits the opening perfectly, overlapping the edges of the hole by about an inch. Once you are satisfied with the template, place it on your new sheet metal – in our case, a 2×3-foot piece of 20-gauge sheet metal – and trace the outline. Use metal shears or a nibbler tool to carefully cut out the sheet metal patch, following the traced line. A precise patch will make welding and finishing much easier.
Step 4: Select Your Welding Equipment and Set It Up
Choosing a MIG welder for sheet metal repair; proper tool selection is crucial for successful welding. Photography Credit: Per Shroeder
For sheet metal repair, a MIG (Metal Inert Gas) welder is generally recommended due to its ease of use and ability to create clean welds on thinner metals. For this project, a Daytona MIG 140-amp 110-volt MIG welder was used. If you are working with thicker gauges or require more power, a 220-volt MIG welder, like an HTP 160-amp, could be used. Setting up your welder correctly is crucial. For 20-gauge sheet metal, start with lower power settings to avoid burning through the metal. On the Daytona MIG, a power setting of 2 out of 4 and a wire speed about a third of the way from minimum is a good starting point. Remember that these settings are just a starting point and will vary depending on your specific welder, the thickness of the metal, and even the ambient temperature. Before welding on your car, always practice on scrap metal of the same thickness to dial in your welder settings and get a feel for the welding process. This practice step is vital for achieving strong, clean welds and avoiding mistakes on your car body.
Step 5: Tack Weld the Patch Panel in Place
Tack welding the sheet metal patch panel to the car body for initial securement. Photography Credit: Per Shroeder
With your patch panel cut and your welder set up, it’s time to attach the patch to your car. Wearing welding gloves and a welding helmet for protection, carefully position the patch panel over the prepared hole, ensuring it aligns correctly. Use clamps or magnets to hold the patch firmly in place. Start by applying a single tack weld in the center of one side of the patch. Remove the clamps and check the patch alignment. If it’s correctly positioned, add another tack weld on the opposite side. Continue adding tack welds around the perimeter of the patch, spacing them a few inches apart. If necessary, gently bend or adjust the patch panel as you tack weld to match the curve of the surrounding bodywork. Tack welding is crucial as it allows you to secure the patch and make adjustments before fully welding, minimizing distortion and ensuring a good fit.
Step 6: Stitch Weld the Patch Panel
Stitch welding around the perimeter of the patch panel for strong and controlled sheet metal repair welding. Photography Credit: Per Shroeder
Once the patch panel is securely tack welded, proceed to stitch welding to fully join the patch to the car body. Stitch welding involves creating a series of short welds (stitches) rather than one continuous bead. This technique is essential for sheet metal repair because it minimizes heat buildup in any one area, reducing the risk of warping the metal. Start welding between the tack welds, creating short, overlapping stitches around the entire perimeter of the patch. Move around the patch as you weld, avoiding concentrating heat in one spot. For example, weld a short section on one side, then move to the opposite side, then to the top, and so on. This intermittent welding technique allows each weld to cool slightly before you weld adjacent sections, further preventing warping. Take your time and ensure each stitch is well-fused to both the patch panel and the original car body for a strong and seamless repair.
Step 7: Grind Down the Welds for a Smooth Finish
Grinding down the weld beads to prepare the surface for body filler and paint in sheet metal repair. Photography Credit: Per Shroeder
After welding, the weld beads will be raised and uneven. Use an angle grinder with a grinding disc to carefully grind down the welds. The goal is to make the welds flush with the surrounding metal surface. Work slowly and methodically, avoiding grinding too much material away, which can weaken the weld or create low spots. Focus on removing the high points of the weld bead. Switch to a flap disc on your angle grinder for smoother blending. The objective of grinding is not to achieve a perfectly smooth surface at this stage, but to reduce the weld bead height and prepare the area for a minimal amount of body filler. A smoother weld bead will require less filler, leading to a more durable and professional-looking repair.
Step 8: Treat and Prime the Repaired Area
Applying metal treatment and primer to prevent future rust after completing sheet metal repair. Photography Credit: Per Shroeder
With the welding and grinding complete, the bare sheet metal is now exposed and vulnerable to rust. It’s crucial to protect it immediately. Start by applying a phosphoric acid-based metal treatment, such as Ospho, to the entire repaired area and slightly beyond. This treatment converts any remaining rust and etches the metal surface to promote better primer adhesion. Follow the metal treatment with an etching primer. Etching primer not only provides a rust-resistant barrier but also bonds strongly to bare metal, creating an ideal base for subsequent layers of primer, paint, and clear coat. Allow the primer to dry completely according to the manufacturer’s instructions before proceeding with body filler (if needed) and painting. Proper surface treatment and priming are essential steps to ensure the longevity of your sheet metal repair and prevent rust from returning.