Windows 10, like its successor Windows 11, includes an automatic repair feature designed to diagnose and resolve common startup problems that can prevent your computer from booting correctly. This self-repair mechanism kicks in if your device fails to start properly twice in a row. On the third boot attempt, the system initiates a series of diagnostic tests to identify and automatically fix typical boot issues.
While generally helpful, there are situations where you might prefer to manually troubleshoot startup problems or find that the automatic repair process itself is causing a frustrating loop. In such cases, it’s possible to disable the automatic repair feature in Windows 10.
This guide will walk you through the necessary steps to turn off automatic diagnosis and repair in Windows 10. Furthermore, if you previously disabled this feature and wish to re-enable it, or simply want to revert the changes, we will also outline the steps to turn it back on.
Steps to Disable Automatic Repair in Windows 10
To disable automatic repair on Windows 10 after three unsuccessful boot attempts, follow these instructions:
- Click on the Start Menu.
- Type Command Prompt in the search bar. Right-click on the Command Prompt result and select Run as administrator from the context menu. This is essential as administrative privileges are required to modify boot settings.
- In the Administrator Command Prompt window, type the following command exactly as shown and press Enter:
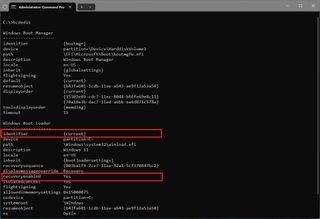
bcdedit - This command will display the Boot Configuration Data. Look for the “Windows Boot Loader” section. Under this section, verify that the values for “recoveryenabled” and “identifier” are set to “{current}” and “yes” respectively. This confirms the current status of automatic repair.
Image: Verifying the ‘recoveryenabled’ status is set to ‘yes’ in Boot Configuration Data, indicating automatic repair is currently enabled on Windows 10.
-
To disable the automatic repair feature, type the following command into the Command Prompt and press Enter:
bcdedit /set {current} recoveryenabled noIn this command,
"{current}"specifies that the change applies to the currently running operating system, andnois the value used to disable the automatic repair function.
Image: Executing the command ‘bcdedit /set {current} recoveryenabled no’ in Command Prompt to disable the automatic repair feature in Windows 10.
- After executing the command, you should see a confirmation message indicating that the operation completed successfully. Close the Command Prompt window.
Once you have completed these steps, the automatic diagnostic and repair feature will no longer activate after the third consecutive failed boot attempt on your Windows 10 computer.
How to Re-enable Automatic Repair in Windows 10
If you have previously disabled automatic repair and want to re-enable it, or if you want to ensure it’s active, follow these steps:
- Open the Start Menu.
- Search for Command Prompt, right-click on the result, and choose Run as administrator.
- Type
bcdeditin the Command Prompt and press Enter. - Again, locate the “Windows Boot Loader” section and check the values for “recoveryenabled” and “identifier”. If you previously disabled the feature, “recoveryenabled” should be set to “no”.
Image: Boot Configuration Data showing ‘recoveryenabled’ set to ‘no’, indicating that automatic repair is currently disabled in Windows 10.
- To re-enable automatic repair, type the following command in the Command Prompt and press Enter:
bcdedit /set {current} recoveryenabled yes
Image: Using the command ‘bcdedit /set {current} recoveryenabled yes’ to enable the automatic repair feature again in Windows 10 through Command Prompt.
Here, `"{current}"` specifies the current operating system, and **"yes"** is the value to enable the automatic repair feature.- Once the command is executed successfully, close the Command Prompt.
After completing these steps to re-enable automatic repair, Windows 10 will once again attempt to diagnose and repair startup issues if your device experiences boot problems. This can be a valuable safety net to resolve common problems and get your system running smoothly again.

