Windows 10 and 11 come equipped with an Automatic Repair feature, designed to automatically diagnose and fix common startup issues that might prevent your computer from booting correctly. This feature is triggered if your device fails to start properly for two consecutive times. On the third boot attempt, the system initiates a self-repair process, running diagnostic tests to resolve typical startup problems.
While Automatic Repair can be helpful, there are situations where you might prefer to troubleshoot startup problems manually. Furthermore, in some instances, Automatic Repair can get stuck in an endless loop, becoming more of a hindrance than a help. If you prefer to take control of troubleshooting or are experiencing issues with the automatic repair loop, disabling this feature in Windows 10 and 11 is possible.
This guide will walk you through the necessary steps to disable the automatic diagnosis and repair feature in your Windows operating system. Additionally, if you have previously disabled Automatic Repair and wish to re-enable it, or simply want to revert the changes, we will also outline the steps to turn it back on.
Steps to Disable Automatic Repair in Windows 10 and 11
To disable Automatic Repair that kicks in after the third unsuccessful boot attempt in Windows 10 or 11, follow these steps:
- Click on the Start button.
- Type Command Prompt in the search bar.
- Right-click on Command Prompt from the search results and select Run as administrator. This is crucial as administrative privileges are required to execute the commands.
- In the Command Prompt window, type the following command and press Enter:
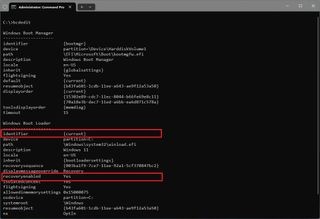
bcdedit - This command will display the boot configuration data. Under the “Windows Boot Loader” section, verify that the “recoveryenabled” and “identifier” values are set to “{current}” and “yes” respectively. This confirms the current status of automatic repair.
Alt text: Command Prompt showing bcdedit output, highlighting “recoveryenabled” set to “yes” indicating automatic repair is enabled in Windows.
-
To disable the Automatic Repair feature, type the following command in the Command Prompt and press Enter:
bcdedit /set {current} recoveryenabled noIn this command, “{current}” specifies that the change applies to the currently running operating system, and “no” is the value used to disable Automatic Repair.
Alt text: Command Prompt window displaying the command “bcdedit /set {current} recoveryenabled no” used to disable automatic repair in Windows 10 and 11.
- Once you have executed these steps, the automatic diagnostic and repair feature will no longer automatically initiate after the third unsuccessful boot of your computer. You will need to manually troubleshoot any startup issues from this point forward if you encounter them.
How to Re-enable Automatic Repair in Windows 10 and 11
If you decide to re-enable the Automatic Repair feature, or if it was previously disabled and you want to turn it back on, you can do so by following these steps:
- Open Start.
- Search for Command Prompt, right-click, and select Run as administrator.
- Type the command
bcdeditand press Enter. - Under the “Windows Boot Loader” section, confirm that the “recoveryenabled” value is set to “no”. This would indicate that automatic repair is currently disabled.
Alt text: Windows 10 Command Prompt displaying bcdedit command output with “recoveryenabled” set to “no”, showing automatic repair is disabled.
- To enable Automatic Repair again, type the following command and press Enter:
bcdedit /set {current} recoveryenabled yes
Alt text: Command Prompt window showing the command “bcdedit /set {current} recoveryenabled yes” to re-enable automatic repair in Windows 11 and 10.
- In this command, “{current}” again targets the current operating system, and “yes” is the value to enable the Automatic Repair feature.
After completing these steps, if your computer experiences startup problems, the system will automatically attempt to diagnose and repair common issues that might be preventing Windows 10 or 11 from starting up correctly.
By following these simple commands in Command Prompt, you can easily manage the Automatic Repair feature in Windows 10 and 11, giving you more control over your system’s troubleshooting processes.


