Windows 8 introduced the Automatic Repair feature, designed to automatically diagnose and fix boot-related issues. While generally helpful for less technical users, this feature can sometimes be more of a hindrance than a help. If you’re a Windows 8 user experiencing unwanted automatic repairs, or if you prefer manual control over system recovery processes, disabling this feature is a straightforward process. This guide will explain how to disable auto repair in Windows 8 effectively, giving you greater control over your system’s startup behavior.
Automatic Repair triggers when Windows detects two consecutive unsuccessful boot attempts. It then initiates a diagnostic process, often running tools like Check Disk (chkdsk) and System File Checker (sfc.exe) to attempt to resolve the problem. For many users, this automation is beneficial, resolving underlying issues and allowing their system to boot normally.
However, there are several scenarios where disabling Automatic Repair becomes advantageous. One common reason is for users who frequently tweak their system files. If you customize boot settings or modify system files for personalization – like applying a custom boot screen for Windows 8.1 – Automatic Repair can revert these changes without warning, effectively undoing your customizations.
Another significant issue is the potential for Automatic Repair to get stuck in a loop. In some cases, the repair process itself can fail to resolve the underlying problem but continues to initiate upon every boot attempt, leading to a frustrating and endless cycle of repair attempts. Furthermore, Automatic Repair operates with limited transparency. It provides minimal information about the diagnostic steps it’s taking or the issues it’s attempting to fix. For users who prefer to understand and control the troubleshooting process, this lack of transparency can be undesirable.
Disabling Automatic Repair empowers you to take manual control when boot problems arise. Instead of relying on an automated process, you can utilize tools like chkdsk or bcdedit directly, gaining better insight into the problem and applying targeted solutions.
Here’s how to disable the Automatic Repair feature in Windows 8:
-
Open Command Prompt as Administrator. To do this, press the Windows key, type
cmd, right-click on “Command Prompt” in the search results, and select “Run as administrator.” This elevated command prompt is necessary to execute the commands required to modify boot settings. -
Execute the
bcdeditcommand. In the Administrator Command Prompt window, type the following command exactly as shown and press Enter:bcdedit /set recoveryenabled NO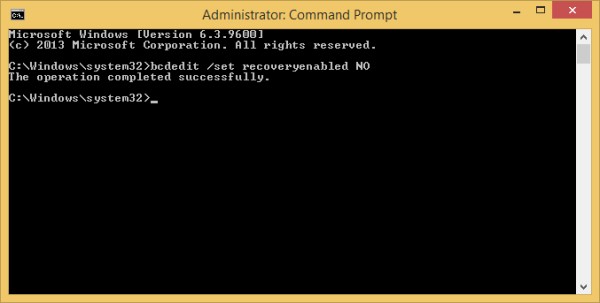 disable automatic repair in windows 8 command prompt
This command utilizes the Boot Configuration Data Edit tool (
bcdedit), a powerful command-line utility for managing boot options. The/set recoveryenabled NOparameter specifically instructs Windows to disable the Automatic Repair feature. After executing the command, you should see a confirmation message indicating that the operation was successful.
That’s all it takes! Automatic Repair is now disabled. If your Windows 8 system fails to boot in the future, it will no longer automatically initiate the repair process. Instead, you will be presented with the Advanced Boot Options menu, allowing you to choose manual troubleshooting steps, such as booting into Safe Mode or using System Restore.
Should you decide to re-enable Automatic Repair at any point, the process is equally simple. Open an elevated Command Prompt again and execute the following command:
bcdedit /set recoveryenabled YESThis command, using the /set recoveryenabled YES parameter, reverses the previous action and re-activates the Automatic Repair feature in Windows 8.
Bonus Tip: For users seeking further control over startup options, it’s worth noting that Windows 8 also disables the Last Known Good Configuration feature by default. If you find the Automatic Repair feature too automated but still desire a quick recovery option, you might be interested in learning how to enable the Last Known Good Configuration feature in Windows 8.1. This feature can provide a less intrusive recovery method in certain situations.
By following these steps, you can easily disable or re-enable the Automatic Repair feature in Windows 8, tailoring your system’s behavior to your preferences and technical expertise. Whether you are a system tweaker, an advanced user who prefers manual troubleshooting, or simply someone who wants to avoid potential Automatic Repair loops, understanding how to manage this feature provides valuable control over your Windows 8 experience.