
Windows 8 introduced the Automatic Repair feature, designed to automatically diagnose and fix boot-related issues during startup. If your Windows 8 PC experiences consecutive crashes or fails to boot correctly, this feature kicks in, initiating a repair process. Automatic Repair runs tools like chkdsk and System File Checker (sfc.exe) to attempt to restore system stability by scanning for and fixing disk errors and corrupted system files.
While Automatic Repair is intended to be a helpful tool for less technical users, there are scenarios where it can become more of a hindrance than a help, prompting users to seek methods to bypass it. For instance, if you’ve made deliberate modifications to system files for customization – such as applying a custom boot screen for Windows 8.1 – Automatic Repair might undo these changes in its attempt to restore the system to a perceived “healthy” state. Furthermore, Automatic Repair has been known, in some instances, to get stuck in an endless repair loop, preventing the system from booting normally and requiring forced shutdowns. Another significant drawback is the lack of transparency; Windows provides minimal information about the repair process itself, leaving users in the dark about what actions are being taken. In these situations, taking manual control over system repair processes becomes preferable.
Fortunately, disabling Automatic Repair in Windows 8 is a straightforward process. Here’s how you can do it:
-
Open Command Prompt as Administrator. To disable Automatic Repair, you’ll need to execute commands with administrative privileges. If you’re unsure how to do this, you can find detailed instructions in guides like “Do you know all these ways to open an elevated command prompt in Windows?”. Generally, you can search for “cmd” in the Start Menu, right-click on “Command Prompt”, and select “Run as administrator”.
-
Execute the
bcdeditcommand to disable recovery. In the elevated Command Prompt window, type the following command exactly as shown and press Enter:bcdedit /set recoveryenabled NOThis command utilizes the Boot Configuration Data Edit tool (
bcdedit), a powerful utility for managing boot settings. The/set recoveryenabled NOparameter specifically instructs Windows to disable the Automatic Repair feature upon the next and subsequent startups.
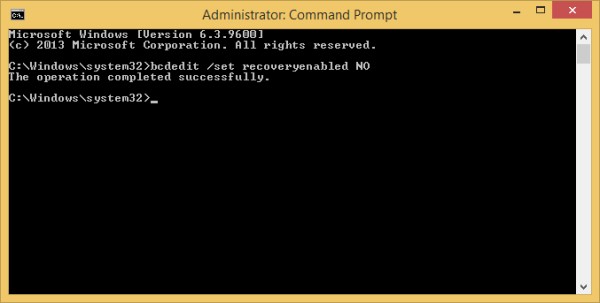 Command prompt showing the command to disable automatic repair in Windows 8
After executing this command, Automatic Repair will no longer automatically initiate when Windows 8 detects boot issues. You will now have more control over the boot process and can manually utilize tools like chkdsk or bcdedit for troubleshooting and repair when necessary.
To re-enable the Automatic Repair feature at any time, simply open an elevated Command Prompt again and execute the following command:
bcdedit /set recoveryenabled YESThis command reverses the previous action, setting recoveryenabled back to YES, and restoring the default Automatic Repair behavior in Windows 8.
Bonus Tip: For further control over startup options, you might also want to explore enabling the “Last Known Good Configuration” feature in Windows 8.1. This recovery option, which can be helpful in reverting to a previously working system state, is disabled by default in Windows 8 and later versions. You can find information on how to enable it in articles like “how to restore the Last Known Good Configuration feature in Windows 8.1”.
By disabling Automatic Repair, you gain greater control over your Windows 8 system’s boot process and troubleshooting, allowing for more deliberate and informed recovery actions when issues arise. Remember to use this control wisely and re-enable Automatic Repair if you prefer the system to handle basic boot repairs automatically.