
Dealing with a damaged car interior can be frustrating. Whether it’s a scratch, tear, burn, or general wear and tear, it detracts from your vehicle’s appearance and can lower its value. One of the first questions that comes to mind is, “How much to repair car interior?” The answer isn’t always straightforward, as it depends on several factors. This guide breaks down the costs associated with car interior repair and explores how you can save money by tackling some repairs yourself.
Understanding Car Interior Repair Costs
The cost to repair your car interior can vary widely based on several key elements:
- Type of Damage: Minor scratches and scuffs are much less expensive to fix than significant tears, burns, or depressed damages.
- Extent of Damage: A small scratch will cost less to repair than extensive wear and discoloration across a whole seat.
- Repair Method: Professional repairs by auto upholstery shops will generally be more expensive than DIY solutions.
- Materials and Labor: Professional services include costs for specialized materials and skilled labor, while DIY repairs primarily involve the cost of repair kits and your own time.
This article will delve into the costs associated with different types of fabric car interior damage and provide insights into how DIY repair can be a cost-effective alternative to professional services. We’ll explore the pros and cons of DIY, offering step-by-step guides to help you decide if you can handle the repairs yourself and save money.
DIY vs. Professional Car Interior Repair Costs: A Detailed Breakdown
One of the most compelling reasons to consider DIY car interior repair is the potential for significant cost savings. Let’s look at a comparison of professional repair costs versus DIY repair costs for various types of fabric damage:
| FABRIC CAR INTERIOR DAMAGE | PROFESSIONAL REPAIR COST RANGE | DIY REPAIR COST RANGE |
|---|---|---|
| Fabric Scratches and Scuffs | $150 – $300 | $19.95 – $50 (DIY Fabric Repair Kit + basic household materials) |
| Worn Fabric and Discoloration | $150 – $1,000 | $19.95 – $50 (DIY Fabric Repair Kit + basic household materials) |
| Fabric Cuts, Rips, and Tears | $200 – $1,000 | $19.95 – $50 (DIY Fabric Repair Kit + basic household materials and optional sewing kit) |
| Fabric Burn Marks and Holes | $200 – $1,000 | $19.95 – $50 ([DIY Fabric Repair Kit](https://coconix.com/collections/coconix-store/products/coconix-fabric-and carpet-repair-kit) + basic household materials and optional sewing kit) |
| Fabric Depressed Damages | $500 – $2,000 | $19.95 – $70 (DIY Fabric Repair Kit + filler materials and optional sewing kit) |
As you can see from the table, DIY repair can offer substantial savings compared to professional services. For a fraction of the cost, you can achieve noticeable improvements in your car’s interior appearance.
The Advantages and Disadvantages of DIY Car Interior Repair
While the cost savings of DIY repair are clear, it’s important to weigh both the pros and cons before deciding if it’s the right approach for you.
PROS of DIY Fabric Car Interior Repair
1. Significant Cost Savings:
The most significant advantage is the money you save. Professional car interior repairs can be expensive, quickly adding up to hundreds or even thousands of dollars. DIY repair kits, on the other hand, are relatively inexpensive, allowing you to address damage for a fraction of the professional cost. This saving directly answers the question “how much to repair car interior” – often, much less with DIY!
2. Skill Development and Learning:
DIY projects offer a fantastic opportunity to learn new skills and gain experience. Repairing your car interior yourself teaches you about different materials, repair techniques, and useful tools. These skills can be applied to future DIY projects, not just in your car but around your home as well.
3. Empowerment and Self-Sufficiency:
Becoming proficient in DIY car interior repair makes you your own “car interior pro.” Knowing you can handle these repairs yourself gives you a sense of accomplishment and self-reliance. You no longer need to depend solely on professionals for minor interior fixes.
4. Convenience:
DIY repairs can be done at your own pace and on your own schedule. You don’t need to book appointments or wait for professional services. You can work on your car interior whenever you have the time and are in the mood.
CONS of DIY Fabric Car Interior Repair
1. Time and Effort Investment:
DIY repairs require your time and effort. While you save money, you invest your personal time and energy. The success of a DIY project depends on this investment. However, consider this time an investment in improving your car’s condition and potentially saving a significant amount of money compared to professional labor costs.
2. Variable Results:
The outcome of a DIY repair can vary. Factors like your skill level, the quality of the DIY repair kit, the tools used, and the time spent all influence the final result. Beginners may not achieve perfect results immediately, but with patience and effort, improvements are certainly achievable. Remember, practice makes perfect, and each DIY project builds your skills.
3. Potential for Unexpected Issues:
DIY projects can sometimes lead to unforeseen problems. If steps are missed or mistakes are made, the damage could potentially worsen or the repair might not last. It’s crucial to follow instructions carefully and be prepared for potential challenges. However, resources like the Coconix Support Team are available to assist you if you encounter difficulties, minimizing the risk of negative outcomes.
DIY Guide: Repairing Fabric Scratches and Scuffs
If you’re ready to start saving money and repair those annoying fabric scratches and scuffs yourself, follow these steps:
DIY REPAIR METER:
| REQUIRED METHOD | REPAIR METER | DAMAGE TYPES |
|---|---|---|
| DIY FABRIC CAR INTERIOR REPAIR | – Fabric Scratches and Scuffs – Pet and Children Damage – Worn Fabric and Discoloration – Sun Damage – Stain Damage from Solids and Liquids | |
| MINOR | ||
| FABRIC CAR INTERIOR | ||
| DAMAGES | ||
MATERIALS NEEDED:
- DIY Fabric Repair Kit:
- Repair fibers
- Fabric glue
- Tweezers
- Mesh
- Backing fabric (usually not needed for scratches/scuffs, but included in kit for versatility)
- Mixing jar
- Mixing ball
- Other Tools:
- Scissors or Cutter
- Rubber band
- Clear hairspray (optional, for added protection)
STEP-BY-STEP PROCESS:
1. Prepare the Damaged Area:
- Trim any loose threads or jagged edges around the scratch or scuff.
- Clean the area with a household cleaner to remove dirt and debris.
2. Mix and Shake Repair Fibers:
- Fill the mixing jar with the color fibers that best match your car’s interior fabric.
- Add the metal mixing ball to the jar.
- Securely screw on the lid and shake the jar vigorously for at least 30 seconds to blend the fibers.
- Remove the metal ball and attach the mesh to the jar opening using the rubber band to create a sifter.
3. Apply Fabric Glue:
- Apply a thin, even layer of fabric glue to the scratched or scuffed area. Work from the outside edges towards the center to minimize air bubbles.
- Ensure the entire damaged area is covered with glue, and apply a thin layer around the immediate perimeter to blend the repair seamlessly.
4. Sift Repair Fibers:
- Hold the mixing jar upside down over the glued area and gently tap to sift the repair fibers onto the adhesive.
- Completely cover the glue with fibers.
- Use the spatula (included in the kit) to gently pat down the fibers, ensuring they adhere to the glue.
- If your fabric has a pattern (lines, swirls), use the spatula to carefully replicate it in the applied fibers.
5. Drying Time:
- Allow the repaired area to dry for 24 hours to ensure the fabric glue is completely set.
- Once dry, gently blow off any loose, excess fibers.
- For areas prone to wear, consider applying a light spray of clear hairspray for added protection.
If you encounter any issues during your repair, don’t hesitate to contact us for personalized assistance!
DIY Guide: Repairing Worn Fabric and Discoloration
Worn fabric and discoloration can make your car interior look aged and tired. DIY repair can revitalize these areas, saving you the cost of professional upholstery services.
DIY REPAIR METER:
| REQUIRED METHOD | REPAIR METER | DAMAGE TYPES |
|---|---|---|
| DIY FABRIC CAR INTERIOR REPAIR | – Fabric Scratches and Scuffs – Pet and Children Damage – Worn Fabric and Discoloration – Sun Damage – Stain Damage from Solids and Liquids | |
| MINOR | ||
| FABRIC CAR INTERIOR | ||
| DAMAGES | ||
MATERIALS NEEDED:
- DIY Fabric Repair Kit:
- Repair fibers
- Fabric glue
- Tweezers
- Mesh
- Backing fabric (usually not needed for worn fabric, but included in kit for versatility)
- Mixing jar
- Mixing ball
- Other Tools:
- Scissors or Cutter
- Rubber band
- Clear hairspray (optional, for added protection)
STEP-BY-STEP PROCESS:
1. Prepare the Damaged Area:
- Trim any loose threads or frayed edges.
- Clean the area to remove dirt and loose fibers.
2. Mix, Shake, and Match Repair Fibers:
- Fill the mixing jar with the primary color fibers.
- Use the color matching guide included in your kit to mix and match secondary colors to achieve a blend that closely matches your car’s fabric. Experiment with small amounts until you find the right mix.
- Add the metal mixing ball, secure the lid, and shake for at least 30 seconds.
- Remove the ball and attach the mesh sifter.
3. Apply Fabric Glue:
- Apply fabric glue to the worn and discolored area, extending slightly under the edges of the surrounding fabric to ensure good adhesion.
- Apply an even layer, filling in worn spots as uniformly as possible. Add a thin layer around the damaged perimeter for blending.
4. Sift Repair Fibers:
- Hold the sifter jar upside down and gently tap to evenly distribute the mixed repair fibers over the glued area.
- Ensure complete coverage of the glue.
- Gently pat down the fibers with the spatula to secure them.
5. Drying Time:
- Allow 24 hours for complete drying.
- Remove any excess loose fibers by gently blowing or lightly brushing.
- If the repaired area will experience frequent use, apply clear hairspray for added durability.
Remember, our support team is ready to assist you with any questions!
DIY Guide: Repairing Fabric Cuts, Rips, and Tears
Cuts, rips, and tears are more significant damage, but still often repairable at home, saving you potentially hundreds of dollars compared to professional upholstery work.
IMPORTANT REMINDER!
For larger cuts, rips, and tears, using a backing fabric is crucial for a strong and durable repair. Sewing the backing fabric to the underside of the car fabric before applying repair fibers is highly recommended for enhanced strength and longevity.
DIY REPAIR METER:
| REQUIRED METHOD | REPAIR METER | DAMAGE TYPES |
|---|---|---|
| DIY FABRIC CAR INTERIOR REPAIR + PROFESSIONAL ADVICE | – Fabric Cuts, Rips, and Tears – Fabric Burn Marks and Holes | |
| MODERATE | ||
| FABRIC CAR INTERIOR | ||
| DAMAGES | ||
MATERIALS NEEDED:
- DIY Fabric Repair Kit:
- Repair fibers
- Fabric glue
- Tweezers
- Mesh
- Backing fabric
- Mixing jar
- Mixing ball
- Other Tools:
- Scissors or Cutter
- Rubber band
- Clear hairspray (optional)
- Sewing kit (for larger repairs)
STEP-BY-STEP PROCESS:
1. Prepare the Damaged Area:
- Trim loose threads and jagged edges around the cut, rip, or tear.
- Clean the area thoroughly.
2. Insert Backing Fabric:
- Cut a piece of backing fabric slightly larger than the damage with rounded edges to prevent corners from poking through.
- Use the spatula to carefully insert the backing fabric underneath the cut/rip, positioning it to provide support to the damaged area. For large tears, consider sewing the backing fabric to the edges of the original fabric for a more secure repair.
3. Prepare Color Mixture:
- Refer to your color matching guide. Mix repair fibers to achieve a color that matches your car interior fabric.
4. Apply Fabric Glue:
- Apply fabric glue to the damaged area, ensuring it goes under the edges of the cut/rip and onto the backing fabric.
- Fill the cut/rip evenly with glue and apply a thin layer around the perimeter for blending.
5. Sift Repair Fibers:
- Sift repair fibers over the glued area, ensuring complete coverage.
- Gently pat down the fibers with the spatula.
6. Drying Time:
- Allow 24 hours to dry completely.
- Remove excess fibers.
- Apply clear hairspray for added protection, especially to areas that experience friction.
For extensive damage, seeking professional advice is always a good option, but DIY can handle many common cuts and tears effectively and affordably.
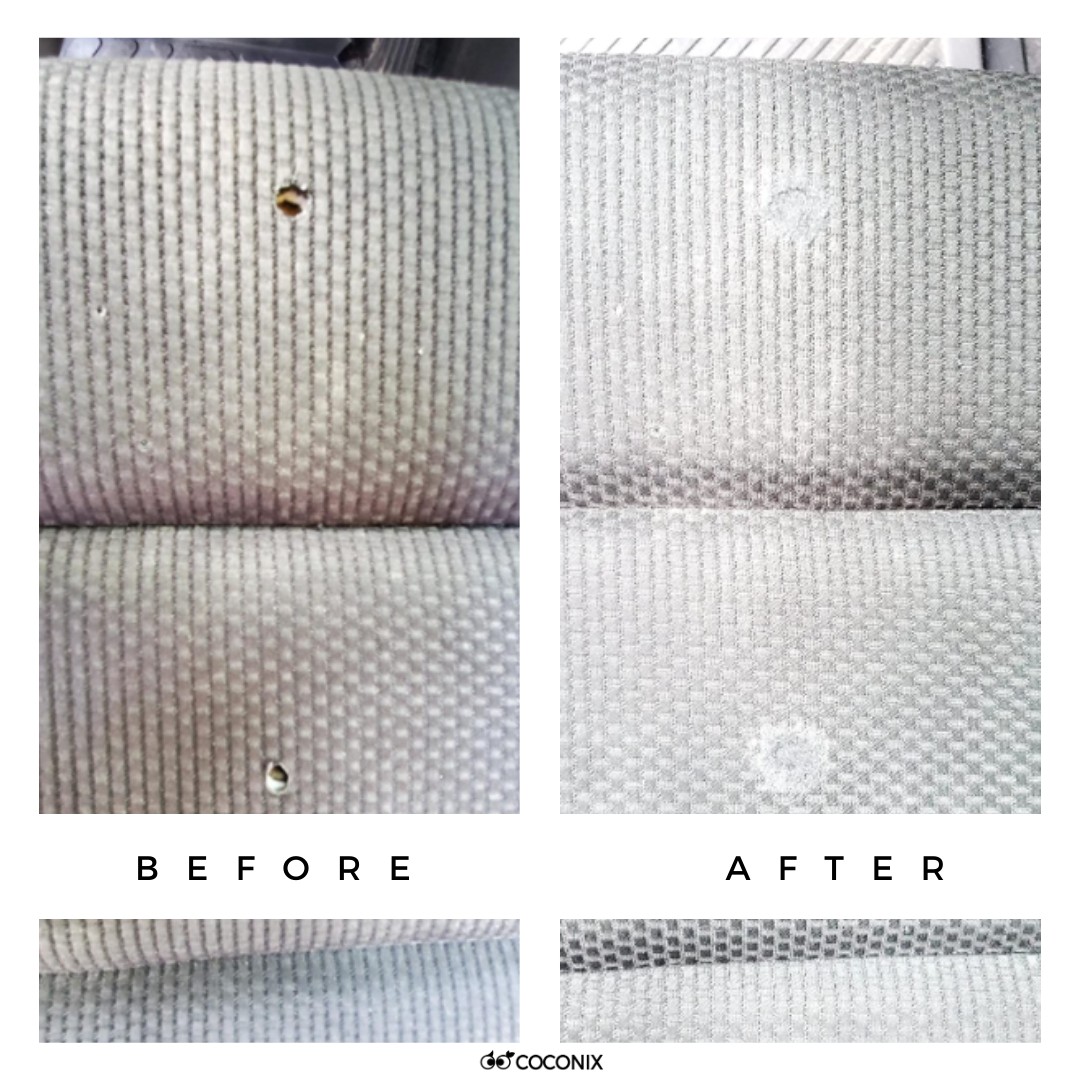
DIY Guide: Repairing Fabric Burn Marks and Holes
Burn marks and holes, often from cigarettes, can be unsightly and reduce your car’s interior appeal. DIY repair offers a budget-friendly solution to restore these damages.
DIY REPAIR METER:
| REQUIRED METHOD | REPAIR METER | DAMAGE TYPES |
|---|---|---|
| DIY FABRIC CAR INTERIOR REPAIR + PROFESSIONAL ADVICE | – Fabric Cuts, Rips, and Tears – Fabric Burn Marks and Holes | |
| MODERATE | ||
| FABRIC CAR INTERIOR | ||
| DAMAGES | ||
MATERIALS NEEDED:
- DIY Fabric Repair Kit:
- Repair fibers
- Fabric glue
- Tweezers
- Mesh
- Backing fabric
- Mixing jar
- Mixing ball
- Other Tools:
- Household cleaner
- Scissors
- Cotton balls or cotton batting (if padding is needed)
- Rubber band
- Clear hairspray (optional)
- Sewing kit (for larger holes)
STEP-BY-STEP PROCESS:
1. Prepare the Damaged Area:
- Carefully trim away any charred or melted edges around the burn mark or hole using scissors.
- Clean the area with a household cleaner.
- If the burn has caused a depression and padding is missing, insert cotton balls or cotton batting to level the area. Spread the filler evenly.
2. Insert Backing Fabric:
- Cut a piece of backing fabric larger than the burn hole, with rounded edges.
- Use the spatula to insert the backing fabric beneath the hole, ensuring it covers the opening and provides a base for the repair. For larger holes, sewing the backing fabric may be necessary.
3. Mix and Shake Repair Fibers:
- Mix and match repair fiber colors to closely match your car’s fabric, using the color guide.
- Fill the mixing jar, add the metal ball, shake for 30 seconds, remove the ball, and attach the mesh sifter.
4. Apply Fabric Glue:
- Apply a thin layer of fabric glue to the damaged area, including the edges of the hole and onto the backing fabric.
- Fill the hole with glue, ensuring even coverage, and apply a thin layer around the perimeter for blending.
5. Sift Repair Fibers:
- Sift the prepared repair fibers over the glued area to completely cover it.
- Gently pat down the fibers using the spatula.
6. Drying Time:
- Allow 24 hours for drying.
- Remove excess fibers.
- Apply clear hairspray for added durability.
DIY burn mark and hole repair is an affordable way to significantly improve your car’s interior appearance. For further guidance, contact our experts.
DIY Guide: Repairing Fabric Depressed Damages
Depressed damages, like indentations or deep impressions in your car seats, are among the more challenging fabric repairs. However, with patience and the right technique, DIY can still offer a cost-effective solution compared to professional seat replacement or extensive upholstery work.
IMPORTANT REMINDER!
For significant depressed damages, filling the depression with filler material (foam, cloth, cotton) before applying backing fabric is crucial for restoring the original shape and providing support. Using fabric glue or foam adhesive to secure the filler is also recommended to prevent bulging and ensure a stable repair.
DIY REPAIR METER:
| REQUIRED METHOD | REPAIR METER | DAMAGE TYPES |
|---|---|---|
| EXPERT FABRIC CAR INTERIOR DIY REPAIR | – Fabric Depressed Damages | |
| FABRIC CAR INTERIOR | ||
| DAMAGES | ||
MATERIALS NEEDED:
- DIY Fabric Repair Kit:
- Repair fibers
- Fabric glue
- Tweezers
- Mesh
- Backing fabric
- Mixing jar
- Mixing ball
- Other Tools:
- Household Cleaner
- Scissors
- Foam/Old cloth pieces/Cotton balls or cotton batting (filler material)
- Fabric glue (additional, if needed) or foam adhesive
- Rubber band
- Clear hairspray (optional)
- Sewing kit (for large depressions)
STEP-BY-STEP PROCESS:
1. Prepare the Damaged Area:
- Trim any loose threads or jagged edges.
- Clean the area.
- If padding is compressed or missing, carefully insert cotton balls or cotton batting into the depression to build up the level. Spread the filler evenly to avoid lumps.
2. Fill Depression and Insert Backing Fabric:
- Fill the depressed area with your chosen filler material (foam, cloth, cotton), being careful not to overfill, which can cause bulging.
- Use fabric glue or foam adhesive to secure the filler in place.
- Cut a piece of backing fabric slightly larger than the depressed area with rounded edges.
- Insert the backing fabric using the spatula, positioning it over the filler to create a stable base. For large or deep depressions, sewing the backing fabric to the surrounding car fabric may be necessary for added support.
3. Mix and Shake Repair Fibers:
- Mix repair fibers to match your car fabric color.
- Fill the mixing jar, add the metal ball, shake for 30 seconds, remove the ball, and attach the mesh sifter.
4. Apply Fabric Glue:
- Apply a thin layer of fabric glue to the prepared area, including the edges and onto the backing fabric.
- Fill the area evenly with glue, extending a thin layer around the perimeter for blending.
5. Sift Repair Fibers:
- Sift repair fibers over the glued area for complete coverage.
- Gently pat down the fibers with the spatula, and replicate any fabric patterns if possible.
6. Drying Time:
- Allow a full 24 hours for drying.
- Remove excess fibers.
- Apply clear hairspray for extra protection.
Repairing depressed damages is more involved, but DIY methods can significantly reduce costs compared to professional solutions. For complex cases, expert DIY repair techniques and advice can be invaluable.
Maintaining Your Fabric Car Interior to Minimize Repair Costs
Preventing damage is always more cost-effective than repairing it. Proper maintenance can significantly extend the life of your car interior and reduce the need for repairs, helping you save money in the long run.
1. Park in Shaded Areas:
Regular sun exposure can cause fabric fading and damage. Parking in the shade helps protect your car interior from harmful UV rays, prolonging its life and preventing discoloration and wear.
2. Vacuum Regularly:
Regular vacuuming prevents dirt and dust buildup, which can abrade fabric fibers over time. Keeping your car seats clean minimizes wear and tear and helps maintain their appearance.
3. Avoid Eating and Drinking Inside the Car:
Food and drinks are major culprits for car interior stains and damage. Spills can lead to stubborn stains and odors, requiring extensive cleaning or even repair. Minimizing food and drinks in your car is a simple way to prevent potential damage.
4. Invest in Quality Window Tint:
Window tint, especially those with UV protection, provides an extra layer of defense against sun damage. Tinting can help keep your car interior cooler and protect fabrics from fading and cracking.
5. Be Mindful of Sharp Objects:
Sharp objects, toys, and equipment can easily puncture or tear fabric. Take care when placing items inside your car. Cover sharp edges and ensure items are properly secured to prevent accidental damage.
Real DIY Repair Results and What to Expect
DIY repairs are effective, but it’s important to have realistic expectations. While you can achieve impressive results and save a significant amount of money, DIY repairs may not always be invisible or “factory-perfect.” The key is to aim for a noticeable improvement that restores the appearance and functionality of your car interior.
Here’s what one satisfied DIYer had to say:
“Worked AS ADVERTISED!”
by S. Ellis on Aug 29, 2020 Click here for the actual review on Amazon.
“Not perfect, and didn’t expect that, but turned out much better than expected. Easy to use. Spend the extra time on the mixing/blending process. Do not overly use the glue or you will get seepage around the mending area as I did. If i re-appply a second time, I think it will turn out even better.”
This review highlights the realistic outcome of DIY repair. It’s about achieving “much better than expected” results, not necessarily flawless perfection. With careful application and attention to detail, you can significantly improve the look of your car interior and save substantially on repair costs.
Conclusion: DIY Car Interior Repair – A Cost-Effective Solution
So, how much to repair car interior? With DIY methods, often significantly less than professional services. DIY car interior repair offers a powerful way to save money and restore your vehicle’s interior. While it requires time and effort, the cost savings, skill development, and satisfaction of doing it yourself make it a worthwhile option for many car owners.
With the right DIY repair kit, patience, and guidance, you can tackle various types of fabric damage, from minor scratches to more significant tears and burns. Remember, you’re not alone in your DIY journey. The Coconix Support Team and the wider DIY community are here to help you every step of the way.
Ready to start your DIY car fabric repair project and save money? Explore the Coconix DIY Fabric Repair Kit and contact our Support Team for personalized advice and support!