Ripped or torn car seats can be an eyesore and negatively impact the overall look and feel of your vehicle’s interior. But did you know that a tear in your upholstery doesn’t necessarily mean a costly trip to the auto upholsterer? This guide will provide you with all the information you need to know about how to repair ripped car seats yourself, saving you both money and the hassle.
Assessing the Damage: What’s the Best Repair Method for Your Car Seat?
The first step in repairing ripped car seats is to assess the severity of the damage.
- Small rips or tears in fabric seats can often be fixed with a simple patch or fabric glue.
- Larger tears or holes might require more advanced techniques, like sewing or using a specialized repair kit.
- Burns, deep cuts, or extensive damage are best left to professional upholsterers.
For leather seats, the approach is slightly different.
- Surface scratches or scuffs can be addressed with leather conditioners and dyes.
- Cracks and tears require leather filler and patching compounds.
Knowing the extent of the damage will help you determine the most appropriate repair strategy and ensure the best possible outcome.
DIY Car Seat Repair: Materials and Techniques
Repairing your own car seats can be a rewarding experience, and with the right approach, you can achieve professional-looking results. Here’s what you’ll need and the steps involved:
For Fabric Car Seats:
Materials:
- Fabric repair kit leather car seat repair kit (color-matched to your car’s upholstery)
- Sharp scissors
- Clean cloth
- Rubbing alcohol (optional)
Instructions:
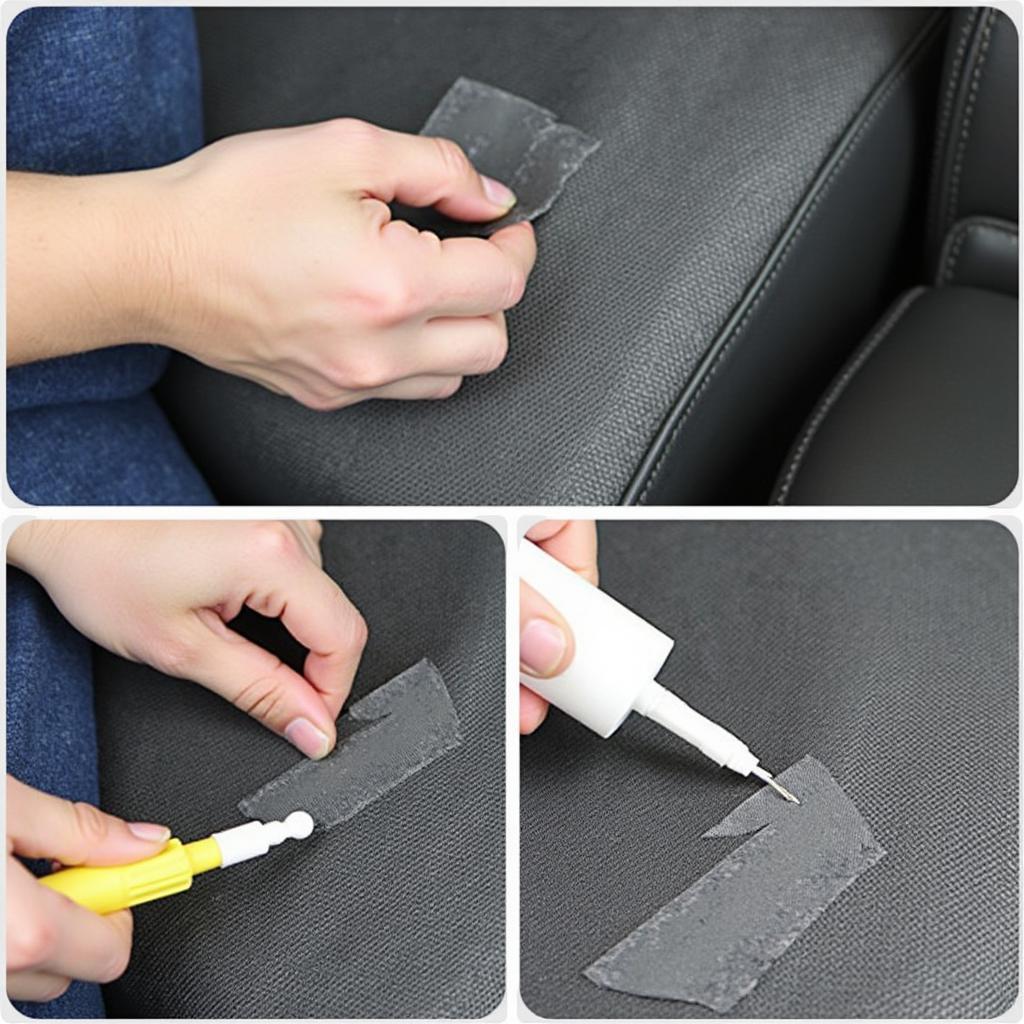
- Clean the area: Use a clean cloth and, if needed, a bit of rubbing alcohol to remove any dirt or debris from the ripped area. Allow the area to dry completely.
- Prepare the patch: If your repair kit includes a fabric patch, cut it to the desired size and shape, ensuring it slightly overlaps the edges of the rip.
- Apply adhesive: Apply the adhesive provided in the kit to the underside of the patch or directly to the edges of the tear, following the manufacturer’s instructions.
- Apply the patch: Carefully align the patch over the rip, ensuring it lays flat and smooth. Press down firmly and hold for the recommended time.
- Let it dry: Allow the adhesive to dry completely before using the seat.
For Leather Car Seats:
Materials:
- Leather repair kit (includes filler, colorant, and sealant)
- Cleaning cloth
- Rubbing alcohol (optional)
- Palette knife or putty knife
- Fine-grit sandpaper
- Heat gun or hairdryer (optional)
Instructions:
- Clean the area: Using a clean cloth and rubbing alcohol (if needed), thoroughly clean the damaged area. Let it dry completely.
- Apply leather filler: If the tear is deep or has missing material, apply leather filler with a palette knife, pressing it firmly into the tear. Let it dry as per the manufacturer’s directions.
- Sand the surface: Once the filler is dry, gently sand the area using fine-grit sandpaper to create a smooth and even surface.
- Apply colorant: Choose a colorant that closely matches your leather upholstery. Apply thin coats, allowing each coat to dry completely before applying the next. A heat gun or hairdryer can speed up the drying process.
- Apply sealant (optional): For added protection and a consistent finish, apply a leather sealant over the repaired area.
Tips for Professional-Looking Results
- Work in a well-ventilated area: Many adhesives and leather repair products emit fumes, so make sure you have good ventilation.
- Follow instructions carefully: Each repair kit will have specific instructions—always follow them closely for the best results.
- Test in an inconspicuous area: Before applying any product to the visible area, test it on a hidden part of the upholstery to ensure color matching and compatibility.
- Be patient: Allow ample drying time between each step for a smooth and durable repair.
- Don’t be afraid to seek professional help: If you’re unsure about any step or the damage is too severe, don’t hesitate to contact a professional upholsterer. how to repair a hole in cloth car seat
“Remember, a well-executed repair can significantly improve the appearance of your car’s interior,” says John Miller, a seasoned auto upholsterer with over 20 years of experience. “Don’t underestimate the power of DIY—you might be surprised by what you can achieve with the right tools and a bit of patience.”
When to Call a Pro
While minor car seat repairs can be tackled with DIY methods, some situations warrant professional intervention:
- Extensive Damage: Large rips, tears, or burns that affect a significant portion of the seat are often best left to professionals. best way to repair torn car seat
- Airbag Deployment: If your car has been in an accident and the airbags have deployed, it’s crucial to have a professional inspect and repair the seats to ensure the airbags will function correctly in the future.
- Complex Upholstery: Vehicles with intricate stitching patterns, delicate fabrics, or heated/cooled seats might require the expertise of a professional.
“Attempting complex repairs yourself can sometimes lead to more damage and ultimately cost you more in the long run,” advises Miller. “It’s always wise to consult with a professional if you’re unsure about the best course of action.”
Maintaining Your Repaired Car Seats
Once you’ve successfully repaired your ripped car seats, proper maintenance can help extend the life of the repair and keep your upholstery looking its best:
- Regular Cleaning: Use a gentle cleaner specifically designed for your car’s upholstery material to remove dirt and stains.
- UV Protection: Prolonged exposure to sunlight can cause fading and cracking, especially in leather seats. Use a sunshade or park your car in the shade whenever possible.
- Leather Conditioning: Regularly condition your leather seats with a quality leather conditioner to prevent drying, cracking, and fading.
By following these maintenance tips, you can enjoy your freshly repaired car seats for years to come.
FAQ
Q: Can I use super glue to repair a ripped car seat?
A: While super glue might seem like a quick fix, it’s not recommended for car seat repairs. Super glue can create a stiff and inflexible bond that can crack or peel over time, especially with the constant movement and pressure car seats endure.
Q: How long does it take for leather filler to dry?
A: Drying times for leather filler vary depending on the product and environmental factors like humidity. Always refer to the manufacturer’s instructions for specific drying times. It’s essential to allow the filler to dry completely before moving on to the next step.
Q: Can I repair a ripped car seat with duct tape?
A: Duct tape is a temporary fix at best. While it might hold the tear together for a short period, it’s not a durable solution. Duct tape will eventually lose its adhesive properties and leave behind a sticky residue that’s difficult to remove.
Q: Where can I find a car seat repair kit that matches my car’s upholstery?
A: Car seat repair kits are available at most auto parts stores, online retailers, and some department stores. Be sure to check for a kit that specifically mentions your upholstery type (fabric or leather) and offers a close color match.
Q: Can I dye my car seats a different color?
A: While it’s technically possible to dye car seats a different color, it’s a complex process that requires specialized dyes and techniques. If you’re considering a color change, it’s best to consult with a professional auto upholsterer.
Q: How much does it cost to have a car seat professionally repaired?
A: The cost of professional car seat repair can range widely depending on the severity of the damage, the type of upholstery, and the location. It’s always a good idea to get quotes from several upholstery shops to compare prices.
Q: Can ripped car seats affect the resale value of my car?
A: Yes, ripped or damaged car seats can negatively impact your car’s resale value. Potential buyers may perceive the damage as a sign of neglect or poor maintenance, leading to lower offers.
Conclusion
Repairing ripped car seats doesn’t have to be a daunting task. By following the steps outlined in this guide and using the right materials, you can restore your car’s interior and enhance its overall appeal. Remember, a little effort can go a long way in preserving the value and comfort of your vehicle.
And if you ever find yourself facing car seat damage that seems too extensive or complicated for DIY methods, don’t hesitate to reach out to a professional. how do you repair leather seats in a car They have the experience and expertise to handle even the most challenging repairs, leaving your car’s interior looking its best. do it yourself leather car seat repair
Need further assistance with your car repairs or diagnostics? Contact us via WhatsApp: +1(641)206-8880 or Email: [email protected]. Our team is available 24/7 to answer your questions and offer expert advice.


