Leather car seats are a luxurious addition to any vehicle, adding a touch of class and sophistication. But over time, even the highest-quality leather can suffer from wear and tear, leaving your seats looking cracked, faded, and less than their best. Fortunately, repairing leather car seats is often possible without needing a professional. With a little know-how and the right materials, you can restore your leather seats to their former glory.
This comprehensive guide will walk you through the process of repairing leather car seats, addressing common issues and providing you with the knowledge to tackle those imperfections yourself.
Identifying the Damage: What’s Wrong With Your Leather Seats?
Before diving into the repair process, it’s crucial to identify the type of damage your leather car seats have sustained. This will determine the appropriate repair method and products to use. Here are some common problems and their characteristics:
- Cracks: These appear as thin lines or deep fissures on the leather’s surface, often caused by aging, dryness, or extreme temperatures.
- Scratches: Varying in depth, scratches are superficial damages that affect the leather’s top layer, usually caused by sharp objects or pet claws.
- Fading and Discoloration: Prolonged exposure to sunlight and UV rays can lead to the leather’s color fading, making it appear dull and uneven.
- Stains and Spills: Liquids, food, and other substances can leave unsightly marks and stains on leather if not cleaned promptly.
- Seam Damage: Worn-out threads or loose stitching can cause the seams of your leather seats to weaken or separate.
Understanding the specific damage will help you choose the right repair method from the options discussed below.
Essential Tools and Materials for Leather Car Seat Repair
To tackle most leather car seat repairs, you’ll need a few basic tools and materials. These include:
- Leather Cleaner: A dedicated leather cleaner will remove dirt, grime, and debris without drying out the material.
- Leather Conditioner: This helps to moisturize and protect the leather, preventing future cracking and fading.
- Leather Repair Kit: These kits typically include a color-matched filler, adhesive, and various applicators for repairing cracks, scratches, and tears. Choose a kit that matches your leather’s color and finish as closely as possible.
- Soft-Bristled Brush: Useful for cleaning crevices and applying cleaning products.
- Microfiber Cloths: Soft and lint-free, these are perfect for wiping and buffing the leather.
- Rubbing Alcohol (Isopropyl Alcohol): Used for cleaning and prepping the leather surface before repair.
- Hair Dryer: Helpful for speeding up the drying process of leather fillers and dyes.
- Masking Tape: Protects surrounding areas when applying filler or dye.
Effective DIY Leather Car Seat Repair Techniques
Here are some common leather car seat repair techniques to address the issues identified earlier:
1. Repairing Cracks in Leather Car Seats
- Clean the Area: Thoroughly clean the cracked area with a leather cleaner and a soft-bristled brush, ensuring all dirt and debris are removed.
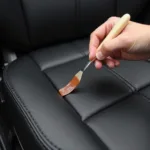
- Apply Leather Filler (if necessary): For deep cracks, use a leather filler to fill in the gaps. Apply the filler with a palette knife or the applicator provided in your repair kit, ensuring it’s level with the leather’s surface.
- Let it Dry: Allow the filler to dry completely according to the manufacturer’s instructions. You might use a hairdryer on low heat to speed up the process.
- Sand and Smooth: Once dry, gently sand the filled area with fine-grit sandpaper until it’s smooth and flush with the surrounding leather.
- Apply Leather Dye (if needed): If the crack is significant or the filler doesn’t match the leather’s color perfectly, apply a matching leather dye to the repaired area using a sponge or applicator.
- Condition the Leather: After the dye dries, apply a leather conditioner to restore the leather’s moisture and protect it from future damage.
Remember, if the cracks are extensive or you’re uncomfortable with the repair process, it’s best to consult a professional leather repair specialist.
2. Fixing Scratches on Leather Car Seats
For minor scratches, you can often minimize their appearance with a simple leather conditioner. Here’s how:
- Clean the Scratched Area: Use a leather cleaner to remove any dirt or debris from the scratch.
- Apply Leather Conditioner: Apply a small amount of leather conditioner to the scratch using your finger or a microfiber cloth.
- Massage the Conditioner: Gently massage the conditioner into the scratch using circular motions. The heat from your finger and the conditioner will help to mask the scratch.
- Wipe Away Excess: Use a clean portion of the microfiber cloth to wipe away any excess conditioner.
For deeper scratches, you might need to use a leather filler followed by a color-matching dye, similar to the process of repairing cracks.
3. Addressing Fading and Discoloration
While preventing fading is ideal (using sunshades and parking in the shade helps), you can often restore some of the lost color using leather dyes or color restorers.
- Clean the Seats: Clean the faded leather thoroughly with a leather cleaner to remove dirt and grime.
- Apply Leather Dye or Restorer: Follow the manufacturer’s instructions carefully and apply the dye or restorer evenly to the faded area using a sponge, brush, or applicator pad. Several thin coats are usually better than one thick coat.
- Let it Dry: Allow the dye or restorer to dry completely between coats and after the final application.
Using a leather conditioner afterward is crucial to keep the leather hydrated and help maintain the restored color.
These are just a few basic techniques for repairing leather car seats. You can find more detailed guides for specific issues, like repairing seam damage or dealing with specific types of stains, on CarRepairOnline.
Preventing Future Damage: Prolonging the Life of Your Leather Seats
Repairing your leather car seats is an excellent way to restore their appearance, but preventing future damage is equally important. Here are some preventive measures:
- Regular Cleaning: Clean your leather seats regularly using a dedicated leather cleaner and a soft-bristled brush. This prevents dirt and grime from building up and damaging the leather.
- Conditioning is Key: Leather conditioners help to moisturize the leather, keeping it supple and preventing it from drying out and cracking. Aim to condition your leather seats every few months or as needed based on usage and climate.
- Avoid Extreme Temperatures: Prolonged exposure to direct sunlight and heat can cause leather to fade, crack, and dry out. Park your car in the shade whenever possible and use sunshades to protect your seats.
- Address Spills Promptly: Accidents happen, but it’s crucial to address spills immediately. Liquid spills can stain and damage leather if left unattended. Blot the spill gently with a clean cloth and use a leather cleaner to remove any residue.
- Use Seat Covers (Optional): While some car owners prefer the natural look and feel of leather, consider using seat covers if you want extra protection, especially if you have children or pets.
By following these preventative measures and addressing minor issues promptly, you can keep your leather car seats looking their best for years to come.
Seeking Professional Help: When to Call in the Experts
While many leather car seat repairs can be done at home, some situations warrant professional attention. Consider consulting a professional leather repair specialist if:
- The Damage is Extensive: If your leather seats have large tears, burns, or extensive damage, a professional can provide more advanced repair solutions.
- You’re Uncomfortable with DIY Repairs: If you’re not confident in your ability to repair the damage yourself, it’s best to leave it to the professionals to avoid potential mishaps.
- The Leather Requires Specialized Treatment: Some types of leather, like aniline or nubuck, require specific cleaning and repair products. A professional can identify the type of leather and provide the appropriate treatment.
Expert Insight:
“Leather car seats are an investment, and proper care is essential for their longevity. Regular cleaning and conditioning are crucial, but addressing damage promptly, even minor scratches, can prevent them from becoming bigger problems down the road.” – Mark Stevenson, Senior Automotive Leather Technician.
Conclusion: Keep Your Leather Car Seats Looking Their Best
Leather car seats elevate the look and feel of any vehicle, and with proper care and maintenance, they can last for many years. Understanding how to identify and address common leather car seat issues empowers you to take charge of their upkeep. Whether you’re tackling DIY repairs or seeking professional help, remember that consistent care and attention will keep your leather seats looking their best for miles to come.
Need more help with your leather car seat repairs? Check out our other informative guides:
- How to repair leather car seat scratch
- How to repair leather car seat cracks
- How to repair leather car seats seam
- How to repair leather car seats w123
- How to repair leather car seat youtube
If you need further assistance, don’t hesitate to reach out to our team of experts via WhatsApp at +1(641)206-8880 or email us at [email protected]. We’re available 24/7 to answer your questions and provide top-notch support!


