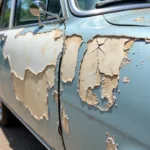
DIY car paint repair using a spray can is a cost-effective solution for minor scratches, chips, and scuffs. Whether you’re dealing with a small rock chip or a key scratch, this guide will walk you through the process of achieving professional-looking results from the comfort of your garage. Learn about the necessary tools, preparation techniques, and application methods for a flawless finish.
Understanding DIY Car Paint Repair
Before diving into the process, understanding the basics of car paint repair with spray cans is crucial. This involves identifying the type of damage, choosing the right paint, and preparing the surface correctly. Skipping these steps can lead to uneven color, orange peel texture, and ultimately, a less-than-perfect repair. This guide will address these aspects in detail, ensuring you’re equipped with the knowledge needed for a successful DIY repair. We’ll also discuss when professional help might be necessary. Sometimes a seemingly small scratch can be more than meets the eye, and attempting a DIY fix might worsen the damage.
After identifying the damage, your next step is to choose the correct spray paint. You’ll need to match the paint color to your car’s factory finish as closely as possible. This can be done by checking your car’s owner’s manual, the sticker inside the driver’s side doorjamb, or contacting your dealership. Remember, even slight variations in color can be noticeable after the repair.
You can find car paint repair in Nashville.
Next is surface preparation. This step is vital for a smooth and even finish. Cleaning the area thoroughly with soap and water, followed by degreasing, is crucial to remove any dirt, wax, or grease that could interfere with paint adhesion. If there’s rust present, you’ll need to remove it completely before proceeding with the repair.
Choosing the Right Spray Paint and Tools
Selecting the right spray paint is critical for achieving a seamless blend with your existing car paint. Look for automotive spray paint specifically designed for touch-ups. Consider factors like color matching, finish (gloss, matte, satin), and compatibility with your car’s clear coat. Beyond the paint, essential tools like sandpaper, masking tape, primer, and clear coat are necessary for a professional finish. This section will guide you through choosing the correct products for your specific needs and explain their usage.
Don’t underestimate the importance of quality tools. Using cheap sandpaper can create uneven surfaces, while poor quality masking tape can lead to paint bleed. Investing in good quality tools will save you time and frustration in the long run. For example, using a tack cloth to remove dust before painting will result in a much smoother finish. Similarly, using a high-quality spray can nozzle will ensure even paint distribution.
Applying the Spray Paint and Finishing Touches
Applying the spray paint requires patience and practice. Hold the can about 6-8 inches away from the surface and apply thin, even coats. Avoid spraying too much paint at once, as this can lead to drips and runs. Allow each coat to dry completely before applying the next. Once the color coats are dry, apply a few coats of clear coat to protect the paint and give it a glossy finish. This section will provide detailed instructions on applying the paint and clear coat, including tips for achieving a professional-looking result.
Car paint repair in Canterbury offers a wide range of services.
After the clear coat has dried, you can use a polishing compound to remove any imperfections and blend the repair seamlessly with the surrounding paint. This step requires careful attention to detail to avoid damaging the fresh paint. Remember to use a soft microfiber cloth and gentle pressure.
Conclusion
DIY car paint repair with a spray can is a viable option for minor damage. By following the steps outlined in this guide and investing in the right tools and materials, you can achieve professional-looking results and save money. Remember that patience and attention to detail are key to a successful repair. While DIY repairs can handle small imperfections, more significant damage may require professional intervention. If you’re unsure about tackling a repair yourself, it’s always best to consult a professional. For those in Brentwood, consider looking for car paint scuff repair Brentwood for professional assistance.
FAQs
-
How long does it take for the paint to dry? Drying times vary depending on the type of paint and environmental conditions. Generally, each coat should dry for at least 30 minutes before applying the next.
-
Can I use any type of spray paint on my car? No, you should use automotive spray paint specifically designed for touch-ups.
-
How do I match the paint color exactly? Check your car’s owner’s manual, the sticker inside the driver’s side doorjamb, or contact your dealership for the exact paint code. You can find car paint repair in Haverhill.
-
What should I do if the paint runs or drips? Let the paint dry completely, then lightly sand the affected area and reapply a thin coat.
-
Do I need to apply clear coat? Yes, clear coat protects the paint and gives it a glossy finish.
-
Where can I find car paint repair near 64068? Several reputable car repair shops offer these services. A quick online search should help you find local options.
-
What if my car has deep scratches or dents? For significant damage, it’s best to consult a professional for car paint repair.
For more specific locations for car repair services, you can look up car paint repair near 64068 or if you are located closer to Haverhill, you can check out car paint repair Haverhill for options.
Need assistance with your car repair project? Contact us via WhatsApp: +1(641)206-8880 or Email: cardiagtechworkshop@gmail.com. Our 24/7 customer support team is ready to help.


