
Discovering a leak, whether in your swimming pool or potentially your car, can be a homeowner’s or car owner’s headache. Leaks lead to wasted resources, potential damage, and costly professional repairs. If you’re facing a leak, you might be exploring DIY solutions to save time and money. One common product that comes up in discussions about leak repair is putty. But can you effectively use putty, specifically pool putty, to repair a leak, and could it even work for a car leak? Let’s dive into the world of DIY leak repair and explore how pool putty can be a surprisingly versatile solution.
Many homeowners, facing issues like a leaking pool, are hesitant to immediately call for professional help due to cost concerns. I experienced this firsthand with my own in-ground pool. Living in California, water conservation is crucial, and noticing an increase in water loss was alarming. Instead of immediately calling a pool service and facing potentially high bills, I decided to investigate a DIY approach to find and fix the leak myself. The good news is, with a bit of investigation and the right materials, often you can tackle these repairs yourself for a fraction of the cost.
The process generally involves two key steps:
- Locating the Leak: The first hurdle is pinpointing the source of the leak.
- Repairing the Leak: Once identified, you need to choose the appropriate method and materials for a lasting repair.
Important Safety Warning: Always prioritize safety when working around water or any potential hazards. If you are working in or around a pool, ensure you have someone present, especially if the leak is in deep water or near electrical installations like underwater lighting.
While professional leak detection and repair services exist, they can be expensive. Often, for straightforward leaks, a DIY approach can be effective and empowering. Let’s explore how to find a leak and how pool putty can be used as a repair solution.
Finding the Leak: Detective Work for DIY Repair
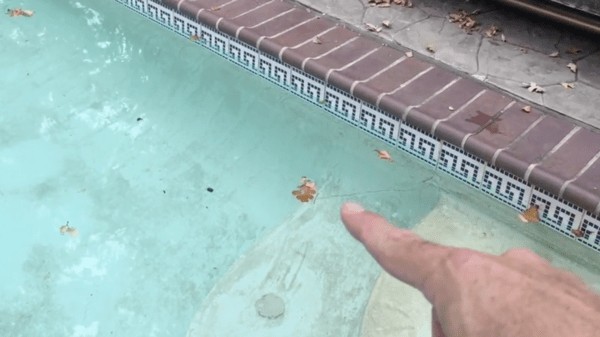
The most challenging part of DIY leak repair is often locating the leak itself. In my case, a visible crack in the shallow end of my pool was a prime suspect. This crack had been present for a while, but I suspected it had worsened, leading to increased water loss.
To confirm my suspicion, I used a simple yet effective method: food coloring. With the pool water still (pump and skimmer off), I released a drop of blue food coloring near the crack. Observing closely, I saw the food coloring being drawn into the crack, clearly indicating a leak. This visual test was a simple and inexpensive way to confirm the leak’s location.
For more subtle leaks or when pinpointing the exact location is difficult, you can use a specialized pool leak dye. These dyes are often denser and more visible than food coloring, making them easier to track, especially in deeper water. You can purchase pool leak detection kits that include this dye and a syringe for precise application.
This specialized dye is heavier than food coloring and less likely to disperse quickly, allowing for more accurate leak tracing. Whether using food coloring or specialized dye, the principle is the same: observe where the dye is drawn into the pool structure to identify the leak source.
If your leak isn’t immediately obvious like a visible crack, systematically test potential leak locations. Remember to turn off your pool pump and filtration system to ensure still water. Common leak areas in pools include:
- Cracks: Even hairline cracks in the pool shell.
- Underwater Lights: Seals around underwater lights can degrade over time.
- Skimmers: Areas around skimmers are prone to leaks.
- Drains: Main drains at the bottom of the pool (exercise caution and have assistance when testing deep areas).
Repairing the Leak with Pool Putty: A Practical Solution
Once you’ve located the leak, the next step is the repair. Many DIYers are relieved to find that repairing a leak, especially a crack or small hole, can be surprisingly straightforward and doesn’t necessarily require professional intervention. This is where pool putty comes into play.
Pool putty is a type of epoxy putty specifically formulated for underwater or wet applications. It typically comes in two parts: a resin and a hardener. When mixed together, these components create a waterproof, durable putty that can harden even underwater. This makes it ideal for repairing pool leaks without draining the pool, saving significant time and water.
To use pool putty effectively:
- Mixing: Take equal parts of the resin and hardener.
- Kneading: Thoroughly mix them together by kneading with your hands until you achieve a uniform color and consistency, similar to working with clay.
- Application: Form the putty into a shape suitable for the leak (like a snake for cracks or a ball for holes). Firmly press the putty into the crack or hole, ensuring good contact with the surrounding surface.
- Smoothing: For underwater applications, smoothing is often easier due to the water itself. For repairs above the waterline, you can use a slightly damp finger or tool to smooth the putty for a neater finish.
For repairs outside of the water, it’s beneficial to roughen the surface around the leak with sandpaper or an abrasive pad before applying the putty. This improves adhesion. For underwater repairs, ensure the area is free of algae or loose debris for optimal putty bonding.
Pool putty typically takes a few days to fully cure and harden. Once cured, it creates a durable, waterproof patch that can last for several years, effectively sealing the leak.
Can You Use Pool Putty on a Car Leak? Considering Other Applications
Now, let’s address the question directly: “Can you use pool putty to repair a car leak?” While pool putty is designed for wet environments like pools and spas, its properties – waterproof, strong adhesion, and ability to cure in challenging conditions – might make you wonder about its broader applications, including car repairs.
For Car Leaks, Consider the Specifics:
- Type of Leak: Pool putty is best suited for rigid materials like pool plaster, concrete, or tile. For car leaks, the materials might be different (metal, plastic, rubber).
- Environment: Car components can experience high temperatures, vibrations, and exposure to chemicals (oil, coolant, gasoline). Pool putty might not be formulated to withstand these conditions long-term in all car applications.
- Specific Car Putties: The automotive industry has specialized putties and epoxies designed for car repairs. These are often formulated to be heat-resistant, fuel-resistant, and compatible with car materials.
When Pool Putty Might Be an Option for Cars (with caution):
- Emergency Temporary Fix: In a pinch, pool putty could potentially be used as a temporary patch for a minor leak in a car, especially if it’s on a rigid, non-critical component and not exposed to extreme heat or chemicals. However, this should be considered a very short-term solution to get you to a repair shop.
- Non-Critical, Non-Engine Areas: Perhaps for sealing a minor leak in a non-essential plastic trim piece or a similar area that doesn’t involve critical engine or fluid systems.
Better Alternatives for Car Leaks:
For reliable car leak repairs, it’s generally recommended to use automotive-specific repair products. These include:
- Automotive Epoxy Putties: Formulated for metal, plastic, and resistant to car fluids and temperatures.
- Radiator Repair Putties: Specifically designed for radiator leaks, heat-resistant and compatible with coolant.
- Fuel Tank Repair Putties: For fuel tank leaks, fuel-resistant and safe for gasoline exposure.
- Silicone Sealants: For certain types of leaks, high-temperature silicone sealants can be effective.
In conclusion, while pool putty is excellent for pool and spa repairs, it’s generally not the ideal long-term solution for car leaks. For car repairs, prioritize automotive-specific repair products designed for the materials and conditions found in vehicles.
The Satisfaction of DIY Repair
There’s a real sense of accomplishment in completing a DIY repair, especially when it saves you money and resources. Fixing my pool leak myself was not only cost-effective but also satisfying, especially knowing I was conserving water during a drought.
After applying pool putty, it’s wise to monitor the repaired area to ensure the leak is fully sealed. However, it’s best to wait for the putty to fully cure before re-testing with dye, as the dye could potentially interact with uncured putty.
DIY repairs can be empowering, but it’s also important to recognize when a job is best left to professionals. For complex or critical leaks, especially in cars or pools with structural issues, seeking expert help is always the safest and most reliable approach.
DIY Takeaway: Finding and fixing a minor leak yourself, whether in a pool or potentially a non-critical area of a car (with caution and using appropriate materials), can be a rewarding DIY project. However, always consider the specific application and choose the right materials for a lasting and safe repair. For car leaks, automotive-specific putties and sealants are generally the better choice for reliable repairs.