Dealing with damaged car exterior panels, especially when plastic parts are missing, can be frustrating. Whether it’s a crack from a minor fender bender or a completely broken mounting tab, many car owners assume replacement is the only option. However, with the right techniques and materials, you can often repair car exterior panels missing plastic yourself, saving time and money. This guide will walk you through proven methods to tackle these repairs, focusing on how to restore your car’s bodywork to its former glory.
Assessing Damage and Gathering Your Repair Kit
Before diving into the repair process, it’s crucial to properly assess the damage to your car exterior panels. Are you dealing with a hairline crack, a broken mounting tab, or is a section of plastic completely missing? Identifying the type and extent of damage will dictate the repair method and materials needed. Most modern car exterior panels are made from ABS plastic, which is well-suited for repair using specific techniques.
To effectively repair car exterior panels missing plastic, you’ll need to gather the right tools and materials. A basic repair kit should include:
- Cyanoacrylate (CA) glue (Super Glue): Medium thickness is recommended for plastic repairs.
- Baking Soda: Used in conjunction with CA glue to create a strong filler and reinforce joints.
- Fiberglass Cloth (2oz and 6oz): For structural reinforcement, especially for larger repairs and missing sections.
- Epoxy Laminating Resin (Slow Cure): Provides superior bonding and strength compared to polyester resin for ABS plastic.
- Micro-balloons: To thicken epoxy resin into a paste-like consistency for filling gaps.
- Modeling Clay: Essential for creating molds when repairing completely missing plastic tabs.
- Rubbing Alcohol: For cleaning surfaces before bonding.
- Sandpaper (Various Grits): For surface preparation and smoothing repairs.
- Mixing Cups and Sticks: For preparing epoxy resin.
- Brushes: For applying resin.
- Dental Pick or Similar Tool: For detailed work with modeling clay and fiberglass.
- Exacto Knife or Trimming Knife: For trimming fiberglass cloth.
- Gloves and Safety Glasses: Essential safety gear when working with resins and adhesives.
Step-by-Step Guide to Repairing Car Exterior Panels
Once you have your materials assembled, you can begin the repair process. Remember to work in a well-ventilated area and take your time for the best results.
Repairing Hairline Cracks
Hairline cracks, while seemingly minor, can worsen over time due to vibrations and weather exposure. Repairing them promptly prevents further damage.
- Cleaning: Thoroughly clean the area around the crack on the backside of the panel with rubbing alcohol and a clean paper towel. Ensure it’s free of dirt, grease, and any loose particles.
- CA Glue Application: Apply a few drops of CA glue directly to the crack on the backside. Rub the glue into the crack to ensure good adhesion.
- Fiberglass Reinforcement: Cut a piece of 2oz fiberglass cloth slightly larger than the crack area. Apply a thin layer of CA glue over the crack again and immediately place the fiberglass cloth over the glued area. Press gently to ensure the cloth is fully saturated with the glue. This creates a strong internal reinforcement. For added strength, you can layer with 6oz cloth and epoxy resin as described in later steps for broken tabs.
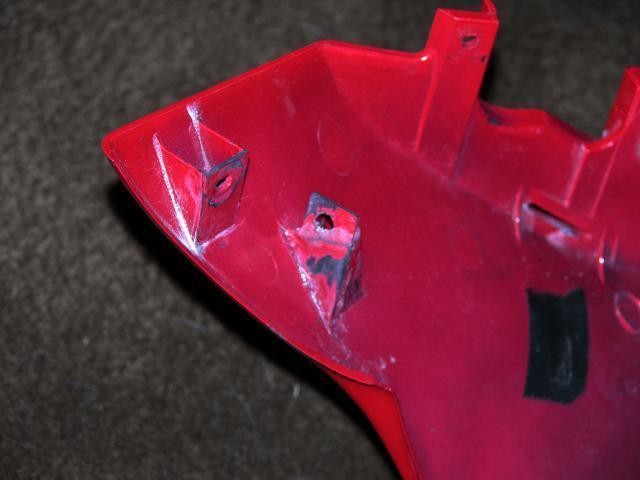
Repairing Broken Mounting Tabs
Broken mounting tabs are a common issue, especially on older vehicles or after minor impacts. Rebuilding these tabs is crucial for secure panel attachment.
- Reassemble Broken Pieces: If you have all the broken pieces of the mounting tab, carefully clean them and fit them back together. Use medium thickness CA glue to bond the pieces. For added strength, apply CA glue to the joint and sprinkle baking soda over it. The baking soda acts as an activator and filler, creating a very hard and durable bond. Repeat this process, layering CA glue and baking soda to fill any gaps and rebuild the tab to its original shape. Ensure the tab is aligned correctly.
- Fiberglass and Epoxy Reinforcement: Once the CA glue repair is solid, prepare your epoxy resin. Mix a small amount of epoxy laminating resin and hardener according to the manufacturer’s instructions. For the area where the tab mates with another part, thicken a small portion of the resin with micro-balloons to a mayonnaise-like consistency. Apply this thickened resin to the flat mating surface of the repaired tab.
- Apply Fiberglass Cloth: Cut pieces of 2oz fiberglass cloth and 6oz fiberglass cloth to reinforce the tab. Apply two layers of 2oz cloth to the areas where the tab does not make contact with its mating part, followed by three layers of 6oz cloth for maximum strength. Apply resin to saturate each layer of fiberglass cloth.
- Trimming and Finishing: Allow the epoxy resin to become firm but not fully cured. Use an Exacto knife to trim any excess fiberglass cloth. Once fully cured, file and sand the tab to shape, ensuring the screw hole is clear.
Recreating Missing Mounting Tabs
When a mounting tab is completely missing, you’ll need to create a new one. This method uses modeling clay to form a mold for the new tab.
- Create a Clay Mold: Use modeling clay to sculpt a temporary tab in the shape of the missing one. Refer to the opposite side tab or any available references to ensure accurate dimensions and shape. Fit and adjust the clay mold until it perfectly matches the required tab shape and position.
- Fiberglass Layup: Carefully cover one side of the clay tab with two layers of 2oz fiberglass cloth. Apply CA glue to saturate the cloth and allow it to harden.
- Remove Clay and Reinforce Other Side: Once the CA glue is set, carefully use a dental pick to extract the modeling clay from the fiberglass shell you’ve created. Apply at least one layer of 2oz fiberglass cloth to the inside of the fiberglass shell where the clay was removed, again using CA glue to saturate.
- Final Reinforcement with Epoxy: After the CA glue is cured, reinforce the newly formed tab with epoxy resin and fiberglass cloth, following the same process as described for repairing broken mounting tabs (steps 2-4 in the “Repairing Broken Mounting Tabs” section). Use layers of 2oz and 6oz cloth for strength.
- Finishing: Sand and file the newly created tab to refine its shape and ensure proper fitting. Drill or open up the screw hole as needed.
Final Steps and Painting
After completing the structural repairs, you can refine the appearance of your car exterior panels. Sand down any rough edges or uneven surfaces. If you plan to paint the repaired area to perfectly match your car’s color, now is the time for body filler (if needed), primer, and paint application. For minor repairs or if perfect color matching isn’t critical, you might be able to simply polish and wax the repaired area to blend it with the surrounding panel.
Conclusion: DIY Plastic Panel Repair is Achievable
Repairing car exterior panels missing plastic might seem daunting, but as this guide demonstrates, it’s entirely achievable for the DIY enthusiast. By using the right techniques and materials like CA glue, fiberglass, and epoxy resin, you can effectively repair cracks, broken tabs, and even recreate missing plastic sections. This approach not only saves you money compared to panel replacement but also allows you to maintain the original components of your vehicle. With patience and careful execution, you can restore the look and integrity of your car’s exterior panels, ensuring they are ready for the road ahead.