
Tubeless car tyres have become increasingly popular for their enhanced safety, improved fuel efficiency, and more comfortable ride. Unlike traditional tyres with inner tubes, tubeless tyres form an airtight seal directly with the wheel rim. This design reduces the risk of sudden deflation and allows for driving even after a minor puncture, thanks to the tyre sealant inside. But what happens when you encounter a puncture? Can you repair a tubeless car tyre yourself? The answer is yes, often you can.
This comprehensive guide from Car Repair Online will walk you through the process of repairing a puncture in a tubeless car tyre, ensuring you can get back on the road safely and efficiently. We’ll cover various repair methods, from using tyre plug kits to applying patches, and even when it’s time to call in professional help.
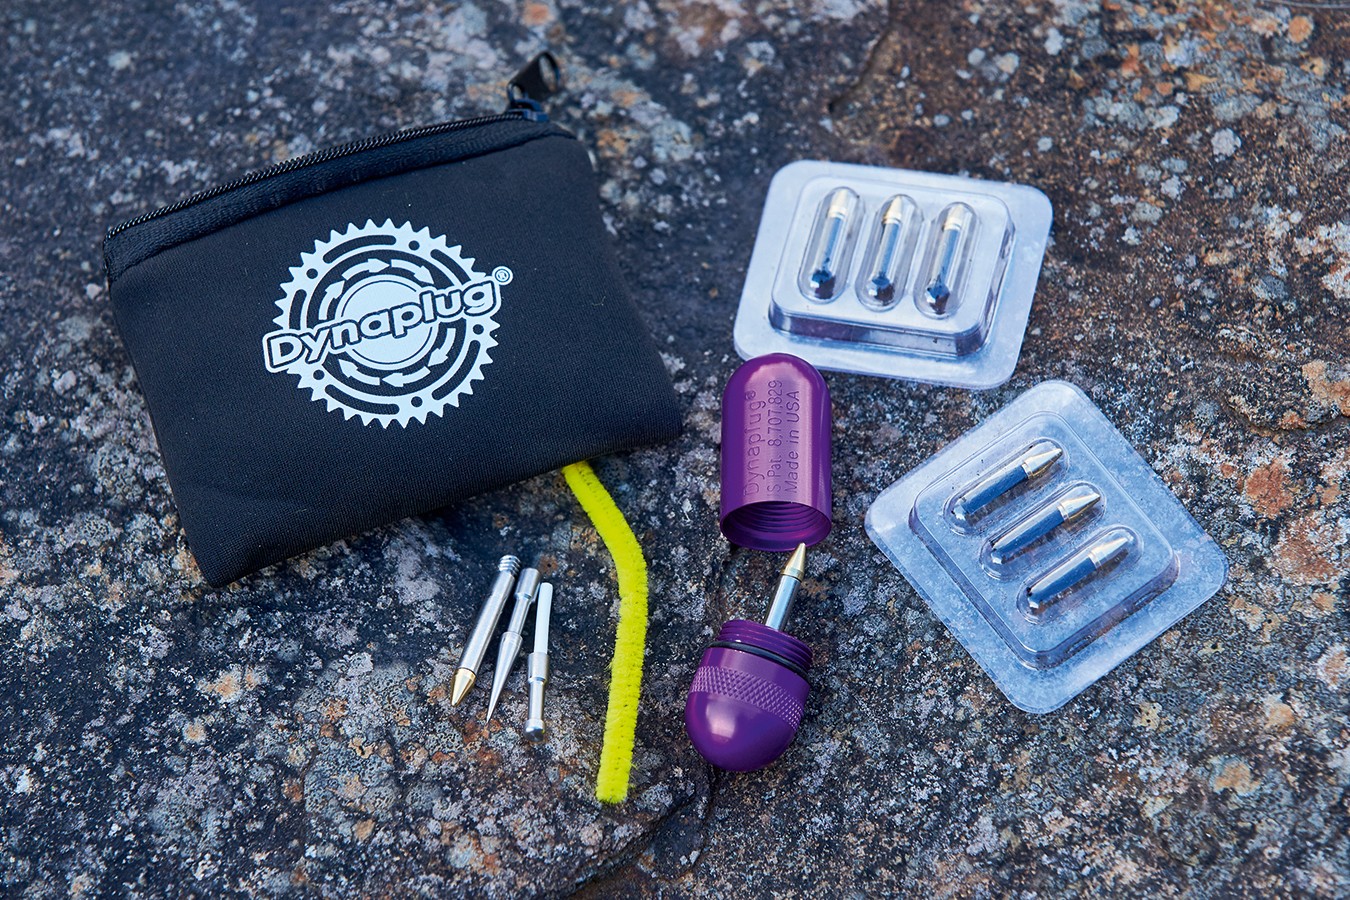
What You Need to Repair a Tubeless Car Tyre Puncture
Before you begin, gather the necessary tools and materials. Having everything at hand will make the repair process smoother and quicker. For most tubeless tyre puncture repairs, you will need:
- Tubeless Tyre Repair Kit: These kits are specifically designed for tubeless tyres and typically include:
- Tyre Plugs (or ‘bacon strips’): Rubberised strips that fill the puncture hole.
- Plug Insertion Tool: A tool to insert the tyre plug into the puncture.
- Reaming Tool: A tool to clean and enlarge the puncture hole for plug insertion.
- Cutting Tool or Knife: To trim excess plug material.
- Pliers or Tyre Levers: To remove any object causing the puncture (nail, screw, etc.).
- Inflation Source: A portable tyre inflator, 12V car tyre pump, or CO2 inflator to reinflate the tyre.
- Tyre Sealant (optional but recommended): To top up sealant levels after repair, ensuring optimal sealing.
- Gloves: To keep your hands clean.
- Safety Glasses: To protect your eyes.
Depending on the type and size of the puncture, you might also need:
- Tyre Patch Kit (for tubeless tyres): For internal patching of larger punctures.
- Rubber Cement/Vulcanising Fluid: For tyre patches.
- Sandpaper or Scraper: To prepare the tyre surface for patching.
- Needle and Thread (heavy-duty): For temporarily stitching large sidewall tears (emergency measure only).
Step-by-Step Guide: Repairing a Tubeless Car Tyre with a Plug Kit
Using a tubeless tyre plug kit is often the quickest and easiest way to repair punctures, especially for small to medium-sized holes in the tyre tread. Here’s how to do it:
-
Locate the Puncture: Identify the puncture by listening for a hissing sound of escaping air or looking for tyre sealant leaking out. If the object causing the puncture is still in the tyre (like a nail or screw), leave it in place for now as it might be temporarily sealing the hole.
-
Prepare the Puncture Hole: If the object is still lodged in the tyre, use pliers or tyre levers to carefully remove it. Now, using the reaming tool from your repair kit, insert it into the puncture hole. Twist and push the reaming tool in and out to clean the hole and create a slightly larger opening. This will help the tyre plug insert smoothly and create a better seal. Be careful not to damage the tyre further or push the reaming tool too deep, potentially damaging the tyre’s inner structure.
-
Insert the Tyre Plug: Take a tyre plug from your repair kit and thread it through the eye of the plug insertion tool. Fold the plug evenly so that both ends are ready to be inserted into the tyre. Apply a bit of tyre sealant to the plug for enhanced sealing (optional).
-
Apply the Plug: Push the plug insertion tool firmly and straight into the prepared puncture hole. You need to push it in with enough force so that approximately half to two-thirds of the plug is inserted into the tyre. Avoid angling the tool excessively as this could damage the tyre’s internal layers.
-
Remove the Insertion Tool: Hold the plug firmly in place with one hand and carefully pull the plug insertion tool straight out. The plug should remain in the tyre, sealing the puncture.
-
Trim Excess Plug: Use a cutting tool or knife to trim the excess plug material protruding from the tyre surface. Cut it flush with the tyre tread or leave a small nubbin of about 3-5mm. Avoid cutting too close to the tyre surface as this could compromise the seal.
-
Inflate the Tyre: Reinflate the tyre to the recommended pressure as indicated on the tyre sidewall or your vehicle’s doorjamb sticker. Check for leaks around the plug repair area by listening for hissing sounds or applying soapy water to the area and looking for bubbles.
-
Check and Re-Seal (if needed): If you detect any leaks, you might need to insert another plug or ensure the existing plug is firmly seated. Rotating the tyre so the repair area is at the bottom can help the tyre sealant flow to the plug and enhance the seal.
Patching a Tubeless Car Tyre Internally
For larger punctures or cuts, especially on the inside of the tyre, a tyre plug might not be sufficient. In such cases, internal patching is a more reliable solution. This method requires removing the tyre from the wheel.
-
Remove the Tyre: Deflate the tyre completely and use tyre levers to carefully detach one side of the tyre bead from the wheel rim. Work your way around the rim until you can remove the tyre completely. Be cautious not to damage the rim or tyre bead during removal.
-
Locate and Clean the Puncture Area (Inside): Identify the puncture from the inside of the tyre. Clean the area around the puncture thoroughly using sandpaper or a scraper to roughen the surface. This will ensure better adhesion of the patch. Remove any debris or sealant residue.
-
Apply Rubber Cement: Apply a thin, even layer of rubber cement or vulcanising fluid to the roughened area around the puncture. Allow it to become tacky, as per the patch kit instructions.
- Apply the Patch: Remove the backing from the tubeless tyre patch and apply it firmly over the puncture area. Press down firmly and evenly across the patch to ensure good adhesion. Use a roller or smooth, hard object to apply consistent pressure and eliminate air bubbles.
-
Allow to Dry: Allow the patch to dry completely according to the patch kit instructions. This could take several minutes to hours, depending on the type of patch and vulcanising fluid used.
-
Reinstall the Tyre: Carefully reinstall the tyre onto the wheel rim, ensuring the tyre bead is properly seated all around the rim.
-
Inflate and Check for Leaks: Inflate the tyre to the recommended pressure and check for leaks around the patch and the tyre bead. Add fresh tyre sealant through the valve stem if necessary, especially if a significant amount was lost during the puncture or repair process.
When Tyre Damage is Too Severe for Repair
While tubeless tyre repair kits and patches are effective for many punctures, some damage is simply too severe for a safe and reliable DIY repair. Consider these situations where tyre replacement is necessary:
- Sidewall Damage: Punctures, cuts, or tears in the sidewall of a tubeless tyre are generally not repairable. The sidewall is a critical structural component, and damage here can severely compromise tyre integrity and safety.
- Large Tread Punctures: Punctures larger than approximately 6mm (1/4 inch) in the tread area may be too large for plugs or patches to handle reliably, especially in high-speed driving conditions.
- Multiple Punctures Close Together: If you have several punctures in close proximity, the structural integrity of that area of the tyre may be weakened, making repair unreliable.
- Tyre Bead Damage: Damage to the tyre bead (the edge that seals against the rim) can prevent a proper airtight seal and is not repairable.
- Run-Flat Damage: If you have driven a tubeless tyre for a significant distance while severely deflated (run-flat situation), even if it’s technically repairable, the tyre’s internal structure might be compromised due to heat buildup and stress. In such cases, replacement is highly recommended.
- Worn Tyres: If your tyres are already nearing the end of their lifespan with low tread depth, it’s generally more sensible to replace them rather than spending time and effort repairing a puncture.
In these situations, it is always safer to replace the damaged tyre with a new one to ensure your vehicle’s safety and handling performance.
Prevention and Regular Maintenance for Tubeless Car Tyres
Preventing punctures and maintaining your tubeless car tyres properly can significantly reduce the chances of needing roadside repairs. Here are some tips:
- Regular Tyre Pressure Checks: Maintain the correct tyre pressure as recommended by your vehicle manufacturer. Underinflation or overinflation can increase the risk of punctures and tyre damage.
- Tyre Inspection: Periodically inspect your tyres for embedded objects, cuts, bulges, or uneven wear. Remove any debris lodged in the tread.
- Tyre Sealant Top-Up: Tubeless tyre sealant dries out over time. Check and replenish the sealant levels every few months or as recommended by the sealant manufacturer.
- Avoid Road Hazards: Be mindful of road conditions and try to avoid driving over sharp objects, potholes, and debris whenever possible.
- Professional Tyre Checks: Have your tyres inspected by a professional tyre technician regularly, especially during routine vehicle servicing, to identify any potential issues early on.
Conclusion
Repairing a puncture in a tubeless car tyre is often manageable with the right tools and knowledge. Using a tubeless tyre plug kit is a quick and effective solution for many common punctures. For larger damage, internal patching can provide a more robust repair. However, it’s crucial to recognise when tyre damage is too severe and replacement is the only safe option. Regular maintenance and preventative measures are key to maximising the lifespan and safety of your tubeless car tyres. By following this guide from Car Repair Online, you can confidently handle tubeless tyre punctures and ensure you’re always prepared for the road ahead.