Maintaining your car can seem daunting, often leading to expensive trips to the mechanic. But the question “can I do car repair at home?” has a resounding yes for many essential tasks. You don’t need to be a professional mechanic to keep your vehicle running smoothly and avoid costly repairs. Many maintenance jobs are straightforward enough to tackle in your own driveway with just a few basic tools. This guide will walk you through some simple yet crucial car maintenance tasks you can confidently perform at home, saving you time and money.
Simple Car Fixes: Lubricating Window Tracks
Sticking car windows are a common annoyance, and ignoring them can lead to bigger problems. When freezing temperatures hit, water can seep into your window tracks. This can cause drag and resistance when you try to operate your windows. This drag isn’t just inconvenient; it can actually damage your window regulator cables, potentially leading to a repair bill of around $300. Fortunately, this is a very easy car repair you can do at home.
The solution is simple lubrication. By lubricating your window tracks, you can ensure smooth operation and prevent damage. All you need is spray silicone or dry Teflon spray lubricant, readily available at any auto parts store or online.
Here’s how to lubricate your window tracks:
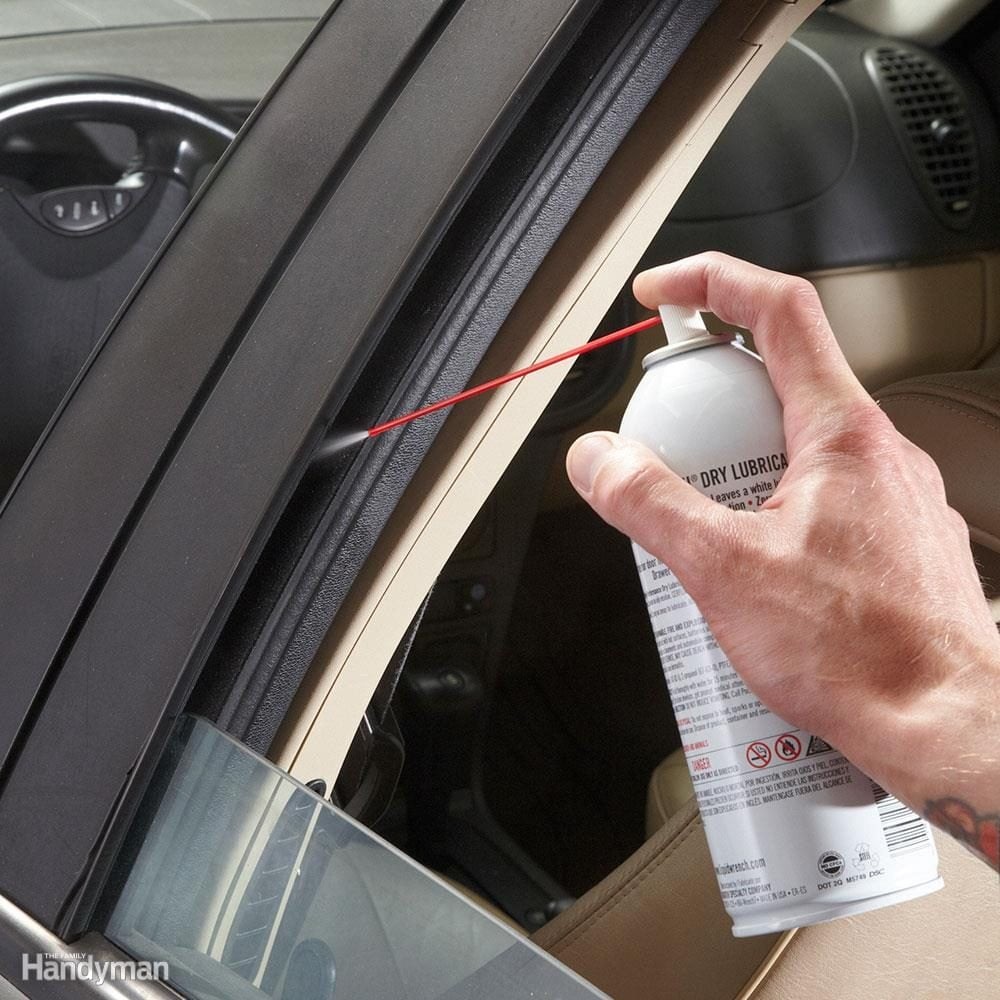
- Lower the window completely. This exposes the window tracks, making them accessible for lubrication.
- Apply lubricant to the tracks. Aim the spray nozzle directly into the front and back window tracks.
- Saturate the tracks. Apply a generous amount of lubricant, enough so that it drips all the way down the track. This ensures thorough coverage.
- Operate the window. Run the window up and down through several complete cycles. This action spreads the lubricant evenly along the entire track, ensuring smooth movement.
- Clean up overspray. Use a glass cleaner and a paper towel to wipe away any lubricant that may have landed on the window glass.
By spending just a few minutes lubricating your window tracks, you can prevent window problems and save yourself from a potentially expensive car repair.
Home Car Maintenance: Swapping Brake Fluid (Partial Swap)
Brake fluid is essential for your car’s braking system, and maintaining it is a vital part of car safety. While a complete brake fluid flush might require professional equipment, a partial brake fluid swap is a straightforward maintenance task you can easily accomplish at home.
Carmakers’ recommendations vary when it comes to brake fluid replacement. Some suggest replacing it every two years or 24,000 miles, while others don’t explicitly mention it. However, it’s easy to check your brake fluid condition yourself using brake fluid test strips. These strips change color to indicate the fluid’s condition. If your brake fluid is dark or contaminated, a fluid swap is a good idea.
This DIY method, known as a fluid swap, won’t replace all the old fluid, but it introduces enough fresh fluid to significantly improve your braking system’s performance and longevity.
Here’s how to perform a brake fluid swap at home:
- Gather your supplies. You’ll need fresh brake fluid (check your car’s manual for the correct type), a turkey baster (dedicated for brake fluid only), and a recycling container for the old fluid. Remember, brake fluid and power steering fluid are incompatible; use separate basters if you plan to change both fluids.
- Remove old brake fluid. Use the turkey baster to carefully suck out the dark, old brake fluid from the brake fluid reservoir.
- Dispose of old fluid. Squirt the used brake fluid into your recycling container. Brake fluid is hazardous waste and should be disposed of properly according to local regulations.
- Refill with fresh fluid. Pour fresh brake fluid into the reservoir, filling it to the recommended level as indicated in your car’s owner’s manual or on the reservoir itself.
- Drive and repeat. Drive your vehicle for about a week to allow the new fluid to mix with the old fluid in the system.
- Repeat the swap. Repeat the fluid swap procedure several times over the next few weeks. Continue this process until the fluid in the reservoir maintains a light honey color, indicating a good proportion of fresh fluid in the system.
Important Note: Brake fluid can be corrosive and may damage the rubber bulb of the turkey baster. Avoid sucking fluid all the way into the bulb to prolong the baster’s life.
DIY Car Repair: Changing Power Steering Fluid
Similar to brake fluid, power steering fluid degrades over time and can impact your car’s steering performance. There aren’t readily available test strips for power steering fluid, so relying on manufacturer recommendations or a general rule of thumb is necessary. A common guideline is to change power steering fluid every two years or 24,000 miles.
Changing your power steering fluid is another simple car repair you can handle at home using the fluid swap method.
Here’s how to change your power steering fluid using a fluid swap:
- Prepare for the swap. You’ll need fresh power steering fluid (again, check your car’s manual for the correct type), a dedicated turkey baster (different from the one used for brake fluid), and a recycling container.
- Remove old fluid. With the engine off, use the turkey baster to suck out as much of the old power steering fluid from the reservoir as possible.
- Refill with fresh fluid. Pour fresh power steering fluid into the reservoir, filling it to the correct level.
- Run the engine. Start your engine and let it run for about 15 seconds. This circulates the new fluid through the power steering system.
- Repeat the swap. Turn off the engine and repeat the fluid swap procedure. Continue this process until you have used up almost the entire quart of fresh power steering fluid. This ensures a significant portion of the old fluid is replaced.
Important Notes: Always use the power steering fluid type recommended by your car’s manufacturer. Never substitute “universal” power steering fluid or add any “miracle” additives or stop-leak products. These can cause serious damage by clogging the fine mesh filter screens in your steering system, leading to expensive repairs.
Conclusion
As you can see, answering “can I do car repair at home?” with a yes is practical and empowering. Lubricating window tracks, swapping brake fluid, and changing power steering fluid are just a few examples of essential car maintenance tasks that are well within the reach of the average car owner. By taking on these simple DIY car repairs, you can save money, gain a better understanding of your vehicle, and ensure its longevity and performance. With a little effort and the right guidance, you can confidently perform these tasks and keep your car running smoothly for years to come.