Black leather car seats exude luxury and sophistication. However, over time, the wear and tear of daily use can leave them looking dull, faded, and scratched. That’s where black car seat leather repair dye comes in, offering a cost-effective solution to restore their former glory. This comprehensive guide will delve into the intricacies of using black car seat leather repair dye, empowering you to achieve professional-looking results from the comfort of your own garage.
applying-black-leather-dye-to-car-seat|Applying black leather dye to a car seat|A close-up shot of a person carefully applying black leather dye to a car seat using a sponge applicator. The focus is on the even application of the dye and the restoration of the leather’s color.>
Understanding Leather Repair Dye
Before diving into the application process, it’s crucial to understand what black car seat leather repair dye is and how it works. This specialized dye is specifically formulated to penetrate the leather’s surface, effectively masking scratches, scuffs, and discoloration. Unlike traditional leather conditioners that sit on the surface, repair dye forms a durable bond with the leather, resulting in long-lasting color restoration and protection.
Choosing the Right Black Leather Dye
Not all black leather dyes are created equal. Selecting the correct dye for your car seats is paramount to achieving a flawless finish. Consider the following factors when making your choice:
- Type of Leather: Different types of leather require specific dye formulations. Ensure the dye you choose is compatible with the type of leather used in your car seats.
- Color Matching: Achieving a perfect color match is essential for a seamless repair. Most dye manufacturers offer a wide range of black shades to match various leather tones.
- Quality and Durability: Opt for a high-quality dye from a reputable brand known for its durability and fade resistance.
Gathering Your Supplies
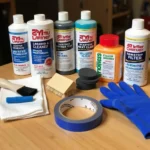
Once you’ve selected the perfect black leather dye, gather the necessary supplies to ensure a smooth and successful repair process. Here’s a checklist:
- Black Leather Repair Dye: This is the hero of our operation!
- Leather Cleaner and Degreaser: Thoroughly cleaning the leather surface is crucial for optimal dye adhesion.
- Fine-grit Sandpaper (optional): Use for light sanding if the leather is heavily worn or has deep scratches.
- Clean Cloths and Sponges: For applying the dye and wiping away any excess product.
- Gloves and Mask: Protect your hands and lungs from the dye and its fumes.
- Well-Ventilated Workspace: Ensure ample ventilation to disperse fumes during the drying process.
car-leather-repair-supplies-arranged-on-table|Car leather repair supplies arranged on a table|An assortment of car leather repair supplies neatly arranged on a table. The image includes bottles of black leather dye and cleaner, sponges, cloths, gloves, and sandpaper.>
Preparing the Leather Surface
Proper surface preparation is the key to achieving a flawless and long-lasting finish. Follow these steps to prepare your car seats for the dye application:
- Cleaning and Degreasing: Begin by thoroughly vacuuming the seats to remove any loose dirt or debris. Then, use a dedicated leather cleaner and degreaser to eliminate ingrained dirt, oils, and residues that can hinder dye adhesion.
- Sanding (if necessary): If your leather seats have deep scratches or significant wear, lightly sand the affected areas using fine-grit sandpaper. This step helps to create a smoother surface for the dye to adhere to evenly.
- Allowing to Dry: Once clean, allow the leather seats to dry completely before proceeding with the dye application. This step prevents moisture from interfering with the dye’s bonding process.
Applying the Black Leather Dye
With your car seats prepared, it’s time to apply the black leather dye. Follow these steps for a professional-looking finish:
- Test in a Hidden Area: Before applying the dye to the entire seat, test it in a discreet, hidden area to ensure color compatibility and assess the drying time.
- Apply Thin, Even Coats: Using a clean sponge or applicator pad, apply the dye in thin, even coats, following the manufacturer’s instructions. Multiple thin coats are always preferable to one thick coat, as they allow for better absorption and prevent streaking.
- Allow Ample Drying Time: Allow each coat of dye to dry completely before applying the next. Refer to the dye manufacturer’s instructions for recommended drying times.
- Repeat Coats as Needed: Depending on the severity of the damage and desired color intensity, you may need to apply multiple coats of dye.
Protecting Your Newly Dyed Seats
After investing time and effort in restoring your car seats with black leather dye, it’s essential to protect your handiwork and ensure long-lasting results. Consider these maintenance tips:
- Regular Cleaning: Regularly clean your leather seats with a dedicated leather cleaner to prevent dirt and grime from building up and dulling the finish.
- Leather Conditioner: Use a high-quality leather conditioner to keep the leather supple, moisturized, and protected from UV damage.
- Avoid Harsh Chemicals: Harsh chemicals and cleaners can strip away the dye and damage the leather. Opt for gentle, pH-balanced products specifically designed for leather care.
newly-dyed-black-leather-car-seat|Newly dyed black leather car seat|A before-and-after image showcasing a car seat before and after being treated with black leather dye. The “after” image highlights the restored color, repaired scratches, and overall improved appearance of the leather.>
Conclusion
Black car seat leather repair dye offers a cost-effective and DIY-friendly solution to revitalize the appearance of your car’s interior. By following the steps outlined in this guide and investing in quality products, you can achieve professional-looking results that will have your car seats looking their best for years to come. If you’re unsure about tackling this project yourself, consult with a professional leather repair specialist for assistance.

