Windows 10’s Automatic Repair is a built-in recovery tool designed to diagnose and fix common issues that prevent your computer from booting correctly. If your system fails to start properly twice in a row, on the third attempt, Automatic Repair kicks in. This feature runs a series of diagnostic tests to identify and resolve startup problems automatically.
While Automatic Repair is often helpful, there are situations where you might want to disable it. Perhaps you prefer to troubleshoot startup issues manually, or maybe Automatic Repair itself is getting stuck in a loop, preventing your system from starting normally. If you find yourself in such a situation, disabling Automatic Repair in Windows 10 is a straightforward process.
This guide will walk you through the steps to disable the automatic diagnosis and repair feature in Windows 10. We will also cover how to re-enable it if you change your mind or need to revert the changes.
Why Disable Automatic Repair?
Before diving into the how-to, let’s briefly consider why someone might want to disable Automatic Repair.
- Manual Troubleshooting Preference: Some users prefer to diagnose and fix startup problems themselves. Disabling Automatic Repair gives them more control over the troubleshooting process.
- Automatic Repair Loops: In certain situations, Automatic Repair can get stuck in an endless loop, repeatedly failing to repair the system and preventing normal startup. Disabling it can break this cycle and allow for alternative troubleshooting methods.
- Advanced Troubleshooting: For users with advanced technical skills, disabling Automatic Repair might be a necessary step to perform more in-depth diagnostics or apply specific fixes that Automatic Repair doesn’t handle.
It’s important to note that disabling Automatic Repair means your system will not automatically attempt to fix startup issues. You will need to manually troubleshoot and resolve any boot problems that arise.
How to Disable Windows 10 Automatic Repair
Disabling Automatic Repair in Windows 10 is done through the Command Prompt using the bcdedit command. Here are the steps:
-
Open Command Prompt as Administrator:
- Click on the Start button.
- Type “Command Prompt”.
- Right-click on “Command Prompt” in the search results and select “Run as administrator”. You may be prompted to confirm administrative access – click “Yes”.
-
Verify Current Boot Configuration (Optional but Recommended):
- In the Command Prompt window, type the following command and press Enter:
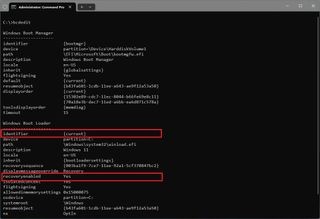
bcdedit - This command will display the boot configuration data. Look for the “Windows Boot Loader” section.
- Confirm that the “recoveryenabled” value is set to “Yes” and the “identifier” is set to “{current}”. This confirms that automatic repair is currently enabled for your current operating system.
- In the Command Prompt window, type the following command and press Enter:
-
Disable Automatic Repair:
- In the Command Prompt window, type the following command and press Enter:
bcdedit /set {current} recoveryenabled no - This command modifies the boot configuration data to disable Automatic Repair. The
"{current}"specifies that the change applies to the current operating system, and"no"disables therecoveryenabledoption.
- In the Command Prompt window, type the following command and press Enter:
-
Confirmation:
- After executing the command, Command Prompt should display a message “The operation completed successfully.” This indicates that Automatic Repair has been successfully disabled.
- You can verify the change by running the
bcdeditcommand again. The “recoveryenabled” value under “Windows Boot Loader” should now be set to “No”.
Once these steps are completed, Windows 10 will no longer automatically initiate the Automatic Repair process after repeated unsuccessful boot attempts.
How to Re-enable Windows 10 Automatic Repair
If you decide to re-enable Automatic Repair, or if you want to revert the changes, the process is equally simple and uses the same bcdedit command.
-
Open Command Prompt as Administrator: Follow the same steps as in the disabling section to open Command Prompt with administrative privileges.
-
Verify Current Boot Configuration (Optional but Recommended):
- Run the
bcdeditcommand to check the current settings. - Confirm that the “recoveryenabled” value is set to “No” and the “identifier” is “{current}”. This verifies that automatic repair is currently disabled.
- Run the
-
Enable Automatic Repair:
- In the Command Prompt window, type the following command and press Enter:
bcdedit /set {current} recoveryenabled yes - This command re-enables Automatic Repair. The
"{current}"targets the current OS, and"yes"sets therecoveryenabledoption back to its default enabled state.
- In the Command Prompt window, type the following command and press Enter:
-
Confirmation:
- A “The operation completed successfully.” message in Command Prompt confirms that Automatic Repair has been re-enabled.
- Run
bcdeditagain to verify. The “recoveryenabled” value should now be “Yes”.
After re-enabling Automatic Repair, Windows 10 will once again automatically attempt to diagnose and repair startup issues if your system fails to boot correctly multiple times.
Conclusion
Disabling Automatic Repair in Windows 10 can be useful in specific troubleshooting scenarios or for users who prefer manual control over system recovery. However, it’s generally recommended to keep Automatic Repair enabled, as it provides an essential safety net for resolving common boot problems. If you disable it, remember to re-enable it once you have completed your troubleshooting to ensure your system benefits from this automatic recovery feature in the future. Always exercise caution when using Command Prompt and modifying boot configurations, and ensure you understand the commands you are executing.


