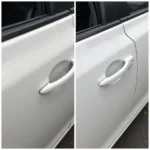
Sanding and repairing your car paint can seem daunting, but with the right tools and techniques, it’s a manageable DIY project. Whether you’re dealing with minor scratches, unsightly chips, or faded clear coat, this guide will walk you through each step, ensuring a professional-looking finish.
Assessing the Damage: What Kind of Repair Do You Need?
Before diving into the sanding process, it’s crucial to assess the severity of the damage.
- Light scratches and swirl marks: Often buffed out with polishing compound.
- Deep scratches penetrating the primer: Require sanding, priming, and repainting.
- Paint chips: Demand careful cleaning and filling before sanding and painting.
Understanding the damage will help you gather the appropriate materials and follow the correct repair process.
Gathering Your Sanding and Repair Arsenal
Having the right tools is essential for achieving a flawless finish. Here’s a list of what you’ll need:
- Sandpaper: A variety of grits, ranging from 200 to 2000.
- Sanding block: Ensures even pressure distribution.
- Masking tape and paper: Protect surrounding areas from accidental sanding.
- Primer: (If damage exposes bare metal).
- Automotive paint: Matched to your car’s color code.
- Clear coat: Provides a glossy and protective finish.
- Polishing compound and pads: For buffing and restoring shine.
- Microfiber cloths: For cleaning and wiping down surfaces.
“Having the right tools not only makes the job easier but also ensures a higher quality repair,” says John Smith, a seasoned automotive painter with over 20 years of experience. “Investing in good quality materials is key to achieving a professional-looking finish.”
The Sanding Process: A Step-by-Step Guide
- Clean the Area: Thoroughly wash and dry the damaged area to remove dirt and debris.
- Mask Off Surrounding Areas: Use masking tape and paper to protect areas you don’t want to sand.
- Start with Coarse Grit Sandpaper: Begin with a grit around 200 to remove the damaged paint. Sand in a back-and-forth motion, applying even pressure.
- Gradually Increase Grit: As you remove the damaged paint, progressively move to finer grits of sandpaper (300, 400, 600, and so on). This process smooths out the surface and prepares it for priming and painting.
- Feathering: When sanding near the edges of the damaged area, use a feathering technique. This involves sanding lightly and gradually tapering the area to create a smooth transition between the repaired and original paint.
Priming and Painting: The Art of Color Matching
- Prime the Area (If Necessary): If the damage exposes bare metal, apply a thin coat of primer to prevent rust and create a uniform surface for the paint.
- Match Your Paint Color: Obtain your car’s paint code (usually found on the driver’s side door jamb) and purchase matching paint.
- Apply Thin Coats of Paint: Using a spray gun, apply thin coats of paint, allowing each layer to dry before applying the next.
- Apply Clear Coat: Once the paint is dry, apply 2-3 coats of clear coat for added protection and shine.
Finishing Touches: Polishing and Buffing
- Wet Sanding: Once the clear coat is fully cured (24-48 hours), wet sand the area with fine-grit sandpaper (1000-2000) to remove any imperfections.
- Polishing: Use a polishing compound and pad to buff out any remaining scratches and bring out the shine.
- Waxing: Apply a coat of car wax to protect the finish and enhance its gloss.
“Patience is key when it comes to car paint repair,” advises Smith. “Taking your time with each step, especially sanding and painting, will ensure the best possible outcome.”
FAQs about Sanding and Repairing Car Paint
Q: Can I use regular sandpaper for sanding car paint?
A: While you can use regular sandpaper, it’s highly recommended to use automotive-grade sandpaper. It’s specifically designed for paint and provides a smoother finish.
Q: How many coats of paint should I apply?
A: Start with 2-3 thin coats of paint, allowing each layer to dry completely before applying the next. More coats may be necessary depending on the color and coverage.
Q: Can I repair dents myself?
A: Repairing dents often requires specialized tools and techniques. It’s best to consult a professional for dent repair.
Need More Help?
For more detailed information on car paint repair, you can check out our articles on car paint repair detail, paint scratches done to rental car usual repair cost, car paint chip repair kit, dupli color body paint repair kit car scratch remover and car paint scratch repair spray.
Sanding and repairing car paint is a skill that takes practice and patience. If you’re unsure about any step, don’t hesitate to seek guidance from experienced professionals. By following these steps and paying attention to detail, you can restore your car’s paint to its former glory.
Need personalized assistance with your car repair needs? Our team of expert technicians is just a call or email away. Contact us via WhatsApp at +1(641)206-8880 or email us at [email protected]. We provide 24/7 customer support to address all your concerns.

